Crochet Agrostemma Githago - Free Pattern
How to crochet Agrostemma Githago pattern with an easy-to-follow, step-by-step tutorial.
Print
Pin
Equipment
- crochet hook 2.0mm
- scissors
- Darning needle
- stitch marker
Ingredients
- Yarn light and dark pink, green, white, and brown
- Flower rod
- Iron wire 0.5 mm and 0.7 mm
- Hot melt adhesive
Instructions
Step-by-Step Crochet Agrostemma Githago Patterns
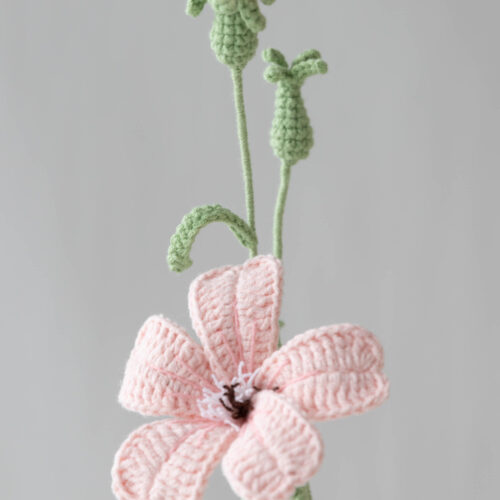
Make 5 Flower Petals for Crochet Agrostemma Githago:
- Start with the foundation chain: 13 ch.
- R1: Add wire, from the 2nd st of the hook, work 1 sc, 2 hdc, 2 dc, 2 htr, 3 tr, 2 tr in next st, and ( 2 tr, 1 dc, 1 ch, 1 ss, 1 ch, 1 dc, 2 tr).
- Work on another side: make( 2 tr, 1 dc, 1 ch, 1 ss, 1 ch, 1 dc, 2 tr ), followed by 2 tr in next st, 3 tr, 2 htr, 2 dc, 2 hdc, and 1 sc. 1 ss, cut and wrap the tail around the wire.
- Take a dark pink yarn and take a strand of it. Sew on the petals to create the texture of the petals and make them more realistic.
Flower sepal of Crocheted Agrostemma Githago Free Pattern:
- Start with a magic ring.
- R1-3: Work 5 sc in the round. 1 ss
- R4: Make (6 ch, then work behind the vertical bar in the chain, and work 5 ss, 1 ss in the next st) Repeat 5 times. 1 ch, cut and weave the ends.
Bud without flower:
- R1: Start with a magic ring, 5 sc in the round. 1 ss and 1 ch
- R2: Make (2 sc in next st) repeat 5 times. 1 ss and 1 ch
- R3-4: Work 10 sc, 1 ss and 1 ch.
- R5: Insert wire, then make 2 sc, sc2tog, 1 sc, sc2tog, 1 sc, and sc2tog. 1 ss and 1 ch
- R6-7: Work 7 sc. 1 ss and 1 ch. add fiberfill
- R8: Make 1 sc, sc2tog, 1 sc, sc2tog, and 1 sc. 1 ss.
- R9: Make (6 ch, work behind the vertical bar in the chain, 5 ss, 1 ss in the next st) repeat 5 times. 1 ch, cut and weave the ends.
Bud with flower:
- R1: Start with a magic ring, 5 sc in the round. 1 ss and 1 ch
- R2: Make (2 sc in next st) repeat 5 times. 1 ss and 1 ch
- R3-4: Work 10 sc, 1 ss and 1 ch.
- R5: Insert wire, then make 2 sc, sc2tog, 1 sc, sc2tog, 1 sc, and sc2tog. 1 ss and 1 ch
- R6-7: Work 7 sc. 1 ss and 1 ch. add fiberfill
- R8: Make 1 sc, sc2tog, 1 sc, sc2tog, and 1 sc. 1 ss.
- R9: Work front loop only ( FLO): make (6 ch, then work behind the vertical bar in the chain, 5 ss, and 1 ss) repeat 5 times
- R10: Change yarn, work back loops only ( BLO): Make (5 ch, then work behind the vertical bar in the chain, 4 sc, 1 ss) repeat 5 times, 1 ss, 1 ch. Followed by ( 1 sc, 1 hdc, 1 dc, 3 dc in same st, 3 dc in same st, 1 dc, 1 hdc, 1 sc) repeat 5 times. cut and weave the ends.
Make 5 leaves for Crochet Agrostemma Githago:
- Start with the foundation chain: 15 ch, then work behind the 2nd st vertical bar in the chain, and 14 sc. cut and leave a tail.
How to Assemble Crochet Agrostemma Githago:
- Step 1: You’ll need 4 short pieces of yarn and a wire. Fold the wire in half and tie the yarn to it. Use pliers to squeeze the wire tight. Then, take another piece of yarn and tie it with the existing yarn. Use a needle to loosen the yarns. For more details, watch the video.
- Step 2: Take the 5 crocheted Agrostemma Githago flower petals and arrange them one by one, and wrap pink yarn around the wire.
- Step 3: Trim the stamens with scissors.
- Step 4: Put the flower sepals of Agrostemma Githago under the flower petals. Weave the stem using green yarn and add the leaf. Keep weaving until it’s done.
- Step 5: Now, take a flower rod and position the crocheted Agrostemma Githago flowers and buds. Use green yarn to weave them in place. Use hot melt adhesive to secure the end.
Notes
- Our pattern is written in US crochet terms.
- Follow the pattern carefully to avoid mistakes.
- Take note of the specific stitch counts and techniques.
- Our pattern requires some attention to detail.
- Use stitch markers to mark the beginning of each round.
- Additional notes are written in Italics.