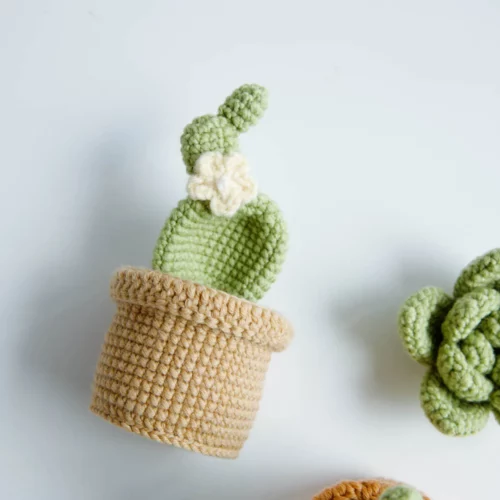
Crochet Potted Cactus Pattern
How to crochet potted cactus pattern with an easy-to-follow, step-by-step tutorial.
Print
Pin
Equipment
- hook 2.5mm
- Darning needle
- scissors
- stitch marker
Ingredients
- Yarn Light and dark green, Light and dark brown, yellow, white, cream
- Fiberfill
- Hot melt adhesive
Instructions
Flower pot
- Start with a magic ring.R1: 8 sc in the round , 1 ss, 1 ch [8]R2: ( 2 sc in next st ) * 8 times, 1 ss, 1 ch [16]R3: (1 sc, 2 sc in next st)* 8 times, 1 ss, 1 ch [24]R4: (2 sc, 2 sc in next st)* 8 times, 1 ss, 1 ch [32]R5: (3 sc, 2 sc in next st)* 8 times, 1 ss, 1 ch [40]R6: (4 sc, 2 sc in next st)* 8 times, 1 ss, 1 ch [48]R7: work back loops only(BLO): 48 sc , 1 ss, 1 ch [48]R8: ( 22 sc, sc2tog/dec )* 2 times, 1 ss, 1 ch [46]R9-17: 46 sc , 1 ss [46]R18: 2 ch, 46 dc , 1 ss [46] R19: 2 ch, work front loops only(FLO): 46 dc, cut and leave a long tail. [46]Make ss a round in R7, cut and hide the tail.
Soil surface
- Start with a magic ring.R1: 8 sc in the round , 1 ss, 1 ch [8]R2: ( 2 sc in next st ) * 8 times, 1 ss, 1 ch [16]R3: (1 sc, 2 sc in next st)* 8 times, 1 ss, 1 ch [24]R4: (2 sc, 2 sc in next st)* 8 times, 1 ss, 1 ch [32]R5: (3 sc, 2 sc in next st)* 8 times, 1 ss, 1 ch [40]R6: (4 sc, 2 sc in next st)* 8 times, 1 ss, 1 ch [48]Soil surface sew between R16 and R17 of the flowerpot.
Cactus A
Big cactus
- Start with a magic ring.R1: 6 sc in the round. 1 ss, 1 chR2: (2 sc in next st ) * 6 times, 1 ss, 1 ch [12]R3: (1 sc, 2 sc in next st)* 6 times, 1 ss, 1 ch [18]R4: (2 sc, 2 sc in next st)* 6 times, 1 ss, 1 ch [24]R5: (3 sc, 2 sc in next st)* 6 times, 1 ss, 1 ch [30]R6-13: 30 sc, 1 ss, 1 ch [30]R14: ( 3 sc, sc2tog/dec )* 6 times, 1 ss, 1 ch [24]R15: ( 2 sc, sc2tog/dex )* 6 times [18]
Middle cactus
- Start with a magic ring.R1: 6 sc in the round. 1 ss, 1 ch [6]R2: (2 sc in next st) * 6 times, 1 ss, 1 ch [12]R3-6: 12 sc, 1 ss, 1 ch [12]R7: (sc2tog/dec)* 6 times[6]
Small cactus
- Start with a magic ringR1: 6 sc in the round. 1 ss, 1 ch [6]R2: (1 sc, 2 sc in next st )* 3 times, 1 ss, 1 ch [9 ]R3-4: 9 sc, 1 ss, 1 ch [9]R5: ( 1 sc, sc2tog/dec )* 3 times [6]
Flower (cream)
- Start with a magic ring.( 2 ch, 2 dc, 2 ch, 1 ss ) * 5 times, 1 ssclose the loop tightly, hide the tail with the darning needle.
Flower core
- Create a loop with white yarn, tie the knot three times around the loop, and sew in the middle of the flower
Assemble
- Step 1: Sew the soil surface between R16 and R17 of the pot. Fill it with stuffing/fiberfillStep 2: Flatten the big cactus and sew it in the soil surface. You’ll sew it across the left R5 to right R5Step 3: Sew the middle cactus to bigger one. It’s up to you whether you will put it on the left or right side of the big cactus.Step 4: Follow it with sewing the last cactus piece (small) and attach it to the middle. It’s up to you whether you will put it on the left or right side of the middle cactus.Step 5: After it, you can now attach your flower. You can put it between big and middle cactus, or between middle and small cactus. You can also put more flowers on it if you want.
Cactus B ( ball cactus )
Main part
- R1: 16 ch, from 2nd st of hook, 15 sc [15]R2-35: turn your work, 1 ch, 15 sc [15] Sew end to end, then sew a circle along the edge, and finally pull the loop tight.
Flower
- Use a piece of yellow yarn to wind and cut to make a little fur ball.
Assemble
- Step 1: Sew the soil surface between R16 and R17 of the pot. Fill it with stuffing/fiberfillStep 2: Sew Cactus B between R6 and R7 of the soil surface. In the hole of the top of it, insert a right amount of fiber fill on it.Step 3: Sew the open hole on the top of the cactusStep 4: Using your hot melt adhesive, attach the yellow furry flower on the top of your cactus.
Notes
- Our patterns are written in US crochet terms.
- Carefully follow the pattern techniques and counting in making this flower.
- Make sure that each petal has the same number of stitches based on our pattern.
- Additional notes are written in Italics.
- A video tutorial is available for additional guidelines.
- Video subtitles need to be turned on by yourself in the settings