
Crochet leaves are perfect for creating floral arrangements, seasonal decorations, and various other crochet projects. You can either assemble them to a crochet flower or even further make a flower bouquet.
They allow the crafter to add a natural and botanical touch to their creations and can be used to create leaves of different types, such as oak leaves, maple leaves, and more. Crochet leaf patterns are highly popular among enthusiasts who wish to incorporate a natural element into their crochet projects.
You can use the leaves individually or in combination with other crochet patterns; these leaf patterns add a beautiful touch of nature to any design. The great thing about crocheting leaves is that you can make them in any color and not stick with the green of natural colors.
Crochet leaf patterns are specific patterns that guide the crafter through creating crochet leaves in various shapes and sizes. These patterns are simple, beginner-friendly designs; you do not need advanced skill levels to make them. You must know the basic crochet stitches and the ability to add wire to a crochet project. The patterns come with a detailed photo tutorial to guide you through the crocheting process.
We included 17 crochet leaves in this post, including rose leaf, crochet large leaf, mint leaf and many others. Check to pick the best one for your project.
Supplies
- Yarn: Any cotton yarn
- Hook: Any matching hook
- Darning needle
- Pair of Scissors
- Thin wire
Abbreviations
- sc – single crochet
- hdc – half double crochet
- dc – double crochet
- tr – treble crochet
- dtr – double treble crochet
- ss – slip stitch
- ch – chain
Stitches
- Single crochet – insert hook into stitch, yarn over, and pull through (2 loops on hook); yarn over and pull through two loops
- Single crochet two together – insert hook into stitch, yarn over and pull through (two loops on hook) insert hook into next st, yarn over and pull through (three loops on hook); yarn over and pull through three loops
- Back loop single crochet – in back loops only, insert hook into stitch, yarn over, and pull through (2 loops on hook); yarn over and pull through two loops
- Half double crochet – yarn over, insert hook into stitch, yarn over pull through (3 loops on hook); yarn over pull through three loops.
- Half double crochet two together – yarn over, insert hook into next stitch, yarn over and pull through (three loops on hook); yarn over and pull through two loops; insert hook into next stitch, yarn over and pull through (five loops on hook) yarn over and pull through (three loops on hook); yarn over and pull through
- Half double crochet spike stitch – working in the 2nd row below; yarn over, insert hook into stitch, yarn over pull through (3 loops on hook); yarn over pull through three loops.
- Double crochet – yarn over, insert hook into stitch, yarn over and pull through (3 loops on hook); yarn over and pull through two loops (2 loops on hook); yarn over and pull through two loops.
- Treble crochet – yarn over twice, insert hook into stitch, yarn over and pull through (4 loops on hook); yarn over and pull through two loops (3 loops on hook); yarn over and pull through two loops (3 loops on hook); yarn over and pull through 2 loops.
- Treble crochet two together – Yarn over the crochet hook twice, insert the hook into the next stitch, yarn over, and pull the yarn through (4 stitches on your hook): yarn over and pull through two loops (3 loops on hook); then yarn over and pull through two loops again, (2 loops on the hook). Yarn over twice, insert the crochet hook into the next stitch; yarn over and pull (5 stitches on hook); yarn over the crochet hook and draw through two loops (4 loops on hook); yarn over and pull through two loops (3 loops on hook); yarn over and pull through all three loops.
- Double treble crochet – yarn over three times, yarn over pull through one loop; yarn over and pull through two loops (5 loops on hook); yarn over and pull through two loops (4 loops on hook); yarn over and pull through (3 loops on hook); yarn over and pull through two loops (2 loops on hook); yarn over and pull through two loops
- Picot stitch – chain3, slip stitch into the first stitch of the chain and pull through
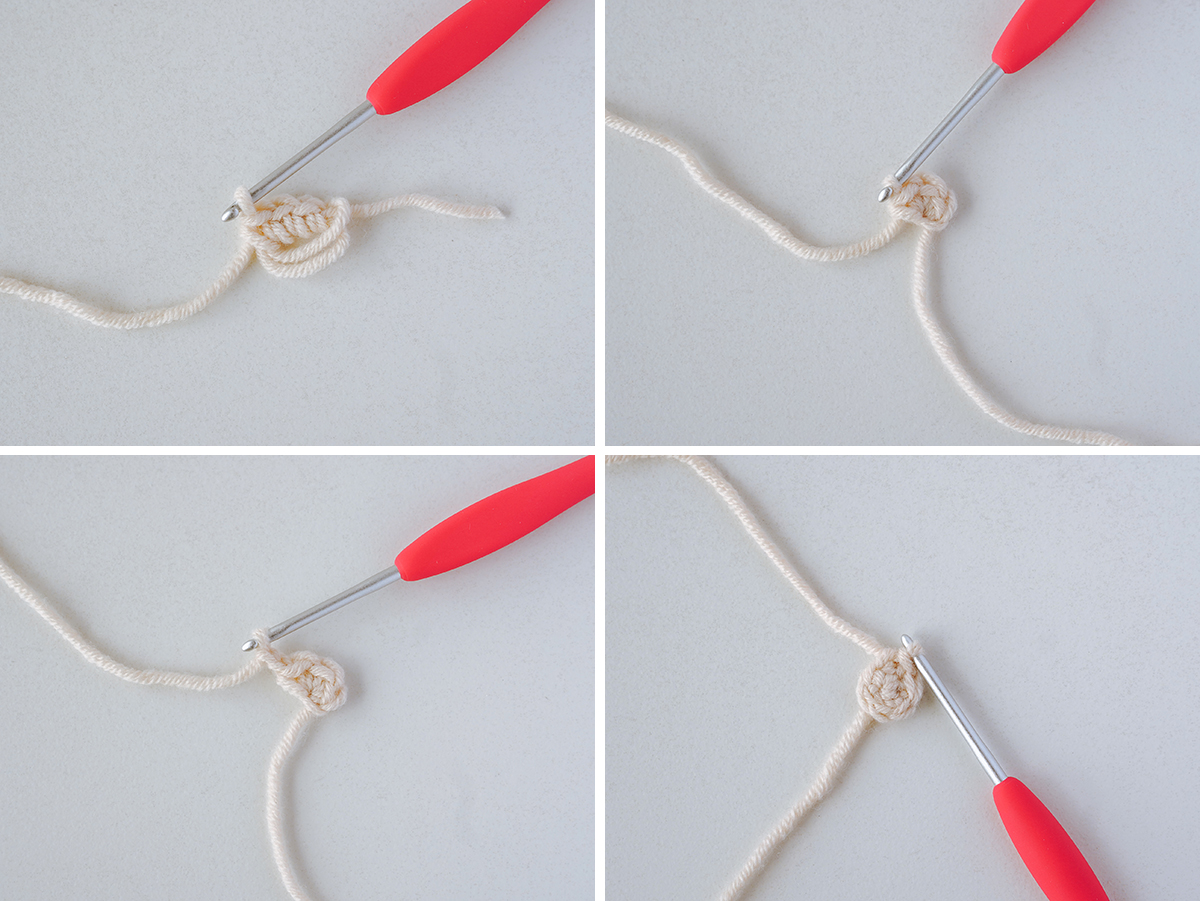
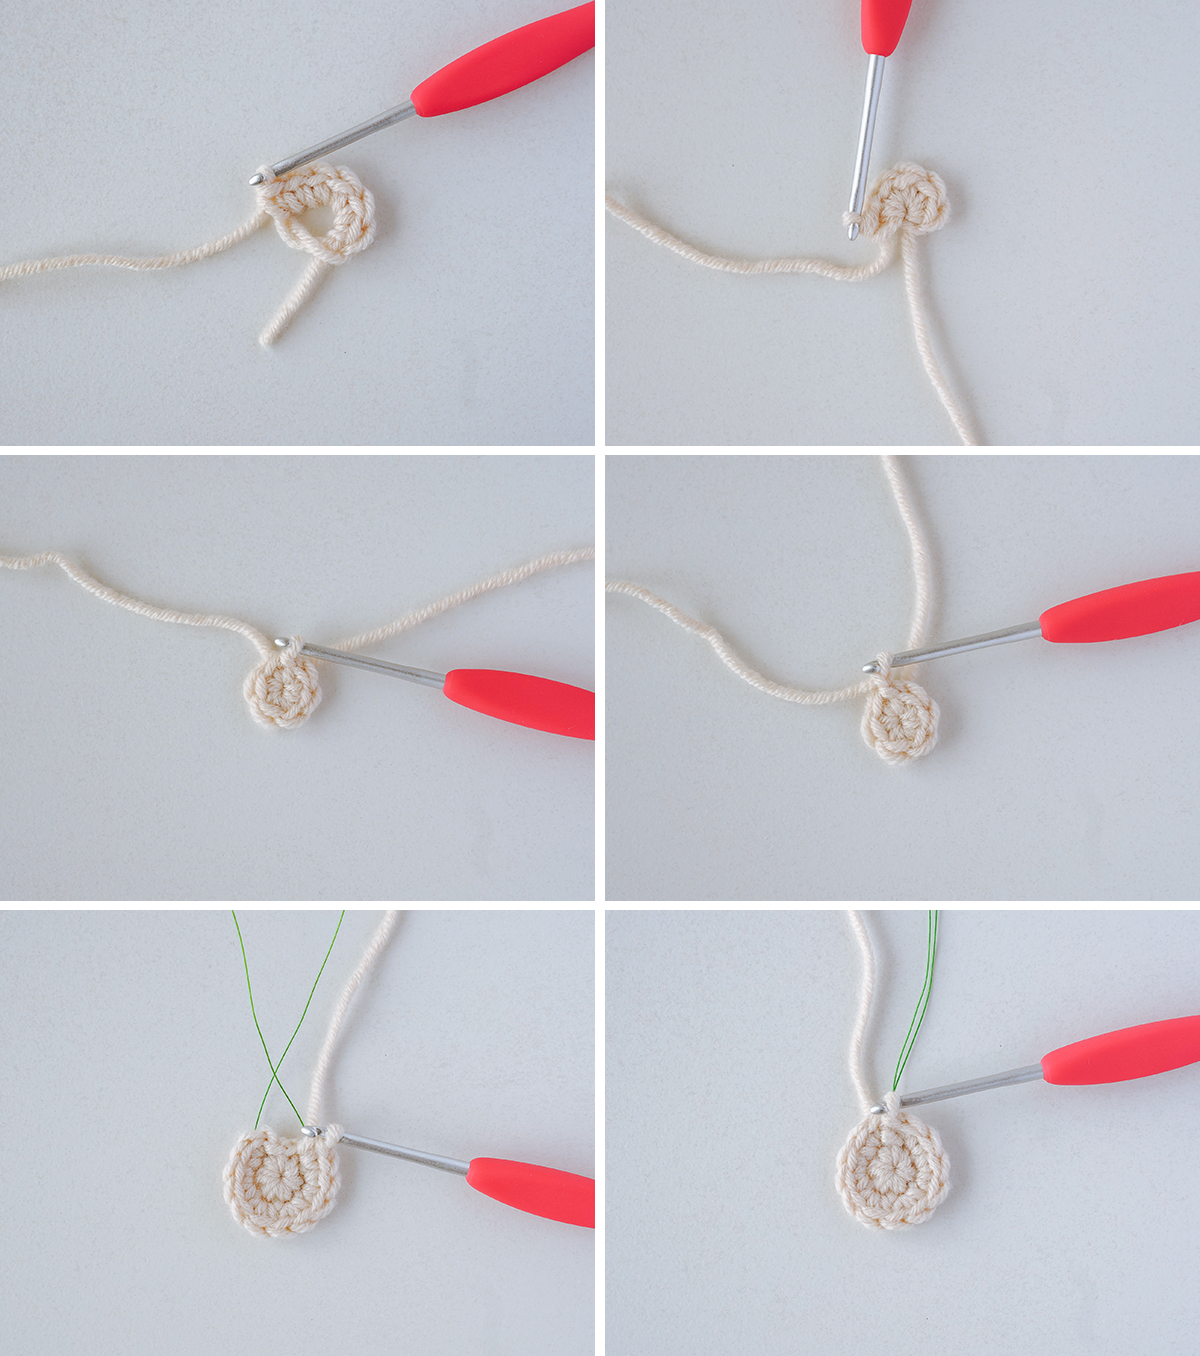
- Magic ring – Wrap yarn around the index and middle finger; then insert your hook under the yarn, yarn over and pull through
Terminology
US terminology
Gauge
Not Applicable
Notes To add the wire, insert your hook under the wire and crochet over it.
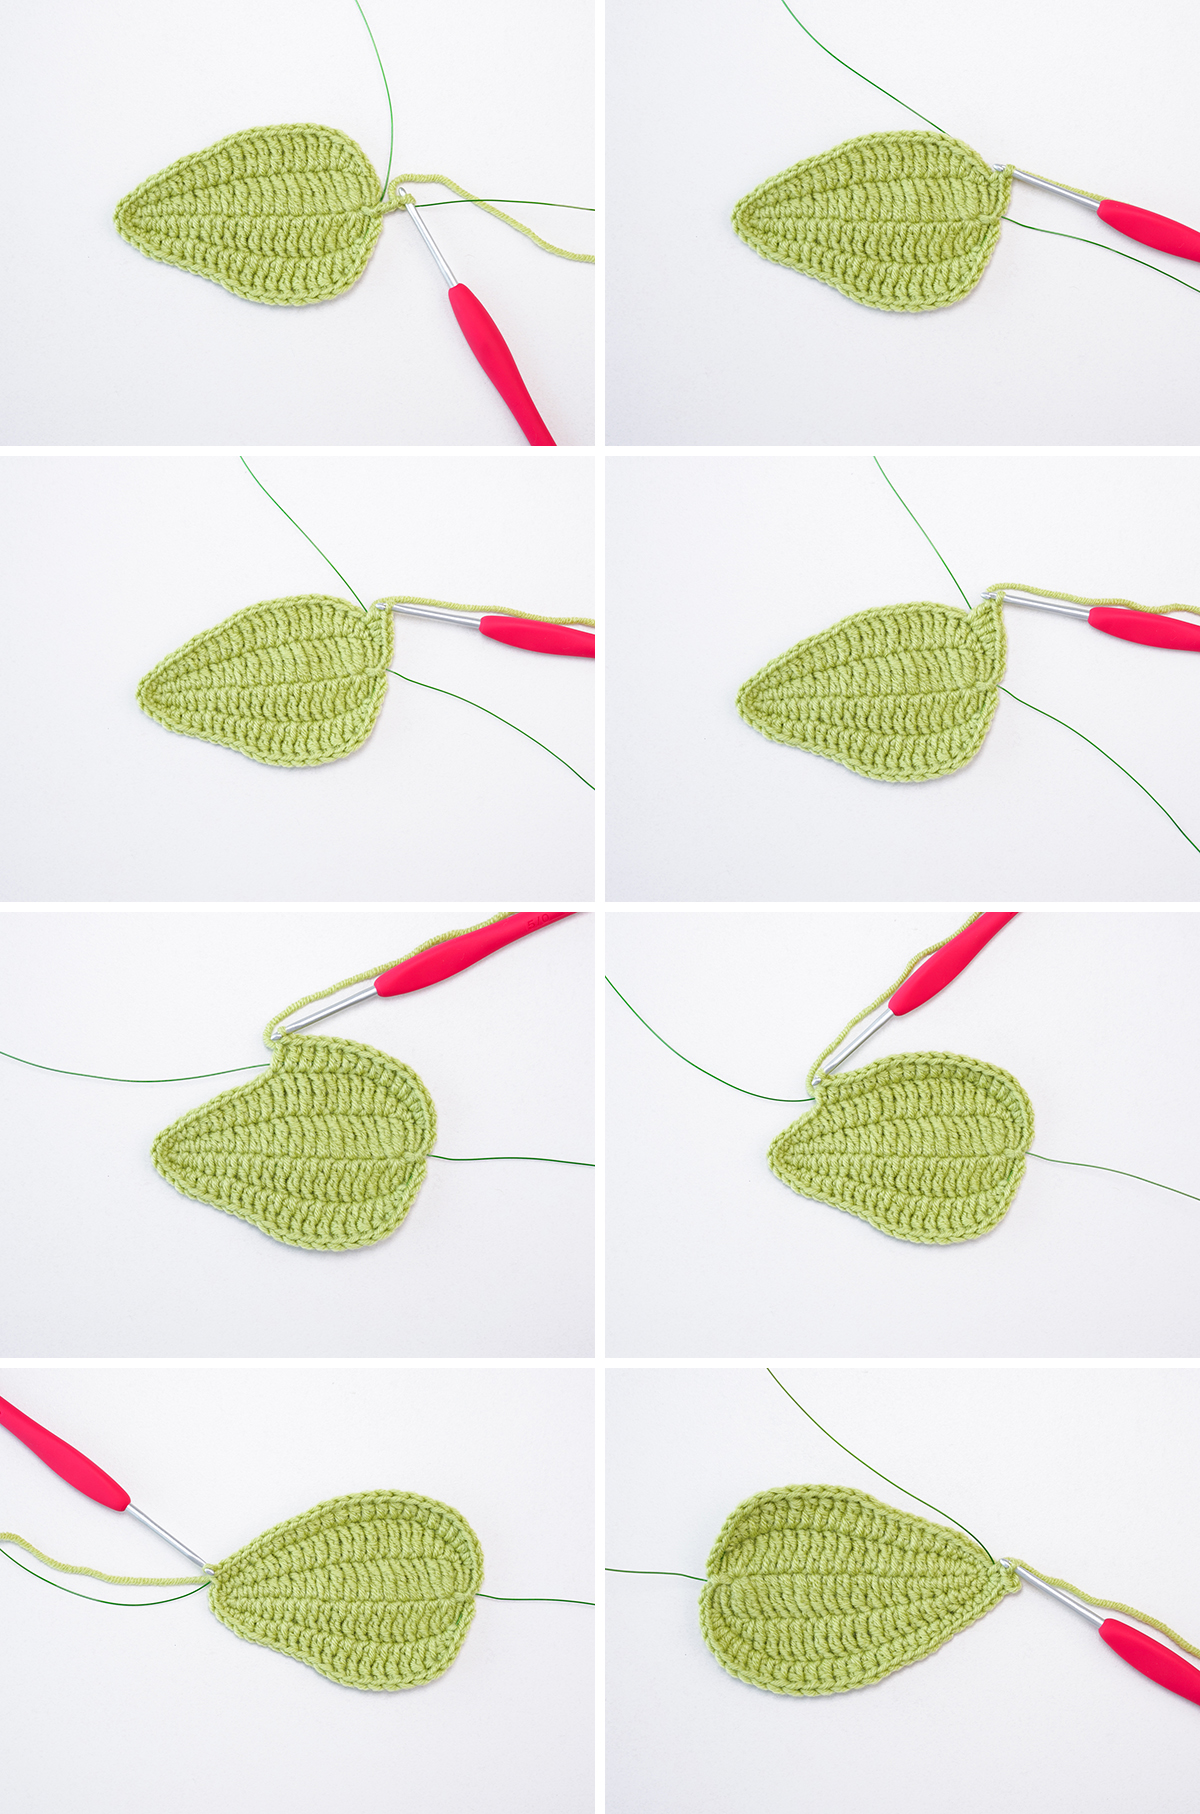
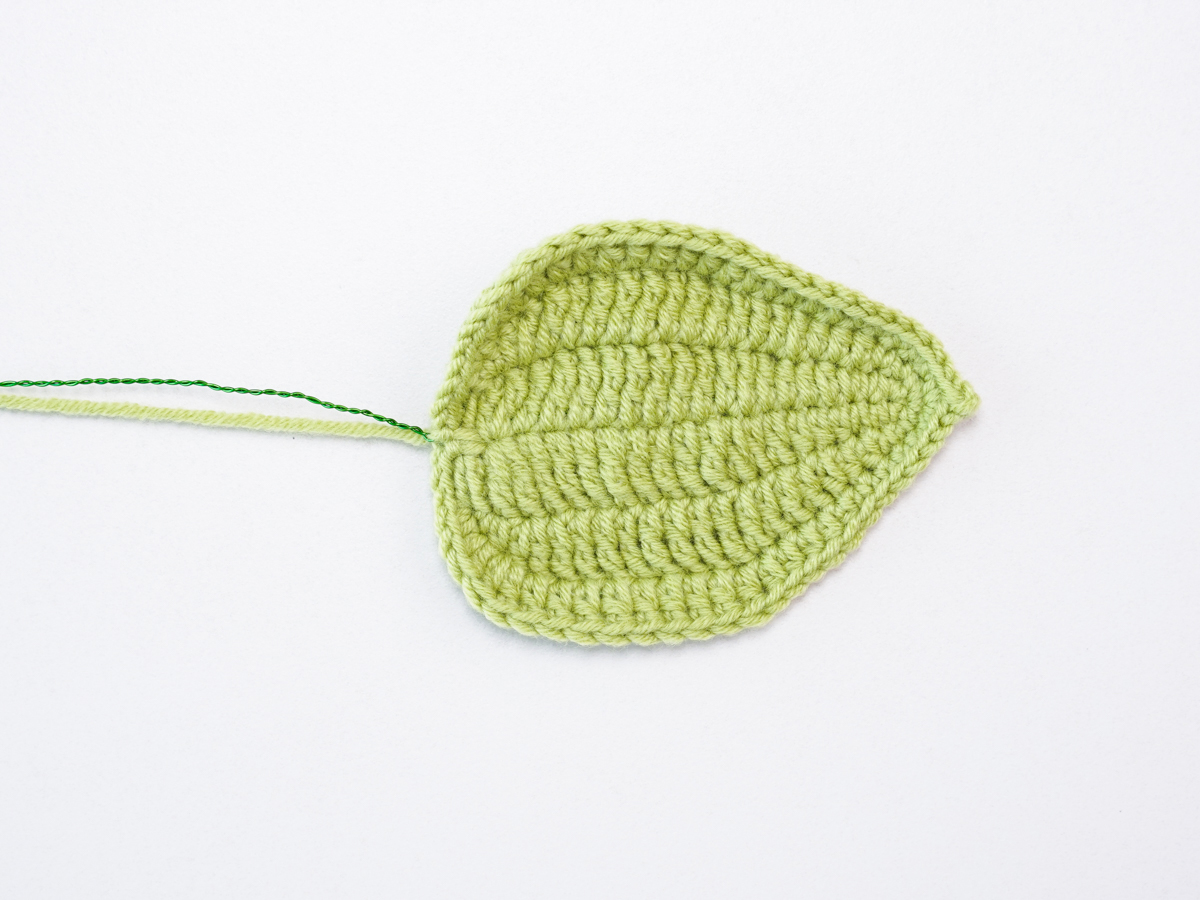
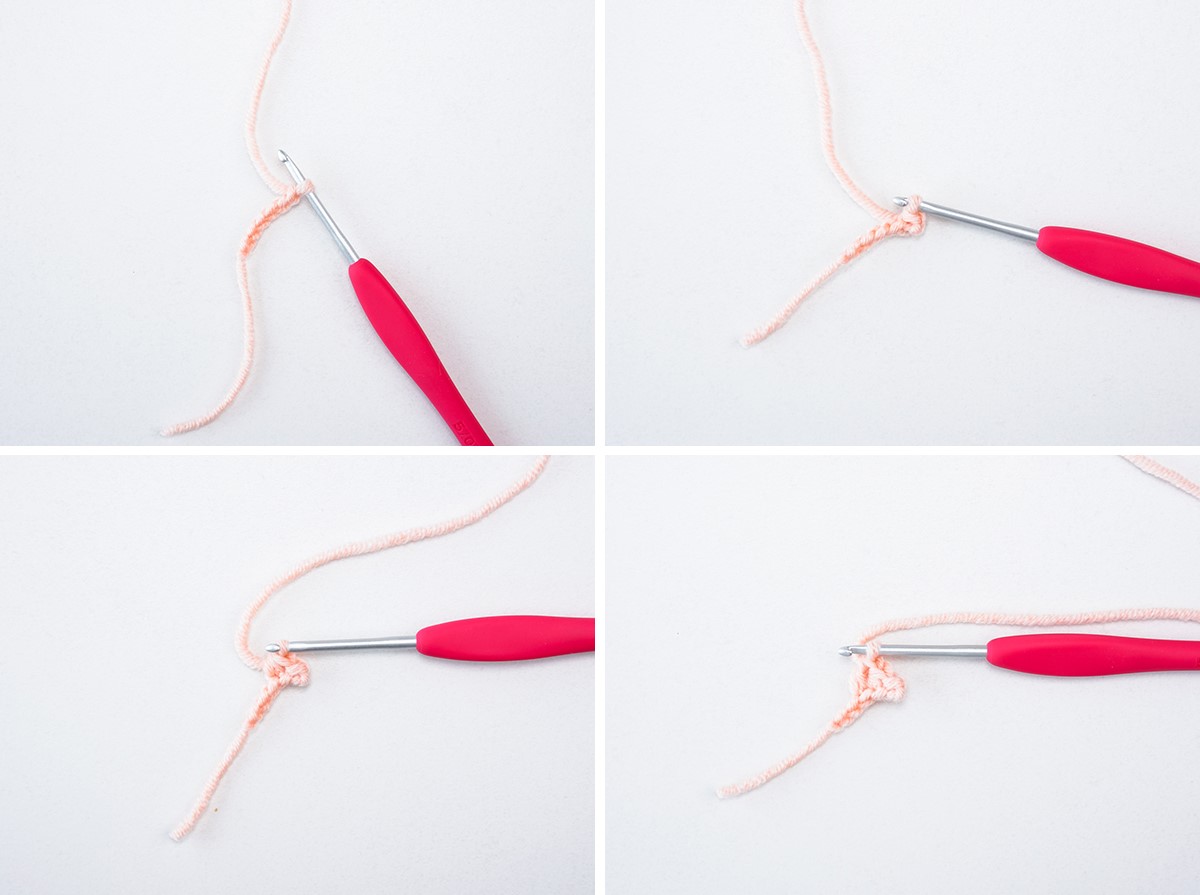
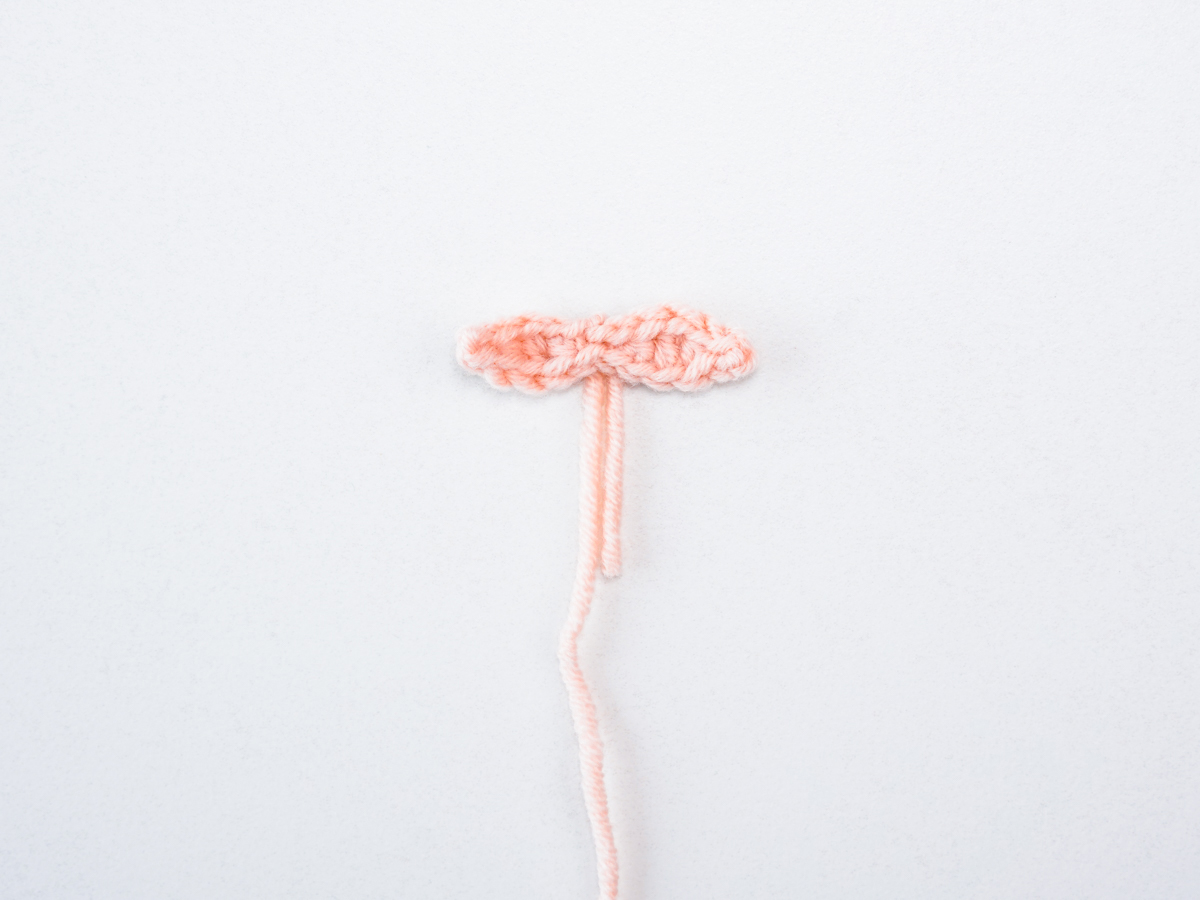
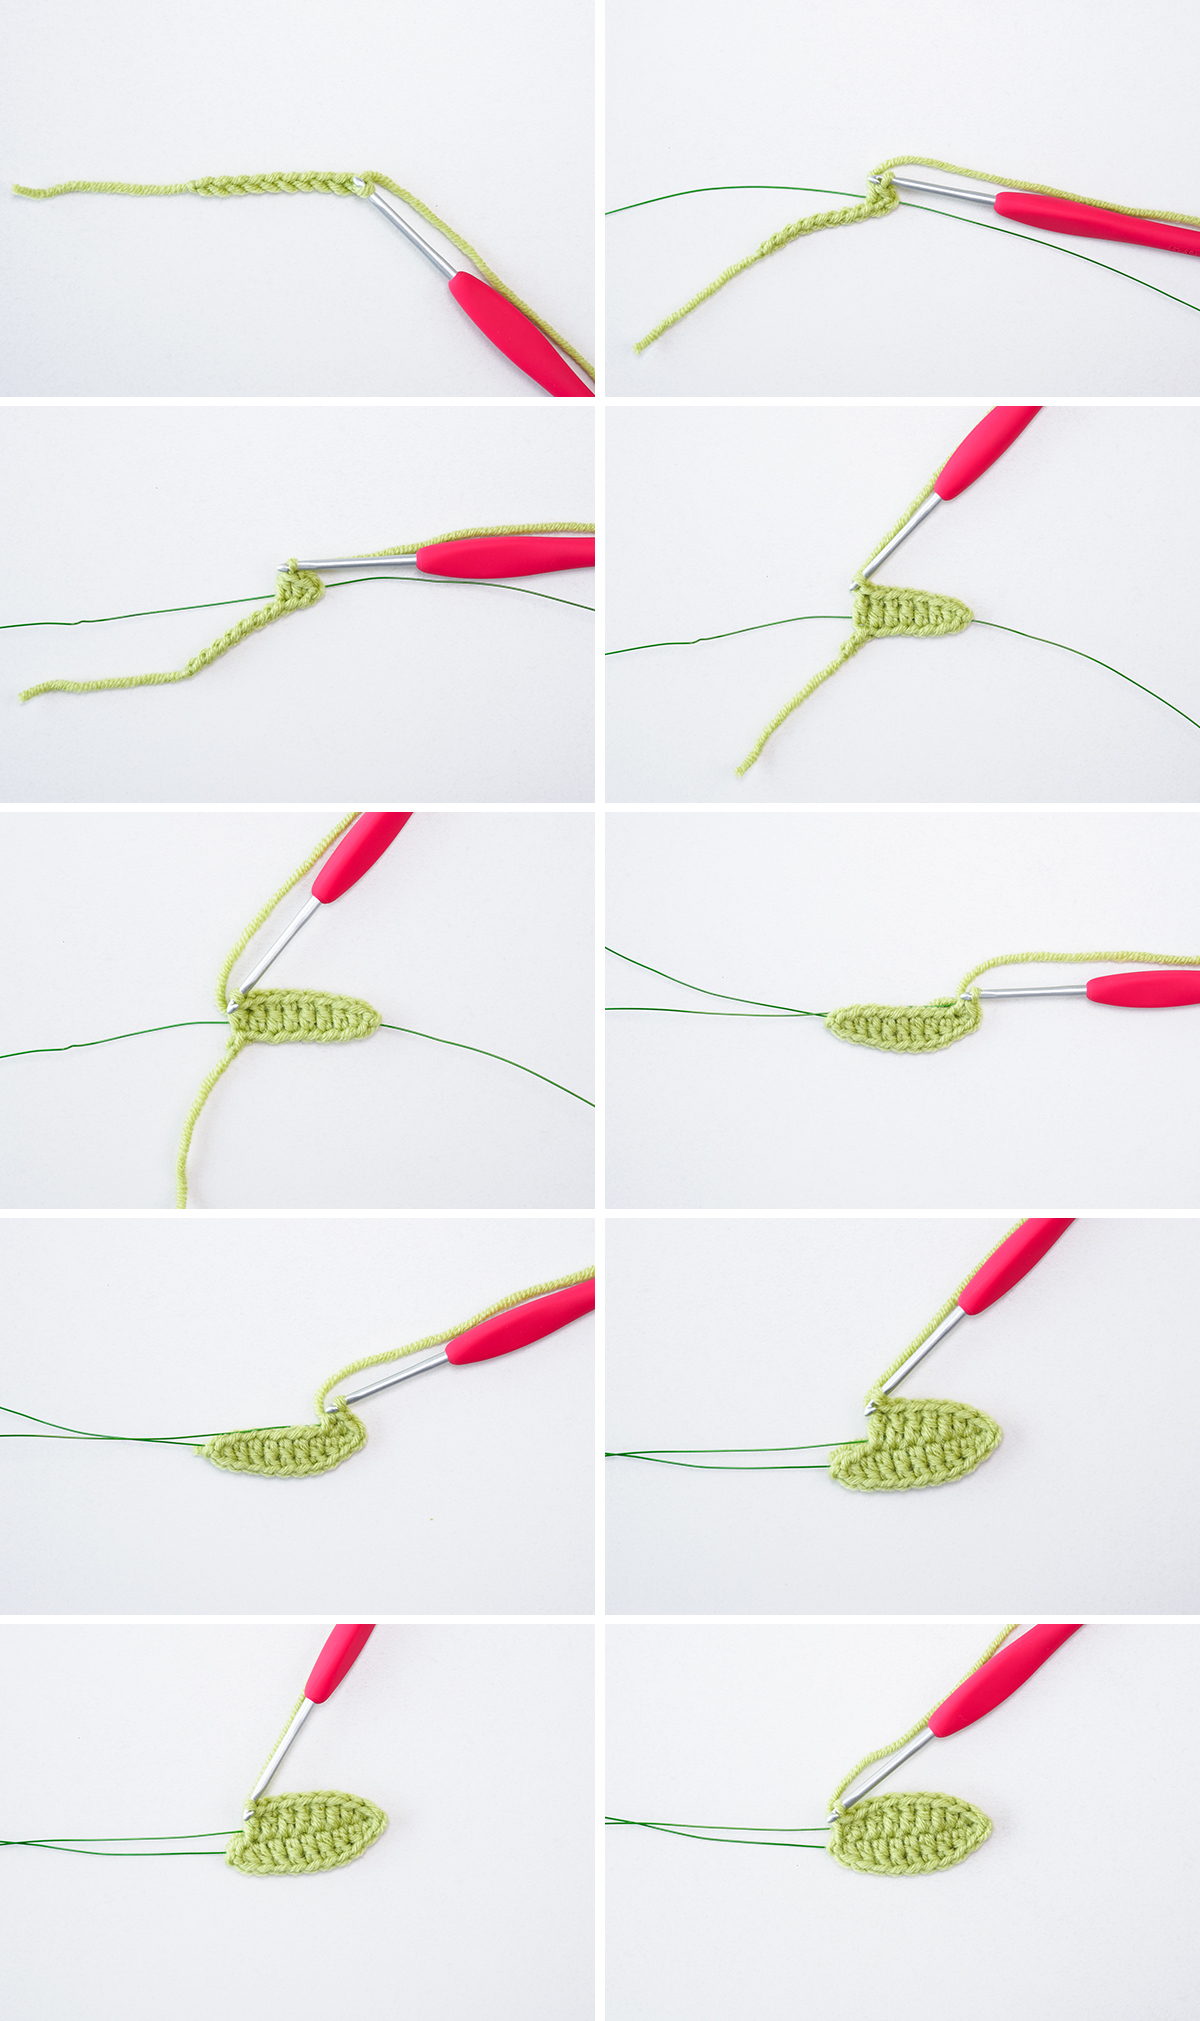
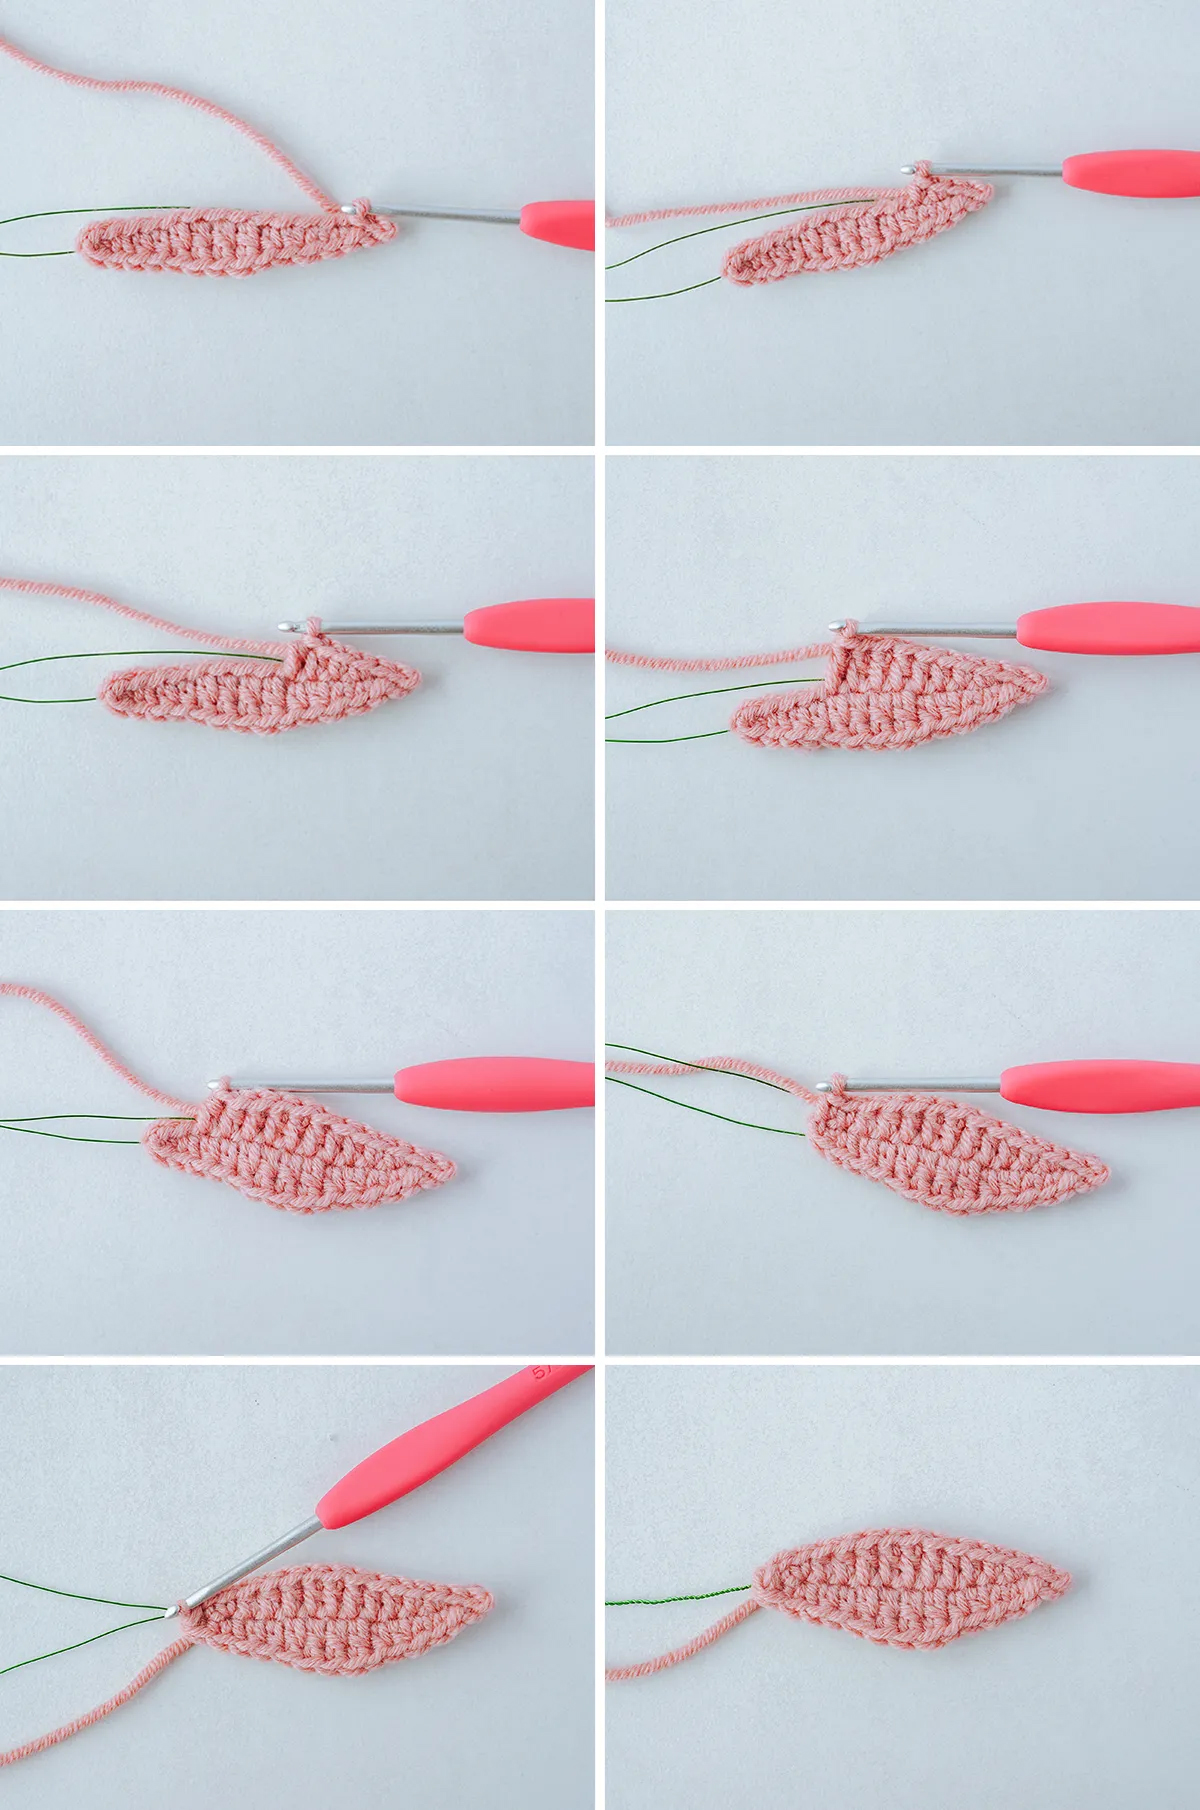
1. Rose Leaf
The crocheted rose leaf is a wonderful way to add a realistic touch to any crocheted rose flower. These delicate leaves created using a variety of stitches result in a textured appearance shaped to mimic the natural curve and tapering of a real rose leaf. When added to a crochet rose, these leaves can take the flower to a new level of beauty and realism.
But crochet rose leaves do not have to be used for individual flowers. They also make a great addition to flower bouquets, whether made entirely of crochet flowers or a mix of crochet and real flowers. Adding crochet rose leaves to a bouquet can create a cohesive and coordinated look that ties all the elements together. Additionally, crochet rose leaves can be made in various sizes and colors, making them a versatile addition to any crochet project.
Abbreviations
- sc – single crochet
- hdc – half double crochet
- dc – double crochet
- tr – treble crochet
- ss – slip stitch
- ch – chain
Notes: The leaf is worked in a round.
Let’s start with foundation chain: ch12
R1: sc from 2nd of hook (join wire leaving 3in 8cm for joining); hdc, dc2, tr3, dc2, hdc, 3sc in the last st (do not turn work on the other side) hdc, dc2, tr3, dc2, hdc, sc2 in next stitch, ss.
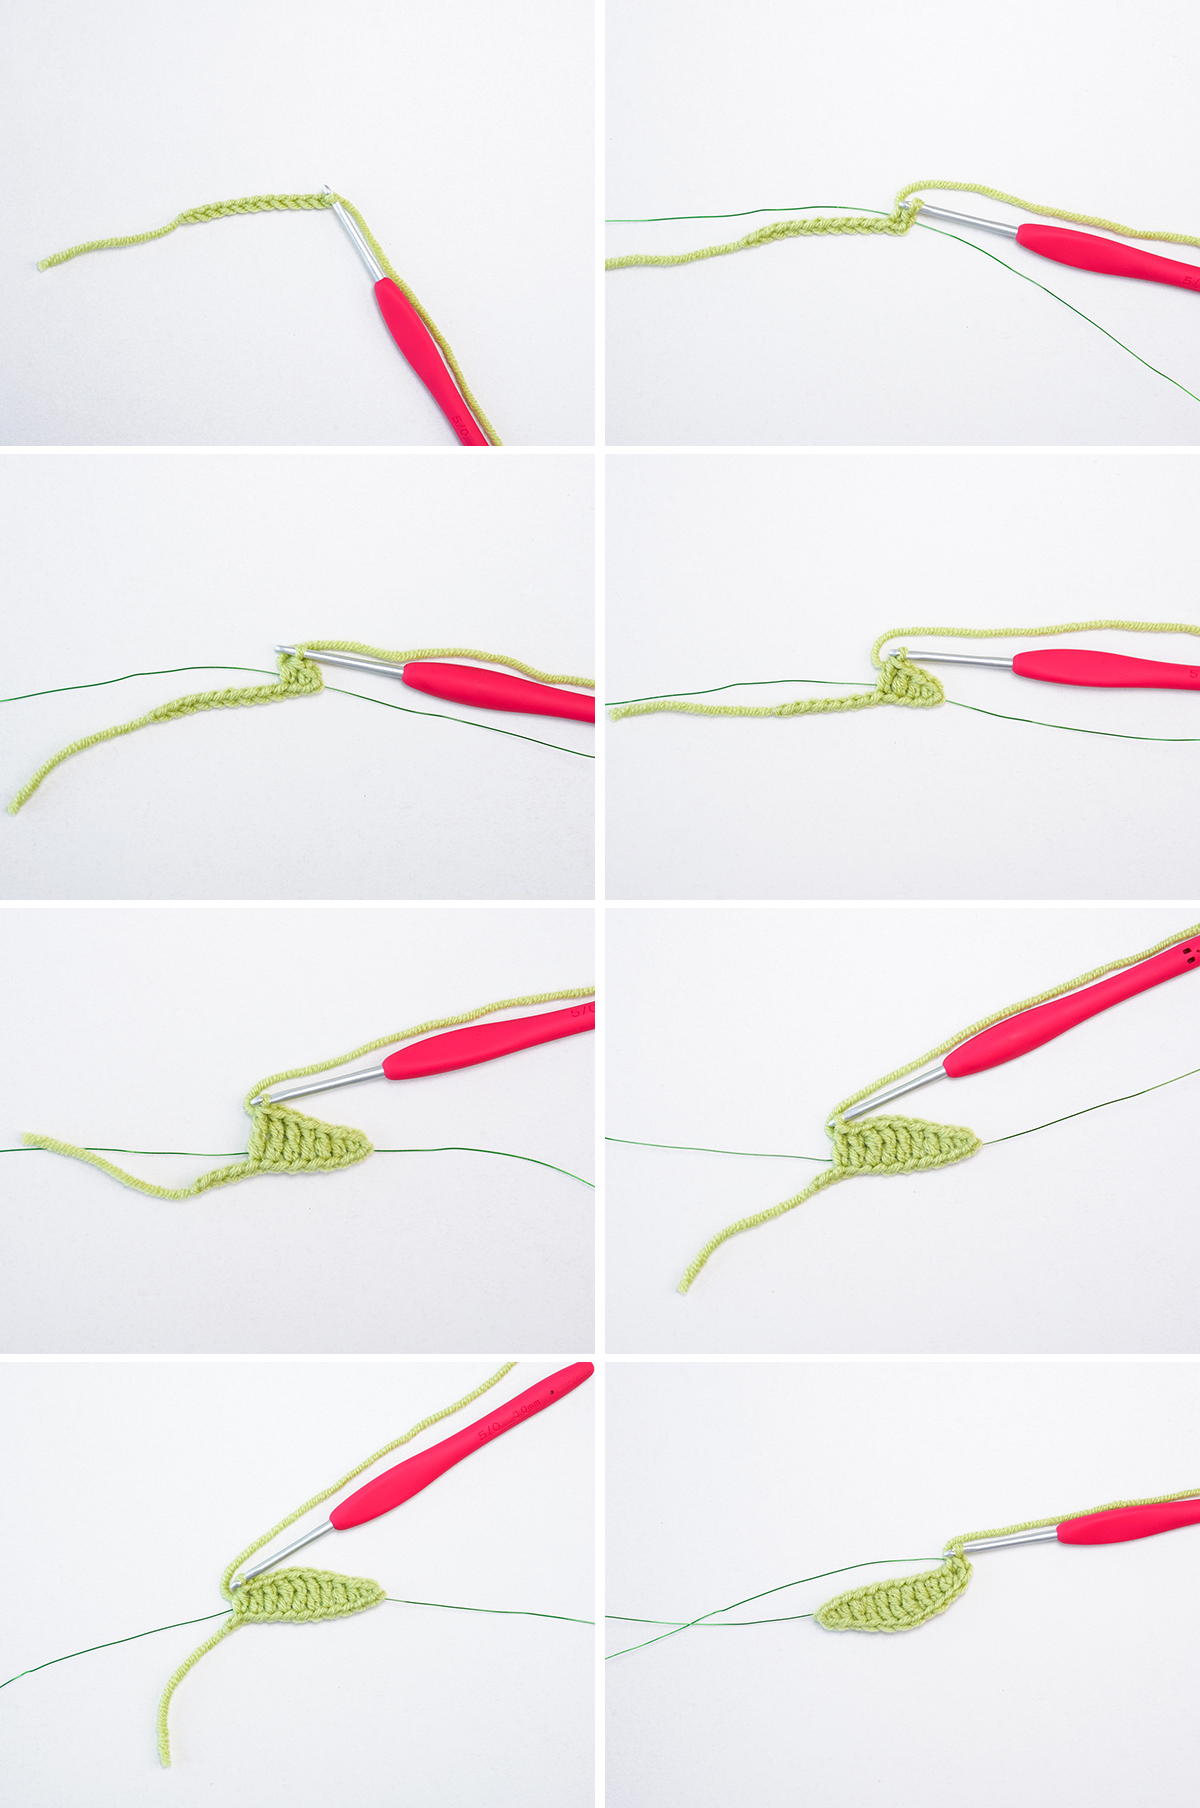

R2: ch2, sc11, picot st, sc11, cut and leave 8 in (20 cm for sewing)

Now we are finished.

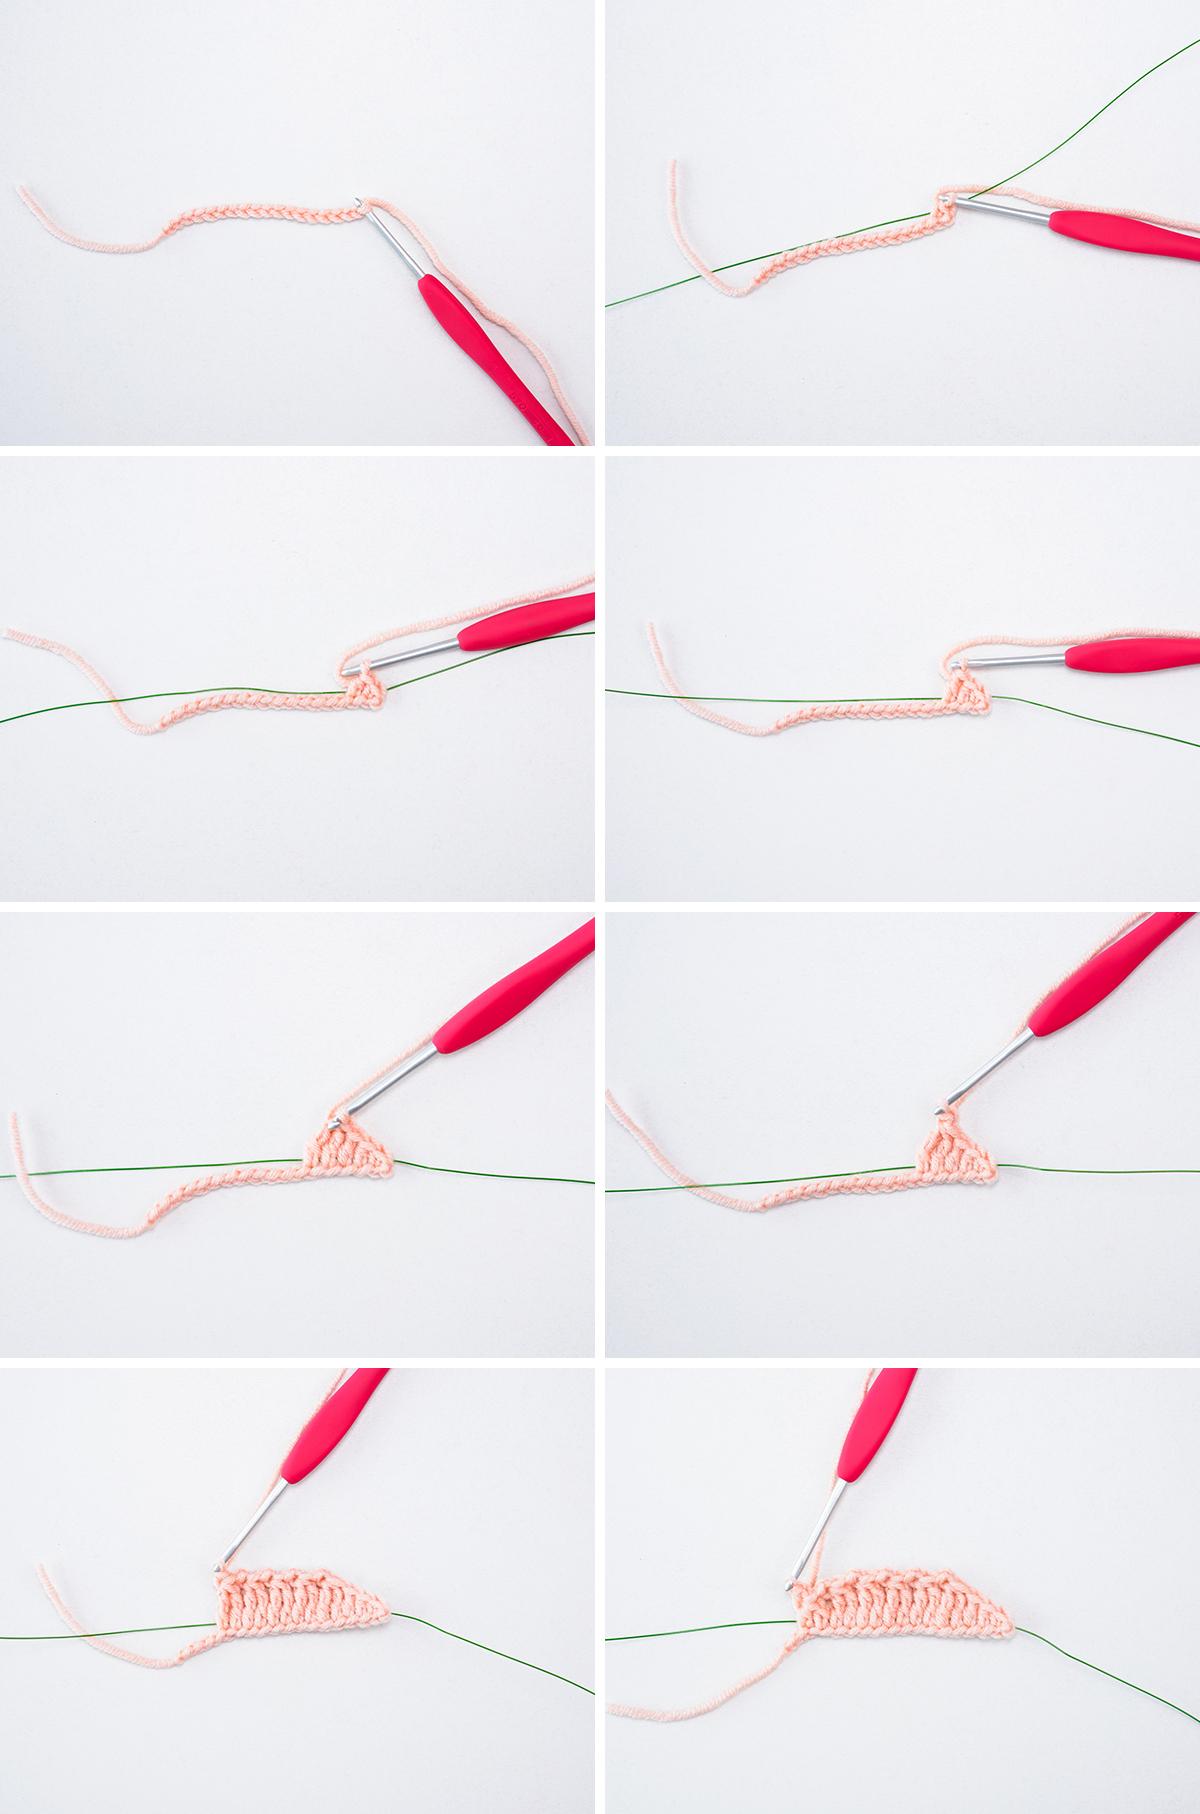
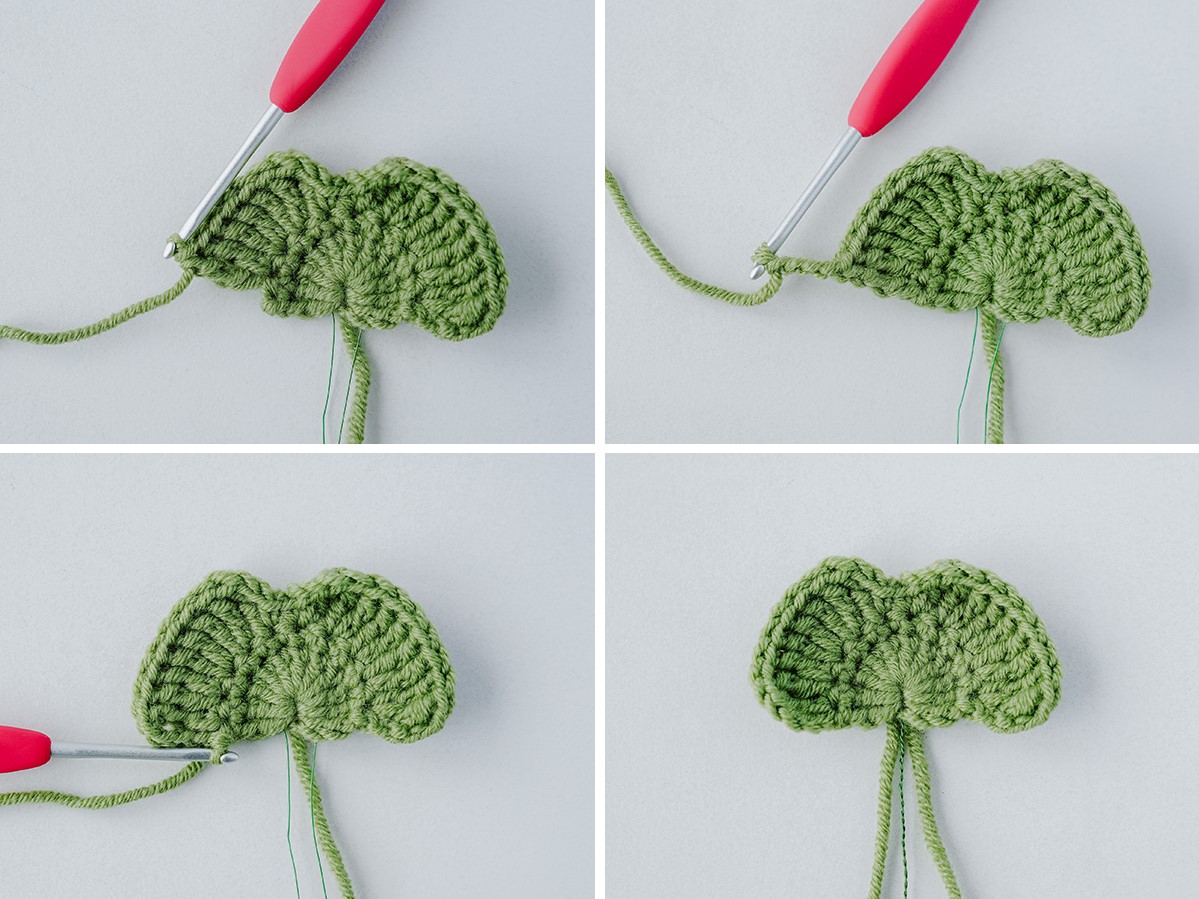
2. Sunflower Leaf
Crochet sunflower leaves are a wonderful way to make your crochet sunflowers look more realistic and beautiful. These leaves use different stitches and colors to mimic a sunflower leaf’s natural shape and vein pattern. Adding crochet sunflower leaves to your crochet sunflowers allows you to create a stunning flower that will stand out in any project.
But the beauty of crochet sunflower leaves does not have to be limited to individual flowers. They also make a great addition to flower bouquets, whether using a mix of real and crochet sunflowers or creating an entire crochet bouquet. Adding crocheted sunflower leaves to a bouquet creates a beautiful, cohesive look that ties all the elements together. Additionally, you can crochet sunflowers in various sizes and colors, making them a versatile addition to any project. Crocheting sunflower leaves to your repertoire is a fun and rewarding project that will enhance the beauty of your crocheted flowers.
Abbreviations
- sc – single crochet
- hdc – half double crochet
- dc – double crochet
- tr – treble crochet
- ss – slip stitch
- ch – chain
Notes:
- The leaf is worked in a round
- In order to give the leaves a wrinkled feel, after finishing the crochet and arranging the broken threads, push a little upwards along the middle wire in the bottom top and then wrap the wire around the root.
Let’s start with foundation chain: Ch 21
R1: in the 4th st from hook, tr2 in next stitch, tr8, dc3, hdc3, sc2, sc3 in last st(do not turn working on the other side); sc2, hdc3, dc3, tr8, tr2 in next st,ch3,ss on bottom of 1st ch.


R2: ch3, in the next st (sc, hdc), in the next st (dc, tr); tr8, dc4, hdc3, sc2, sc3 in last st, (do not turn, working on the other side); sc2, hdc3, dc4, tr8, in the next st (tr,dc) in the next st (hdc,sc); ch3, ss at base of ch3.


R3: ch3, sc2 in next st, hdc2 in next st, dc2 in next st, dc9, hdc5, sc5, in the next st (sc2, 2ch picot st, sc2); sc5, hdc5, dc9, dc2 in next st, hdc2 in next st, sc2 in next st, ch3, ss at the base of 1st ch. Cut and leave a tail to join.

Now we are finished.
3. Orchid Leaf
Crochet orchid leaf patterns are a beautiful and intricate way to add realism to any crochet orchid flower. The pattern uses various stitches to achieve a textured appearance mimicking an orchid leaf’s delicate and unique shape. You can create a stunningly realistic flower by incorporating crochet orchid leaves into your crochet flowers.
In addition to adding realism to individual flowers, crochet orchid leaves attached to an orchid flower are a great addition to a bouquet. Additionally, you can make the crochet orchid leaves in various sizes and colors, making them a versatile addition to any crochet flower project. Crochet orchid leaves require patience and skill, but the effort is worth it. Learning to make these intricate leaves can be a fun and rewarding challenge for any crocheter, despite their skill level. Adding crochet orchid leaves to your crochet range allows you to take your floral creations to the next level and create stunningly realistic flowers that will amaze and inspire.
Abbreviations
- sc – single crochet
- hdc – half double crochet
- dc – double crochet
- tr – treble crochet
- ss – slip stitch
- ch – chain
Notes: The leaf is worked in a round
Let’s start with foundation chain: Ch 60
R1: sc in 2nd ch from hook, (add wire) sc2, hdc52, sc3, 3sc in last st, (do not turn, working on the other side); sc3,hdc52, sc3, cut and leave a long tail to join.

Now we are finished.

4. Mint Leaf
Mint is a perennial herb that belongs to the family Lamiaceae, known for its fresh aroma and cooling flavor, a common ingredient in culinary preparations, such as in teas, beverages, and desserts. Additionally, mint has several medicinal benefits, including easing digestive issues, reducing inflammation, and promoting relaxation.
The crochet mint leaf design is a pattern resembling the shape and texture of a mint leaf. You can get a small or large flower based on the design.
While an artificial crochet mint leaf may not have the fresh aroma or taste of a real mint leaf, it can still add an aesthetic appeal to a crochet design. The design can add a touch of nature to a crochet project, bringing a calming and refreshing effect to the overall design. Even though it may lack the natural scent, an artificial crochet mint leaf can still enhance a crochet project’s beauty and appeal.
Abbreviations
- sc – single crochet
- hdc – half double crochet
- hdc2tog – half double crochet two together
- dc – double crochet
- tr – treble crochet
- tr2tog – treble crochet two together
- ss – slip stitch
- ch – chain
Notes: The leaf is worked in a round.
a. Mint Leaf Large
Let’s start with foundation chain: Ch 18
R1: add wire,sc from 2nd of the hook, hdc, dc, *(tr2tog, picot)* repeat ** 4 times; (dc, hdc2 tog, picot); sc,3sc in last st, (do not turn, working on the other side); sc,(dc, hdc2 tog, picot); *(tr2tog, picot)* repeat ** 4 times; dc, hdc, sc, ss into 1st ch.

Now large mint leaf finished.

b. Mint Leaf Medium
R1: Add wire ch4, hdc in 2nd st from hook, *(dc, ch picot)* repeat ** 2 times; *(dc, ch picot)* repeat ** 5 times;hdc, ch,ss,leave long tail

Medium mint leaf finished.
c. Mint Leaf Small
Note: Do not add wire
Ch6
R1: ss from 2nd of hook; hdc, dc, hdc, ss; ch6, ss 2nd ch in hook; hdc, dc, hdc, ss; cut and leave tail to join

Now small mint leaf finished.
Assembly completed


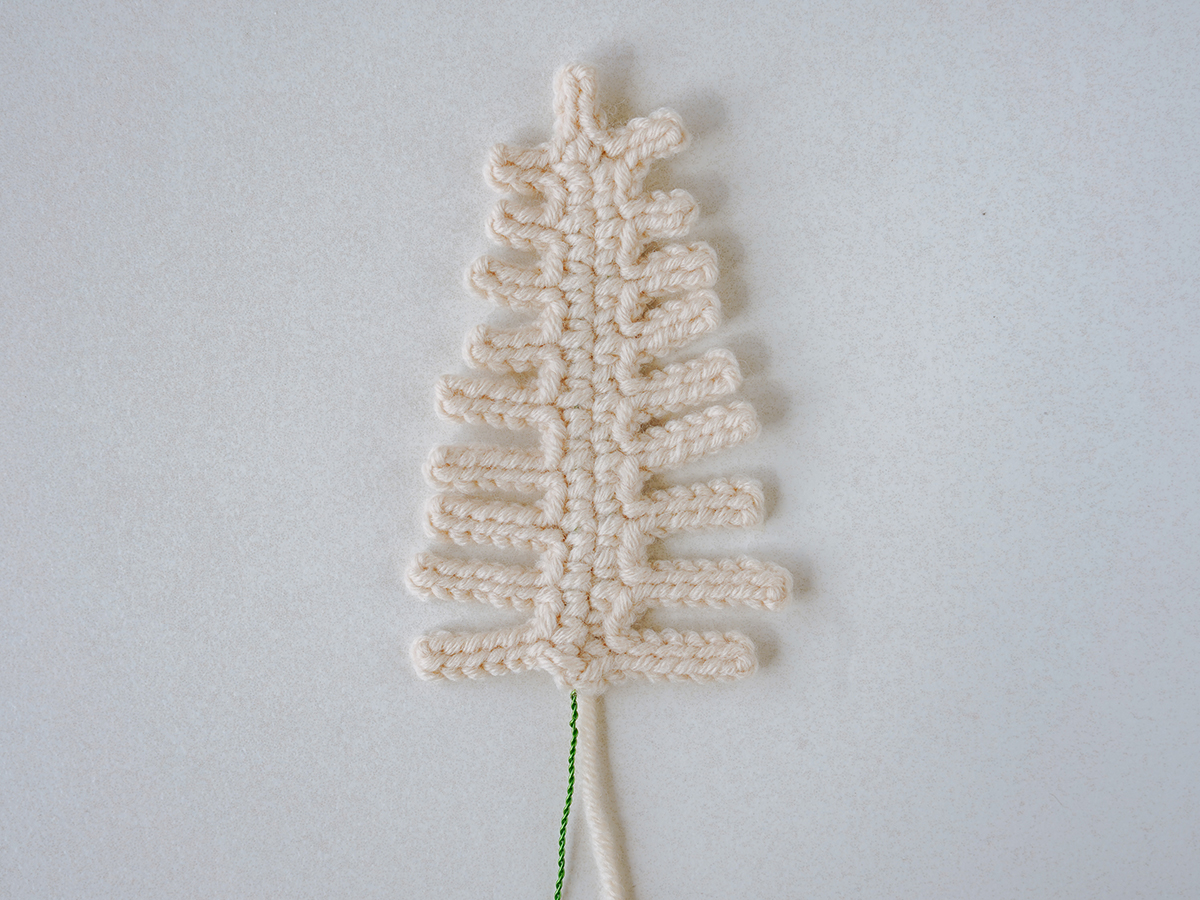
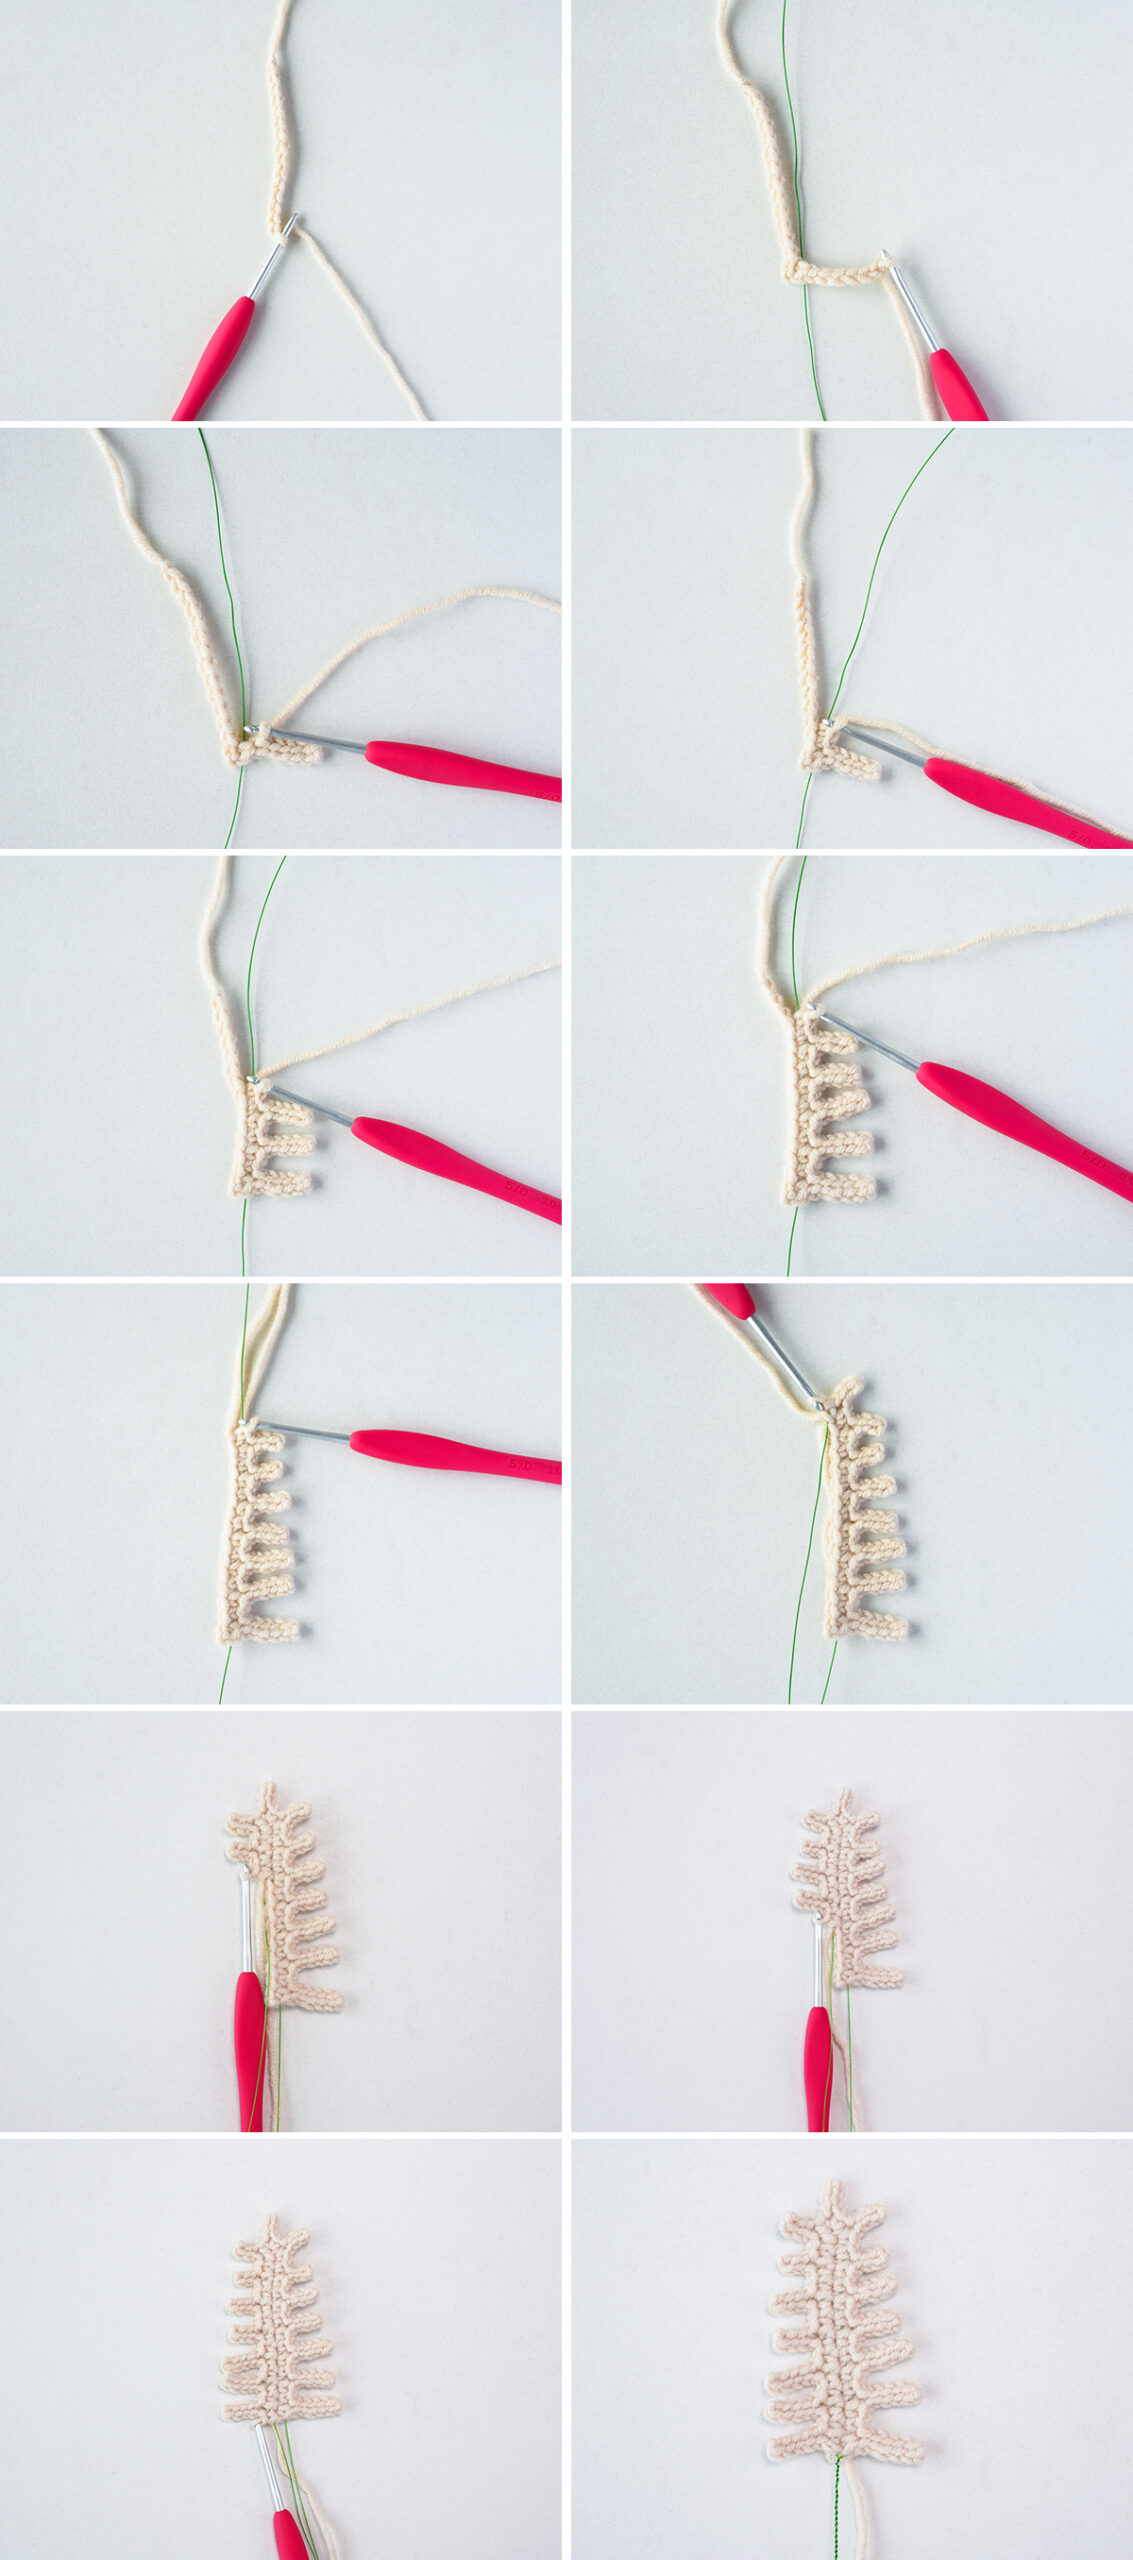
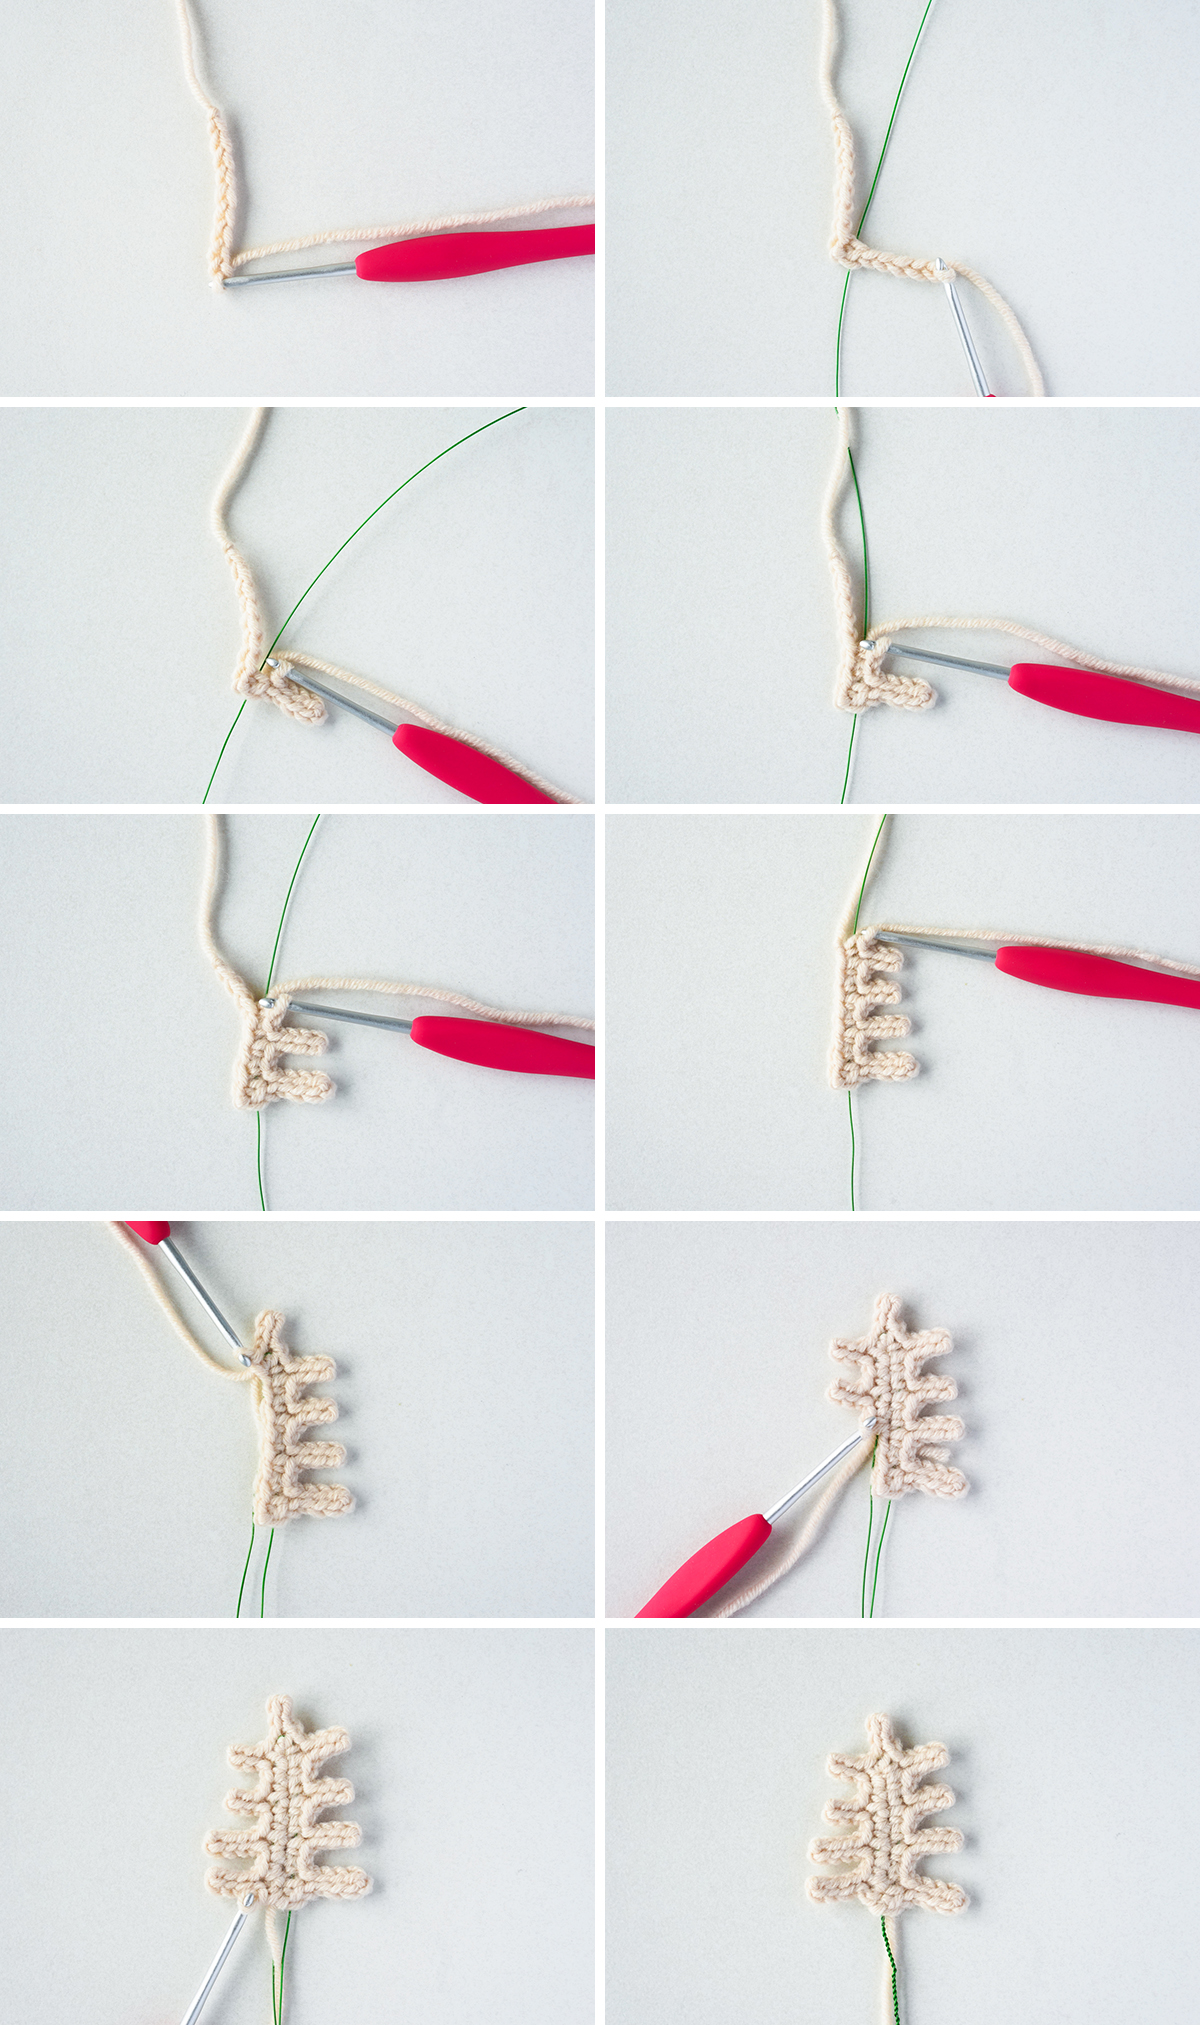
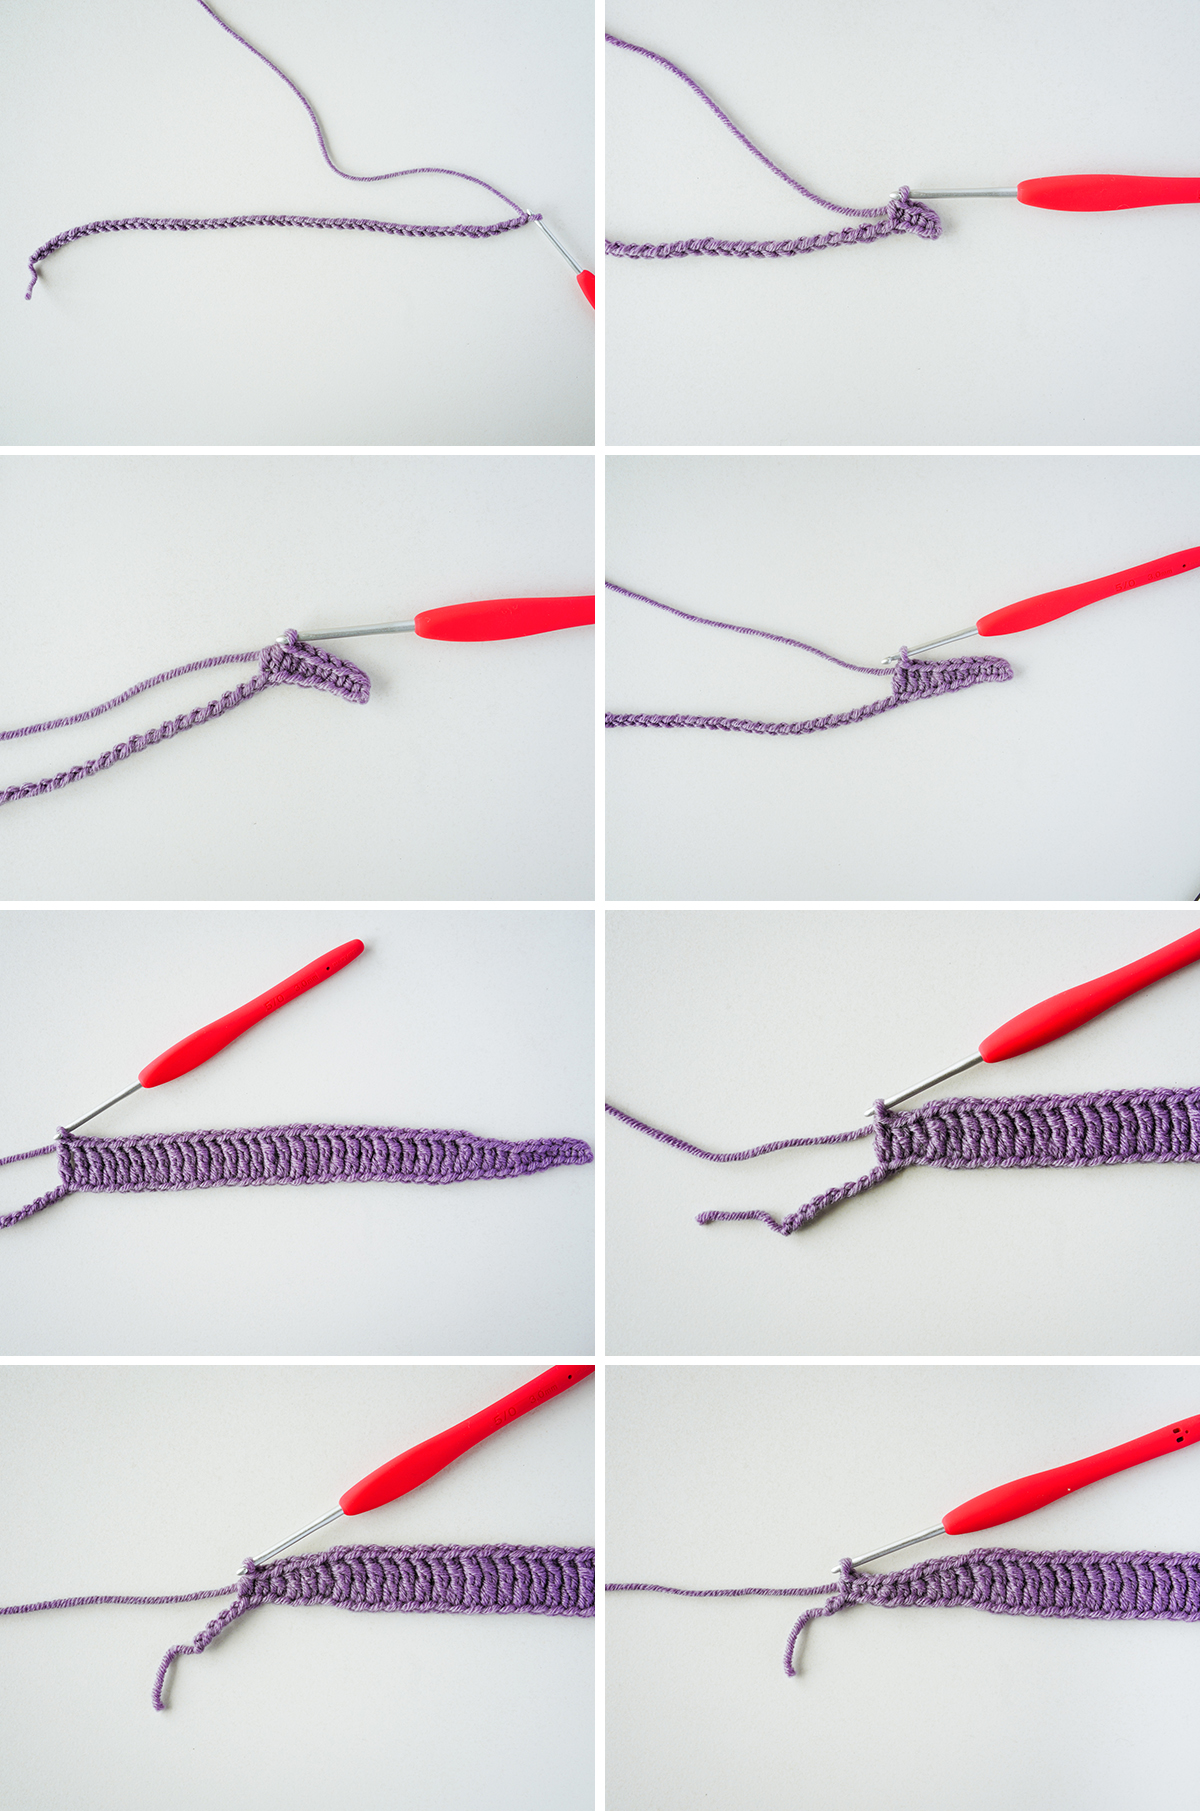
5. Fern Leaf
A crocheted fern leaf is a popular design that mimics the shape and texture of a real fern leaf using crochet stitches. A crochet fern leaf’s delicate and intricate design can add an elegant touch to various crochet projects, such as shawls, afghans, and home decor items. In floral arrangements, crochet fern leaves add a natural and organic touch to flower bouquets or arrangements, complementing the beauty of other floral elements.
Ferns are often associated with friendship, making the crochet fern leaf an excellent addition to flower arrangements for close friends or special occasions, such as weddings or birthdays. Crochet fern leaves can be used as standalone decor pieces or as embellishments to add depth and dimension to other crochet projects.
Abbreviations
- sc – single crochet
- hdc – half double crochet
- dc – double crochet
- tr – treble crochet
- ss – slip stitch
- ch – chain
a. Fern Leaf #1 (Make 1)
Ch25 (this is the base ch)
R1:
Leaf 1: add wire; sc in 2nd ch from hook; ch10, from 2nd of hook 9ss; the sc2 in the base ch
Leaf 2: ch9; from 2nd of hook ss8; then sc2 in base ch
Leaf 3: ch8; from 2nd of hook ss7; then sc2 in base ch
Leaf 4: ch7; from 2nd of hook ss6; then sc2 in base ch
Leaf 5: Repeat Leaf 4
Leaf 6: ch6; from 2nd of hook ss5; then sc2 in base ch
Leaf 7: ch5; from 2nd of hook ss4; then sc2 in base ch
Leaf 8: ch4; from 2nd of hook ss3; then sc2 in base ch
Leaf 9 – 10: Repeat Leaf 8
Leaf 11: ch3; from 2nd of hook ss2; then sc2 in base ch
Leaf 12: Repeat Leaf 11
Sc, ch3
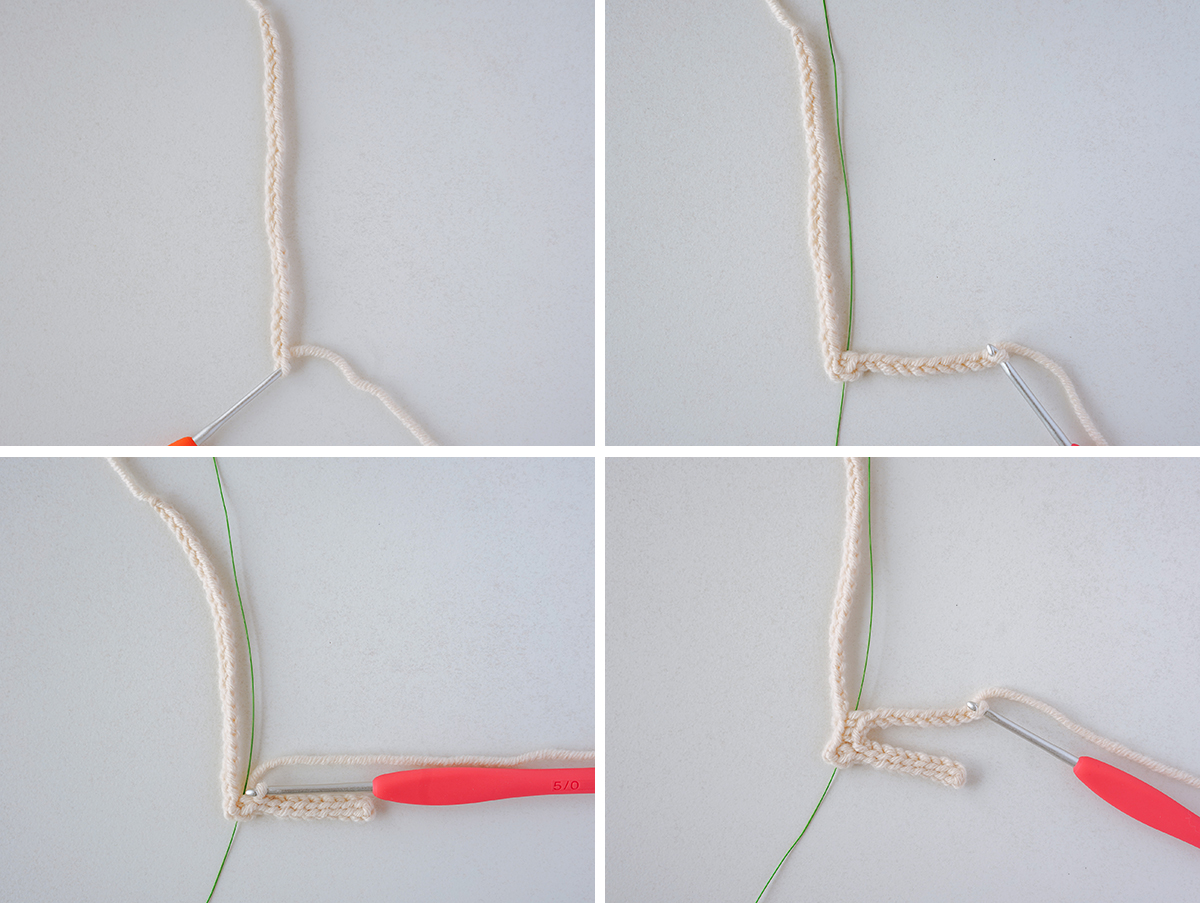

Working on the other side of the base chain
Leaf tip: ch3, ss 2nd ch in hook
Leaf 13: ch3; from 2nd of hook ss2; then sc2 in base ch
Leaf 14: repeat leaf 13
Leaf 15: ch4; from 2nd of hook ss3; then sc2 in base ch
Leaf 16 – 17: repeat leaf 15
Leaf 18: ch5; from 2nd of hook ss4; then sc2 in base ch
Leaf 19: ch6; from 2nd of hook ss5; then sc2 in base ch
Leaf 20: ch7; from 2nd of hook ss6; then sc2 in base ch
Leaf 21: repeat leaf 20
Leaf 22: ch8; from 2nd of hook ss7; then sc2 in base ch
Leaf 23: ch9; from 2nd of hook ss8; then sc2 in base ch
Leaf 24: ch10, from 2nd of hook 9ss; the sc2 in the base ch


Now fern leaf #1 finished.

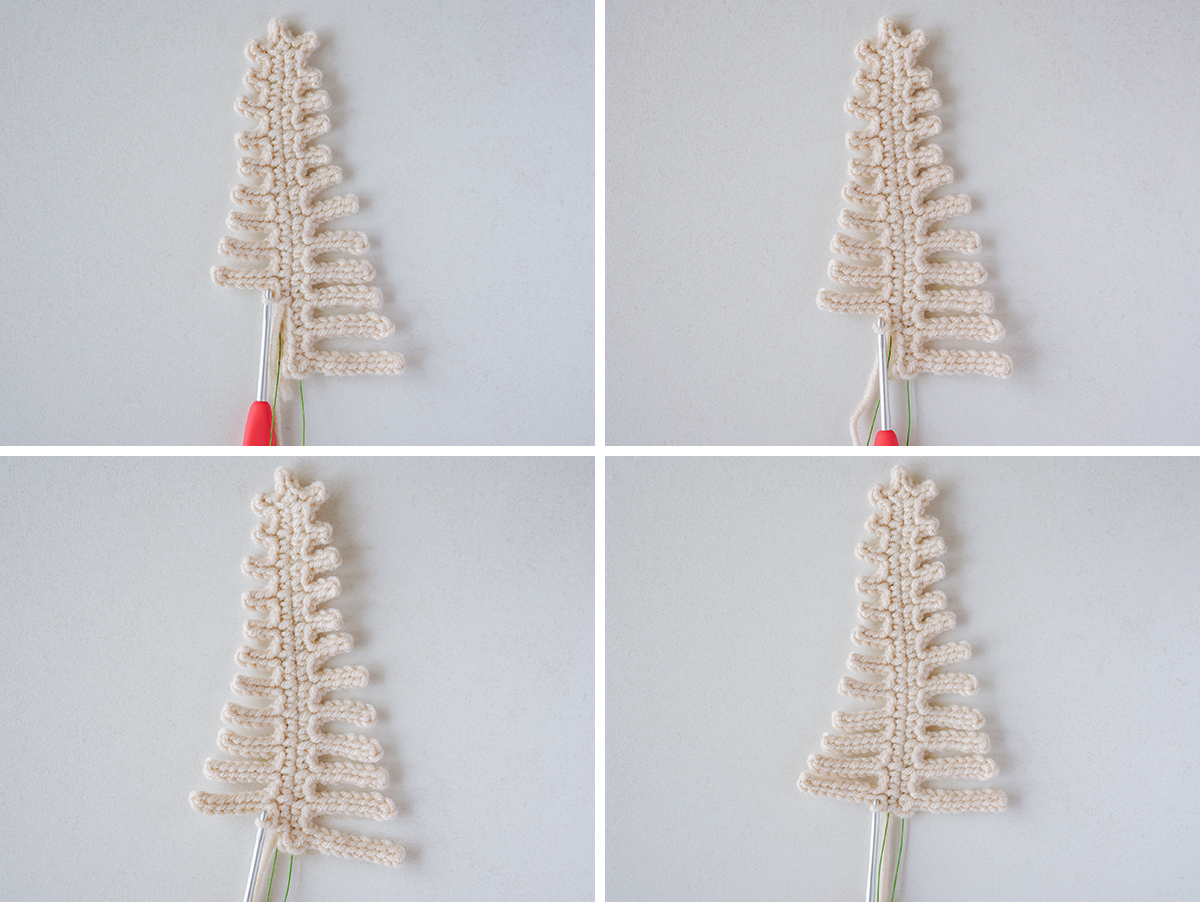
b. Fern Leaf #2 (Make 2)
Ch 19 (this is the base ch)
Leaf 1: add wire; sc from 2nd of hook; ch7; from 2nd of hook ss6; then sc2 in base ch
Leaf 2: ch8; from 2nd of hook ss7; then sc2 in base ch
Leaf 3: ch7; from 2nd of hook ss6; then sc2 in base ch
Leaf 4: repeat leaf 3
Leaf 5: ch6; from 2nd of hook ss5; then sc2 in base ch
Leaf 6: ch5; from 2nd of hook ss4; then sc2 in base ch
Leaf 7: repeat leaf 6
Leaf 8: ch4; from 2nd of hook ss3; then sc2 in base ch
Leaf 9: repeat leaf 8


Working on the other side of the base ch
Leaf tip: ch4; from 2nd of hook ss3; then sc2 in base ch
Leaf 10: ch4; from 2nd of hook ss3; then sc2 in base ch
Leaf 11: repeat leaf 10
Leaf 12: ch5; from 2nd of hook ss4; then sc2 in base ch
Leaf 13: repeat leaf 12
Leaf 14: ch6; from 2nd of hook ss5; then sc2 in base ch
Leaf 15: ch7; from 2nd of hook ss6; then sc2 in base ch
Leaf 16: repeat leaf 15
Leaf 17: ch8; from 2nd of hook ss7; then sc2 in base ch
Leaf 18: ch7; from 2nd of hook ss6; then sc2 in base ch


Now fern leaf #2 finished,continue to finish another one.Totally need two.
c. Fern Leaf #3 (Make 2)
Ch15 (this is the base ch)
Leaf 1: add wire; sc from 2nd st from hook; ch6; from 2nd of hook ss5; then sc2 in base ch
Leaf 2 – 3: repeat leaf 1
Leaf 4: ch5; from 2nd of hook ss4; then sc2 in base ch
Leaf 5: repeat leaf 4
Leaf 6: ch4; from 2nd of hook ss3; then sc2 in base ch
Leaf 7: repeat leaf 6
Leaf tip: ch4; from 2nd of hook ss3; then sc2 in base ch
Working on the other side of base ch
Leaf 8: ch4; from 2nd of hook ss3; then sc2 in base ch
Leaf 9: repeat leaf 8
Leaf 10: ch5; from 2nd of hook ss4; then sc2 in base ch
Leaf 11: repeat leaf 10
Leaf 12: ch6; from 2nd of hook ss5; then sc2 in base ch
Leaf 13 – 14: repeat leaf 12
Fern leaf #3 finished,Now continue to finish another one.Totally need two.

d. Fern Leaf #4 (Make 2)
Ch 9 (this is the base ch)
Leaf 1: add wire; sc from 2nd st from hook; ch5; from 2nd of hook ss4; then sc2 in base ch
Leaf 2: ch5; from 2nd of hook ss4; then sc2 in base ch
Leaf 3: ch4; from 2nd of hook ss3; then sc2 in base ch
Leaf 4: repeat leaf 3
Leaf tip: ch4; from 2nd of hook ss3; then sc2 in base ch
Leaf 5: ch4; from 2nd of hook ss3; then sc2 in base ch
Leaf 6: repeat leaf 5
Leaf 7: ch5; from 2nd of hook ss4; then sc2 in base ch
Leaf 8: repeat leaf 7
Now fern leaf #4 finished,continue to finish another one.Totally need two.

e. Fern Leaf #5 (Make 2)
Ch 7 (this is the base ch)
Leaf 1: add wire; sc from 2nd st from hook; ch4; from 2nd of hook ss3; then sc2 in base ch
Leaf 2: ch4; from 2nd of hook ss3; then sc2 in base ch
Leaf 3: repeat leaf 2
Leaf tip: ch4; from 2nd of hook ss3; then sc2 in base ch
Leaf 5: ch4; from 2nd of hook ss3; then sc2 in base ch
Leaf 6: repeat 5

Now fern leaf #5 finished,continue to finish another one.Totally need two.

Fern Leaf Assembly
Using the tail from fern leaf 5, wrap the yarn a few times around the wire and then join the two fern leaf #5 on opposite sides. Do the same for fern leaves 4, 3, and 2, cut and weave in the ends.
Check the photos below to see the finished project.


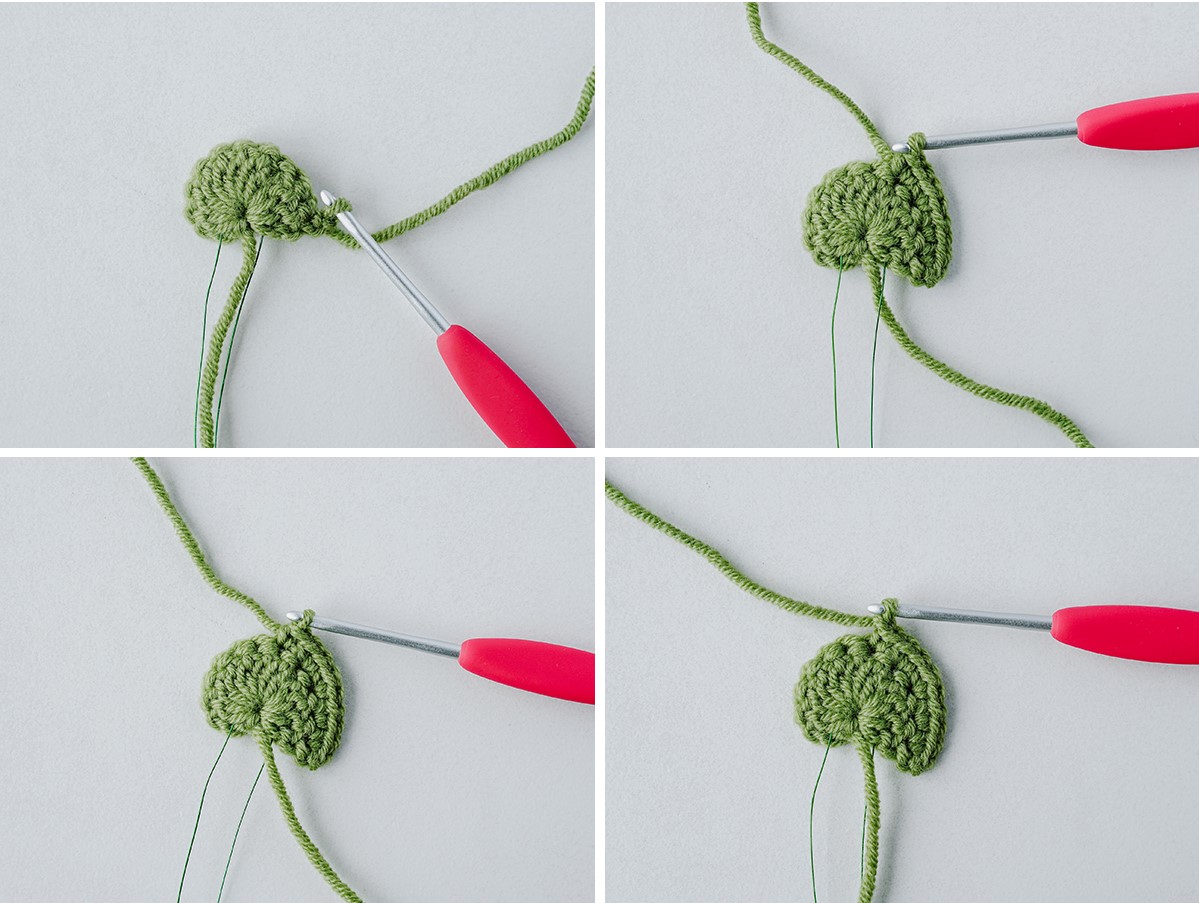
6. Little Daisy Leaf
Crocheted little daisy leaf is a charming design that imitates a small daisy leaf’s delicate shape and texture. The design is applicable in creating various crochet projects, such as bookmarks, headbands, and home decor items. In floral arrangements, crochet little daisy leaves add a whimsical touch to flower bouquets or arrangements, providing a natural and fresh look.
The little daisy leaf can represent innocence, purity, and new beginnings, making it an excellent addition to flower arrangements for weddings, christenings, or baby showers. Crochet little daisy leaves can be used as standalone decor or combined with other floral designs to create unique and vibrant crochet projects. The versatility and charm of the crocheted little daisy leaf make it a special design among crochet enthusiasts and floral enthusiasts alike.
Abbreviations
- sc – single crochet
- sc2tog – single crochet two together
- hdc – half double crochet
- dc – double crochet
- tr – treble crochet
- ss – slip stitch
- ch – chain
Notes: leaf is worked in a round
Let’s start with foundation chain: Ch13
R1: add wire; in 2nd st from hook 11sc, sc3 in last st, then working on the other side of base ch work 11sc, ss

R2: *(sc2tog, picot st)*; repeat ** all round, ss, cut and leave a tail to join

Now we are finished.

7. Convallaria Majalis Leaf
The crochet convallaria majalis leaf is a beautiful design that replicates the shape and texture of a lily of the valley leaf. The delicate and intricate design of the leaf makes it an excellent addition to floral arrangements, adding a semblance of natural beauty and elegance. In a floral arrangement, the crochet Convallaria Majalis leaf can complement other floral elements, such as lilies of the valley flowers or other spring blooms.
Lilies of the valley are often associated with sweetness, purity, and humility, making the crochet convallaria majalis leaf a suitable addition to flower arrangements for weddings, baptisms, or other special occasions. Besides floral arrangements, crochet convallaria majalis leaves design can be a bookmark, brooch, jewelry, and jewelry and much more. Combine this with other crochet designs to make one-of-a-kind and complicated crochet crafts like doilies, table runners, and drapes.
Abbreviations
- sc – single crochet
- hdc – half double crochet
- dc – double crochet
- tr – treble crochet
- ss – slip stitch
- ch – chain
Let’s start with foundation chain: Ch26
R1: sc2 in 2nd st from hook, hdc2, 2dc, tr12, dc2, hdc2, sc2, 3sc in last st(working on the other side of base ch) sc2, hdc2, dc2, tr12, dc2, hdc2, sc2, ss Leave long tail to join


Now we are finished.
8. Four-Season Leaf
Four Seasons Crochet Leaf is a unique design capturing the essence of each season in one leaf. The leaf design is usually green yarn; however, you can crochet each quadrant of the leaf with a different color to represent the four seasons: green for spring, yellow for summer, red for autumn, and white for winter.
The four seasons crochet leaf is an ideal addition to a bouquet that celebrates the changing seasons or an addition to a wreath or garland that reflects the natural beauty of each season.
The four seasons crochet leaf is also a great embellishment for other crochet projects, such as Afghans, shawls, and pillows. The design provides an excellent opportunity to experiment with different color combinations and stitch patterns, making it a fun and challenging project for crochet enthusiasts. The four seasons crochet leaf can be used as a standalone decor piece or combined with other designs to create unique and vibrant crochet projects.
Abbreviations
- sc – single crochet
- hdc – half double crochet
- ss – slip stitch
- ch – chain
Let’s start with foundation chain: Ch10
R1: add wire; sc in 2nd ch from hook; hdc, dc5, hdc, 3sc in last st, (working on the other side of base ch) hdc, dc5, hdc, sc, ss, cut and leave tail for sewing
Now we are finished.

9. Grape Leaf
The crochet grape leaf is a lovely and detailed design that uses crochet stitches to simulate the shape and feel of a real grape leaf. The design provides an excellent opportunity for crochet enthusiasts to experiment with different stitch patterns and color combinations.
In floral arrangements, crochet grape leaves add a natural and organic touch to flower bouquets or arrangements, complementing the beauty of other floral elements. The grape leaf creates a stunning natural look when combined with other crochet floral designs or real grapevines.
Apart from floral arrangements, crochet grape leaves are great appliques to crochet projects, such as table runners, coasters, and trivets. The grape leaf design provides a unique and elegant touch to home decor items, adding warmth and coziness. Crochet grape leaves can be used as standalone decor or combined with other designs to create unique and vibrant crochet projects.
Abbreviations
- sc – single crochet
- blosc – back loop single crochet
- ss – slip stitch
- ch – chain
a. Grape Leaf – Big (Make 2)
Let’s start with foundation chain: Ch 12
R1: in 2nd st from hook, sc10, sc3 in last st,(working on the other side of base ch) sc9, turn
R2: ch,in 2nd st from hook blosc9, 3sc in last st, (working on the other side) blosc9, turn
R3: blosc9, sc3 in last st,(working on the other side) blosc9, turn
R4 – 5: repeat R3

Big grape leaf finished. Now continue to finish another one. Totally need two.
b. Grape Leaf – Small (Make 1)
Let’s start with foundation chain: Ch9
R1: in 2nd st from hook, sc7 ,sc3 in last st,(working on the other side of base ch) sc6, turn
R2: in 2nd st from hook blosc6, 3sc in last st,(working on the other side) blosc6, turn
R3: blosc6, sc3 (working on the other side) blosc6, turn
R4 – 5: repeat R3

Small grape leaf finished.

c. Grape Leaf – Stalk
Step 1: Using a double-strand yarn ch7
Step 2: Aligned the three leaves together (as shown in pic) sc into the first leaf, sc in the center leaf, ss in the last leaf, cut and weave in the ends
Assembly complete

10. Holly Leaf
The holly leaf is a unique and intricate crochet design that replicates the shape and texture of a leaf. It is a popular design in various floral arrangements such as bouquets, centerpieces, and other floral arrangements, complementing the beauty of other floral elements.
As the holly leaf suggests, the leaf representing peace and goodwill is particularly suitable for arrangements used for religious ceremonies, such as weddings or baptisms.
Abbreviations
- sc – single crochet
- blosc – back loop single crochet
- ss – slip stitch
- ch – chain
Let’s start with foundation chain: Ch10
R1: sc 2nd st from hook, sc8, ch4, turn
R2: in 2nd st from hook blosc9, ch1, turn
R3: blosc9, ch4, turn
R4: repeat R2
R5: repeat R3
R6: repeat R2
R7: repeat R3
R8: repeat R2


R9: blosc6, ch1, turn
R10: blosc6, then jump to R7, blosc3, ch1, turn
R11: blosc6, ch1, turn
R12: blosc6, then jump to R5, blosc3, ch1, turn
R13: blosc6, ch1, turn
R14: blosc6, then jump to R3, blosc3, ch1, turn
R15: blosc6, ch1, turn
R16: blosc6, then jump to R1, blosc3, ss into first ch, ch6 turn
R17: in 2nd st from hook ss5, blosc6, cut and leave long tail

Now we are finished.

11. Vermilion Banana Leaf
The vermilion banana leaf design features a deep, rich vermilion color that captures the natural beauty of the banana leaf. The banana leaf symbolizes growth, prosperity, and good luck in many cultures, making this design popular among crochet enthusiasts.
The pattern is a great decorative piece to create unique and vibrant crochet projects, adding a touch of nature and warmth to the final product, such as blankets, cardigans, and home décor. The vermilion banana leaf pattern provides an excellent opportunity for crochet enthusiasts to experiment with different stitch patterns and color combinations.
Abbreviations
- sc – single crochet
- hdc – half double crochet
- dc – double crochet
- tr – treble crochet
- ss – slip stitch
- ch – chain
- Hdc spike stitch – half double crochet spike stitch
Using color 1 ,start with foundation chain: ch50
R1: From 2nd st of hook sc3, hdc3, dc3, tr30, dc3, hdc3, sc3, 3sc in last st,(working on the other side of base ch); sc3, hdc3, dc3, tr30, dc3, hdc3, sc3, ss,

R2: ch1, add wire, sc6, hdc6, dc3, tr20, dc3, hdc6, sc5, 3sc in last st,(working on the other side of the base ch) sc5, hdc6, dc3, tr20, dc3, hdc6, sc7, cut and leave a long tail to sew in.


R3: Using color 2, join yarn in the 1st st; ch1, sc10, hdc spike st in desire, cut and weave in ends

Now we are finished.

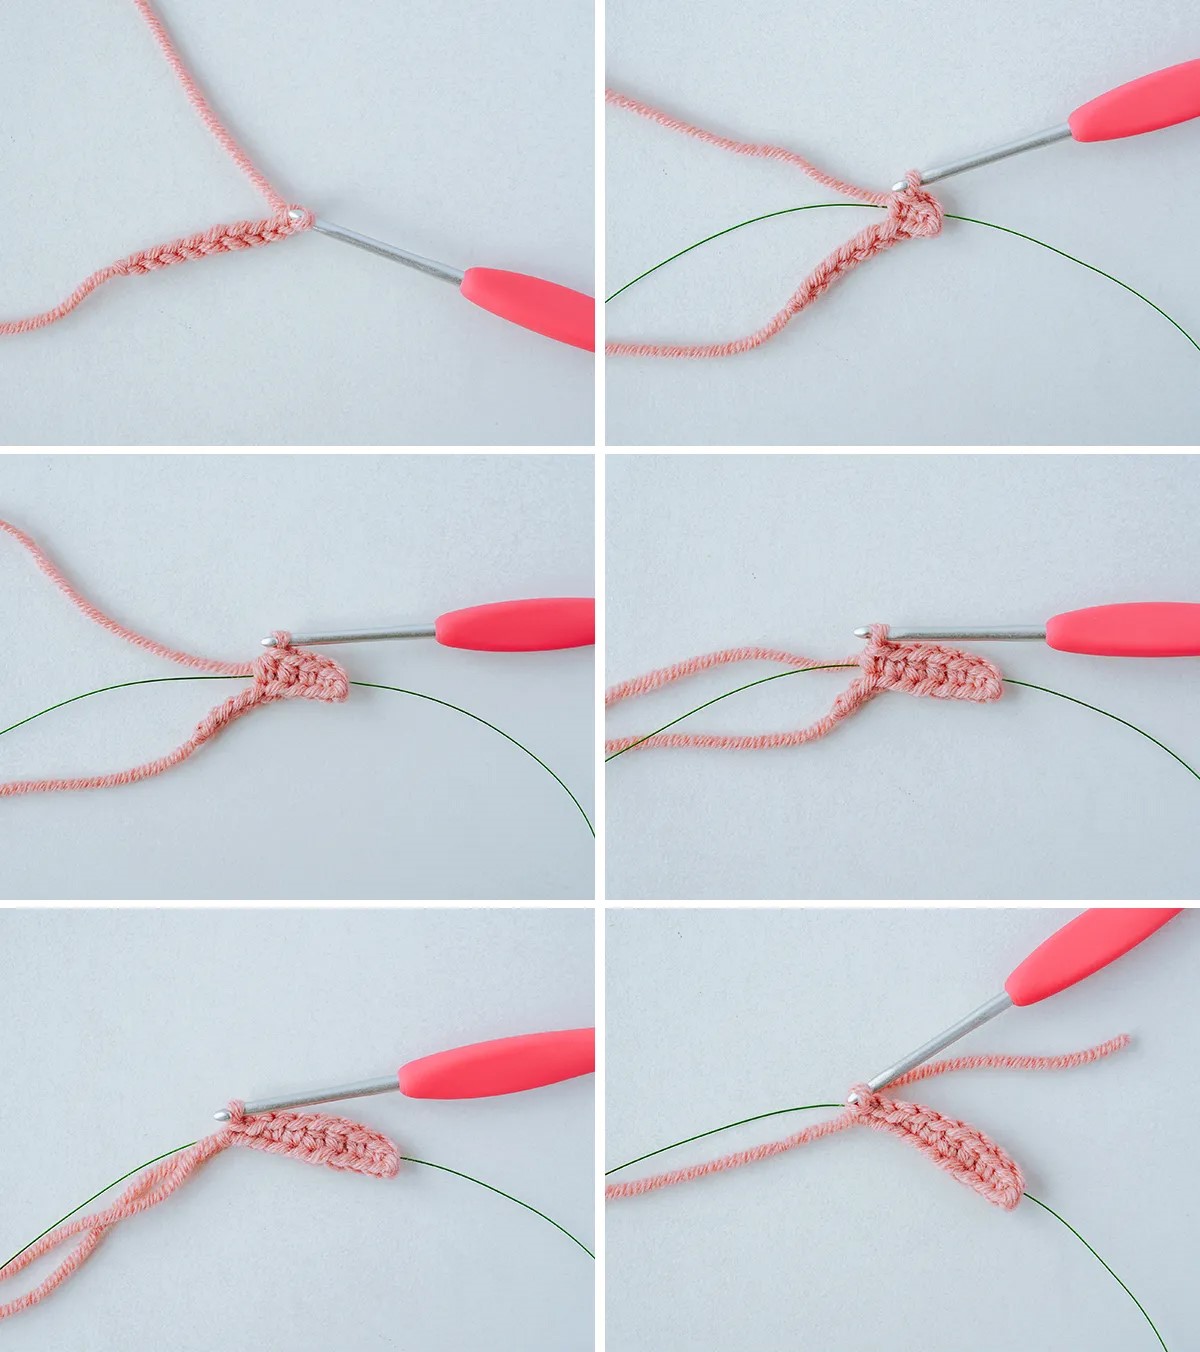
12. Olive Leaf
The olive leaf crochet pattern is a popular design that mimics the beautiful, slender leaves of the olive tree. The characteristic of the pattern includes its delicate, lacy appearance, often used to create stunning accessories and home décor items.
Olive leaves add an elegant touch to any bouquet and pair beautifully with a wide range of flowers, including roses, peonies, and hydrangeas. They add a touch of greenery and texture to your arrangement. To include olive leaves in your bouquet, you can create a few crochet leaves using the olive leaf pattern and attach them to floral wire or stems. With this pattern, you get a variation of how to make a big or small olive leaf.
Abbreviations
- sc – single crochet
- hdc – half double crochet
- dc – double crochet
- ss – slip stitch
- ch – chain
a. Olive Leaf Big (Make 4)
Let’s start with foundation chain: Ch 30
R1: add wire, sc 2nd st from hook, sc next st, hdc3, dc18, hdc3, sc2, 3sc in last stitch, (working on the other side of the base ch) sc2, hdc3, dc18, hdc3, sc2, ss, ch1


R2: sc8, hdc10, sc8, ss3, 3sc in last st; (working on the other side of the base ch); ss3, sc8, hdc10, sc8, ss; cut and leave long tail for sewing

Big olive leaf finished. Now continue to finish another three. Totally need four.

b. Olive Leaf Small (Make 3)
Let’s start with foundation chain: Ch26
R1: add wire, sc 2nd st from hook, sc next st, hdc2, dc16, hdc3, sc, 3sc in last stitch, (working on the other side of the base ch) sc, hdc3, dc16, hdc2, sc2, ss, ch1


R2: sc7, hdc9, sc5, ss4, 3sc in last st; (working on the other side of the base ch); ss4, sc5, hdc9, sc7, ss; cut and leave long tail for sewing

Small olive leaf finished. Now continue to finish another two. Totally need three.

13. Ginkgo Leaf
The unique fan-shaped leaves of the Ginkgo biloba tree inspire the Ginkgo leaf crochet pattern. This pattern has an intricate, lacy appearance, complementing various flowers and adding an interesting element of dimension and texture to any arrangement.
The Ginkgo tree is a living fossil, as it is one of the oldest tree species in the world. Popular for its medicinal properties in traditional Chinese medicine, adding this to a flower arrangement symbolizes longevity, hope, and resilience. To include Ginkgo leaves in your bouquet, you can create a few crochet leaves using the Ginkgo leaf pattern and attach them to floral wire or stems. You make large or small leaves to add interest and depth to your bouquet, creating a unique and personalized arrangement.
Abbreviations
- sc – single crochet
- hdc – half double crochet
- dc – double crochet
- tr – treble crochet
- ss – slip stitch
- ch – chain
a. Ginkgo Leaf Big
Make a magic ring and ch3
R1: add wire and dc10 into the ring, close the loop, ch1, turn

R2: sc all sts, ch4, turn

R3: (tr2 in next st)x4, in the same st [(tr, ch2, sc) (sc, ch2, tr)]; (tr2 in next st)x3; tr2 in next st, ch4, ss to the center of magic loop leave long tail for sewing


Big ginkgo leaf Finished.

b. Ginkgo Middle Leaf
Make a magic ring and ch3
R1: add wire and dc10 into the ring, close the loop, ch1, turn

R2: ch2, turn,(dc2 in next st)x4,in the same st [(dc, ch, ss) (ss, ch, dc]; (dc2 in next st)x3; dc, ch2, ss to the center of magic loop leave long tail for sewing


Ginkgo middle leaf finished.

c. Ginkgo Small Leaf
Make a magic ring and ch3
R1: add wire and dc10 into the ring, close the loop, ch1, turn

R2: (sc2 in next st)x4; in the same stitch(sc, ch,ss),(ss,ch,sc),(sc2 in next st)x3,(sc,ch),ss to the center of magic loop leave long tail for sewing

Ginkgo samll leaf finished.

Joining the Ginkgo Leaf
Align the three leaves with the big leaf at the center, and using double-strand yarn, wrap around the wires to join (see photos for reference).


14. Maple Leaf
Crocheting a maple leaf is a fun and easy project that can add a touch of autumn to any decor or clothing item. The pattern typically involves working in rounds and using basic crochet stitches like chains, single crochets, half-double crochets, and slip stitches.
You will get three sizes to join together to form the maple. You can choose any yarn color to achieve a real maple leaf’s characteristic red, orange, and yellow hues.
The maple leaf has many meanings depending on the region; it is a well-known symbol of Canada, featured prominently on the country’s flag, and associated with its natural beauty, strength, and resilience. In Native American culture, the maple leaf symbolizes balance and wisdom, while in European folklore, the leaf relates to love, longevity, and abundance.
Adding a crochet maple leaf to a bouquet can be a unique and personalized touch, especially during autumn. The leaf can be attached to the stem of a flower using wire or string or glued to a decorative stick or wooden dowel and inserted into the bouquet. Alternatively, combine crochet maple leaves to create a festive garland draped over a vase or wrapped around a bouquet. A crochet maple leaf can add an inviting and cozy atmosphere to any room when combined with other fall-themed elements like acorns, pumpkins, and dried leaves.
Abbreviations
- sc – single crochet
- hdc – half double crochet
- ss – slip stitch
- ch – chain
a. Maple Leaf #1 (Make 3)
Let’s start with foundation chain: Ch15
R1: add wire, sc in 2nd st from hook, sc in the next st, hdc2, dc4, hdc2, sc2, ss2, ch1, (working on the other side of base ch), ss2, sc2, hdc2, dc4, hdc2, sc2, ss, cut and leave long tail for sewing

Maple leaf#1 finished. Now continue to finish another two. Totally need three

b. Maple Leaf #2 (Make 2)
Let’s start with foundation chain: ch13
R1: add wire, sc2 in 2nd st from hook, hdc2, dc2, hdc2, sc2, ss2, ch1, (working on the other side of base ch), ss2, sc2, hdc2, dc2, hdc2, sc2, ss, cut and leave long tail for sewing


Maple leaf#2 finished. Now continue to finish another one. Totally need two.

c. Maple Leaf #3 (Make 2)
Let’s start with foundation chain: ch9
R1: add wire, sc in 2nd st from hook, sc in the next st, hdc2, sc2, ss2, ch1, (working on the other side of base ch), ss2, sc2, hdc2, sc2, ss, cut and leave long tail for sewing

Maple leaf#3 finished. Now continue to finish another one. Totally need two.

Assemble completed

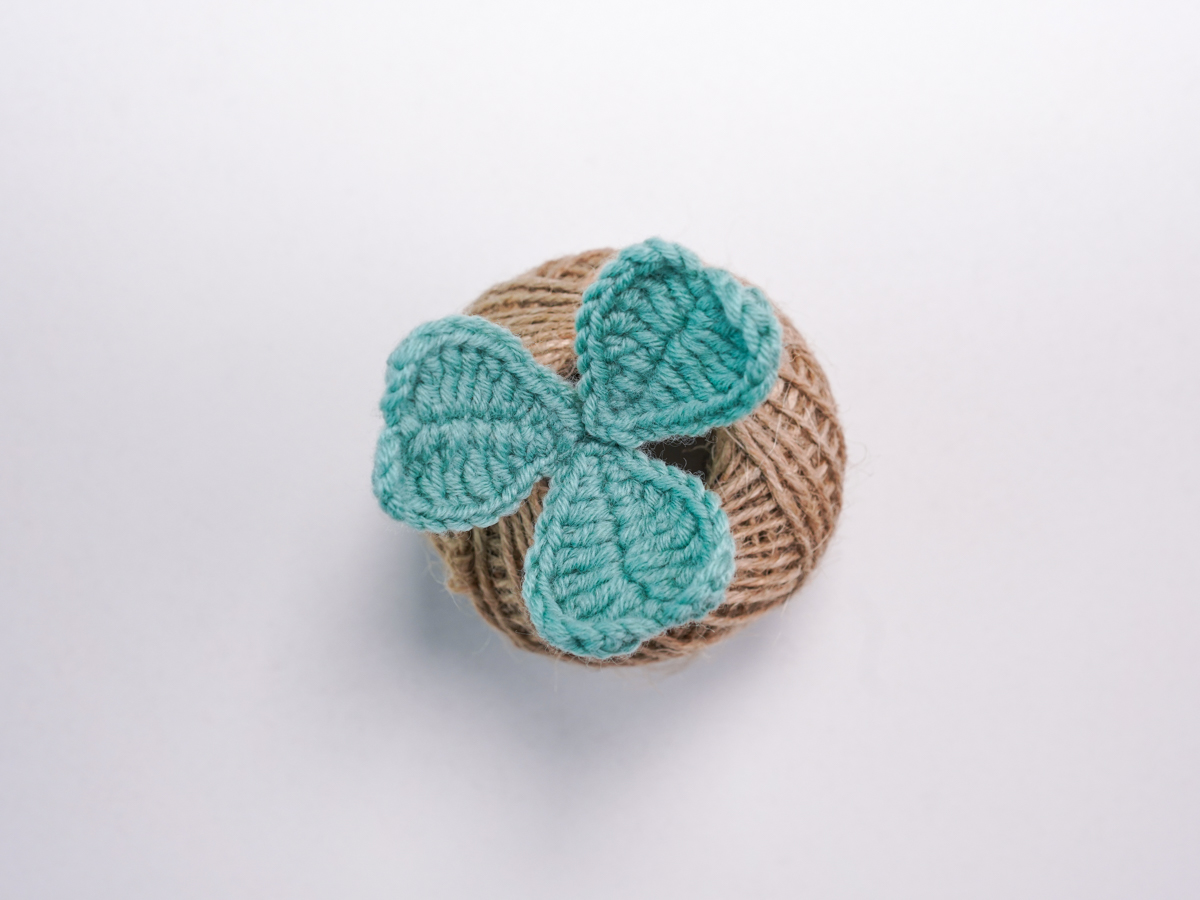
15. Three Leaf Clover (Make 3)
The three-leaf clover crochet is an easy and popular project that crafters of all levels love. The three-leaf clover is a well-known symbol of luck and is often associated with St. Patrick’s Day celebrations, where finding a four-leaf clover will bring even more luck. However, the three-leaf clover also holds spiritual significance for some, representing the trinity,
When crocheted, the three-leaf clover can be made in various sizes and colors, making it a versatile addition to any craft project. It can be an applique to embellish clothing, hats, bags, or home decor items like pillowcases or table runners. It can also be a piece of jewelry or a cute and fun keychain or bag charm.
Adding a crocheted three-leaf clover to a bouquet can bring luck and positivity to the arrangement. It can be attached to the stem of a flower using wire or string or glued to a decorative stick or wooden dowel and inserted into the bouquet. When combined with other crochet elements like flowers, greenery, or branches, the crocheted clover can add a unique and personal touch to any bouquet.
Abbreviations
- sc – single crochet
- hdc – half double crochet
- dc – double crochet
- tr – treble crochet
- ss – slip stitch
- ch – chain
Let’s start with foundation chain: Ch8
R1: add wire, sc in 2nd st from hook, sc in the next st, hdc, dc, tr, tr2 in next st;(tr2 in next 2 sts,ch3,ss,ch3,tr2 in next st,) ; (working on the other side of the ch); (tr2 in next 2 sts,ch3,ss,ch3,tr2 in next st,) tr2 in next st, tr,dc, hdc, sc2, ss, cut and leave tail for sewing.
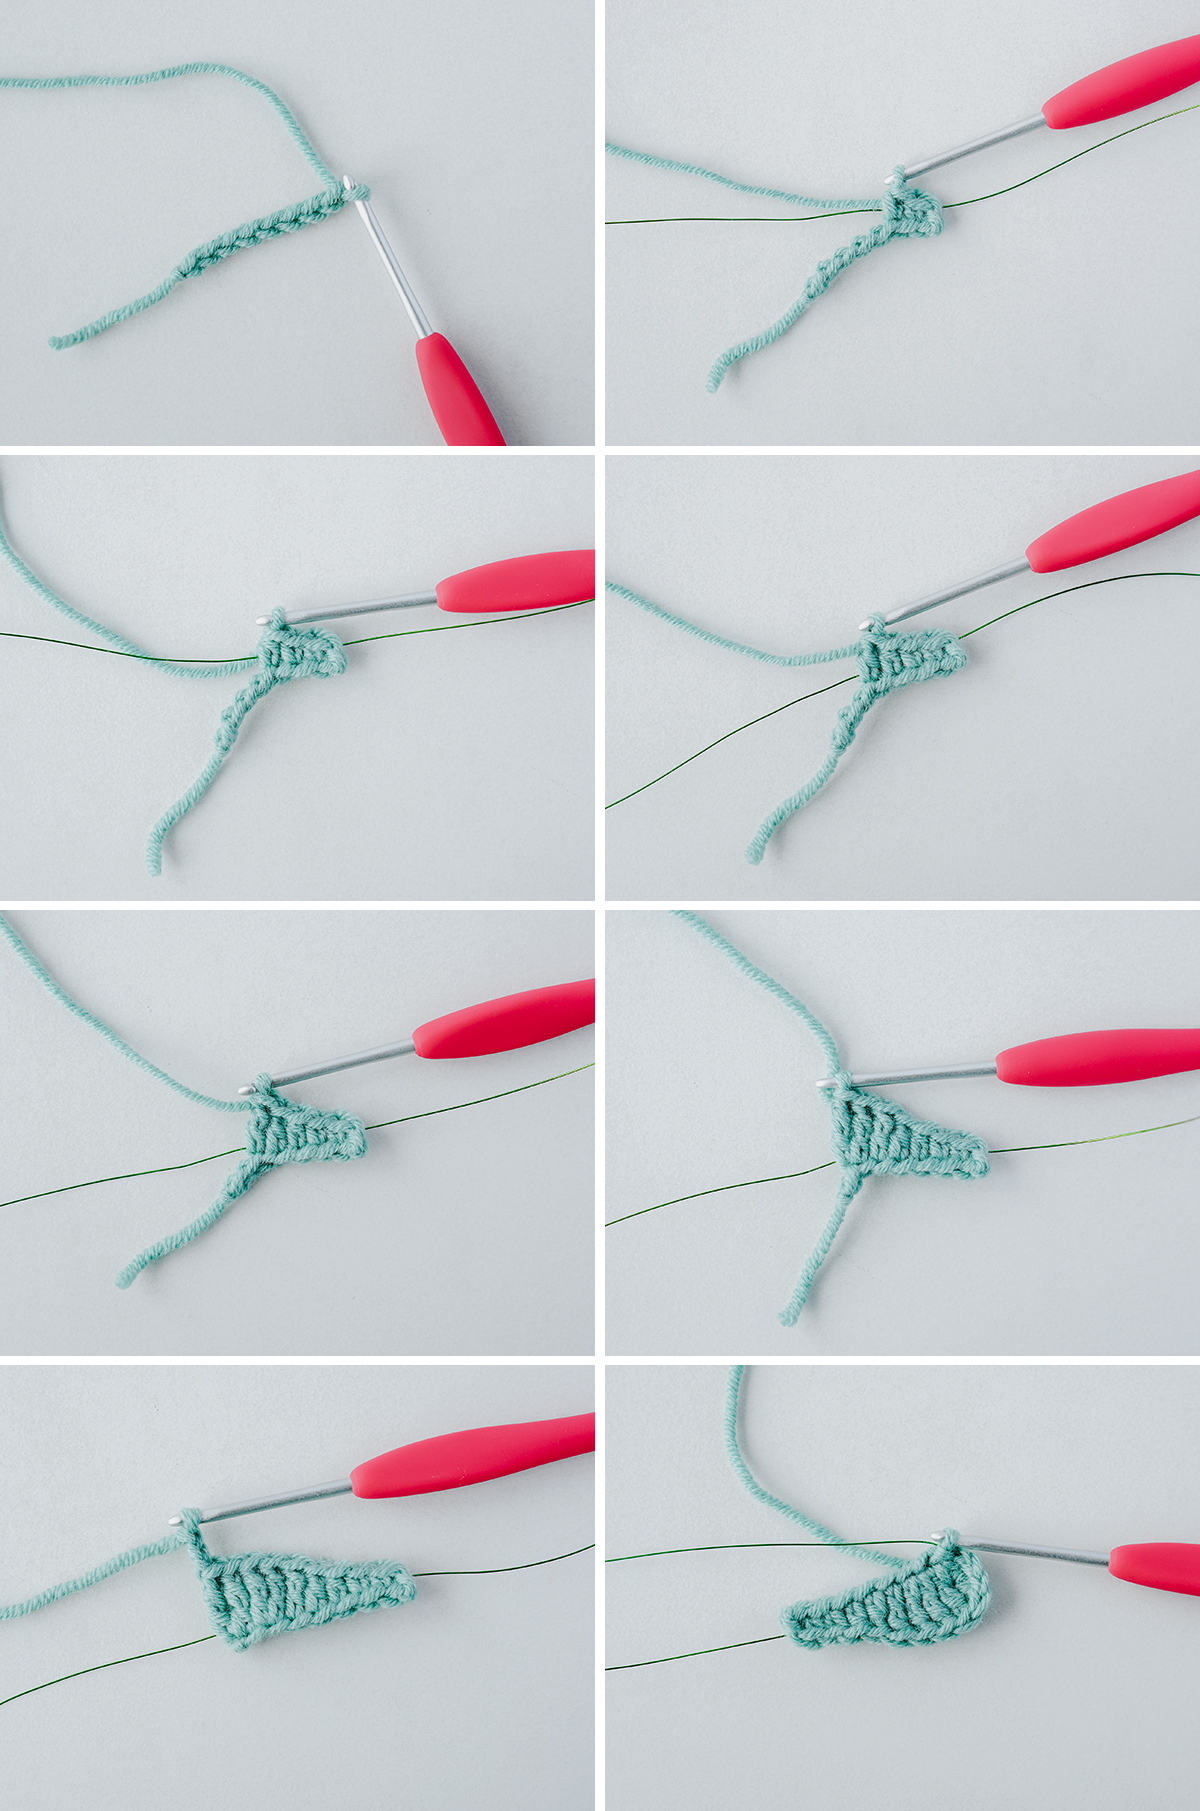
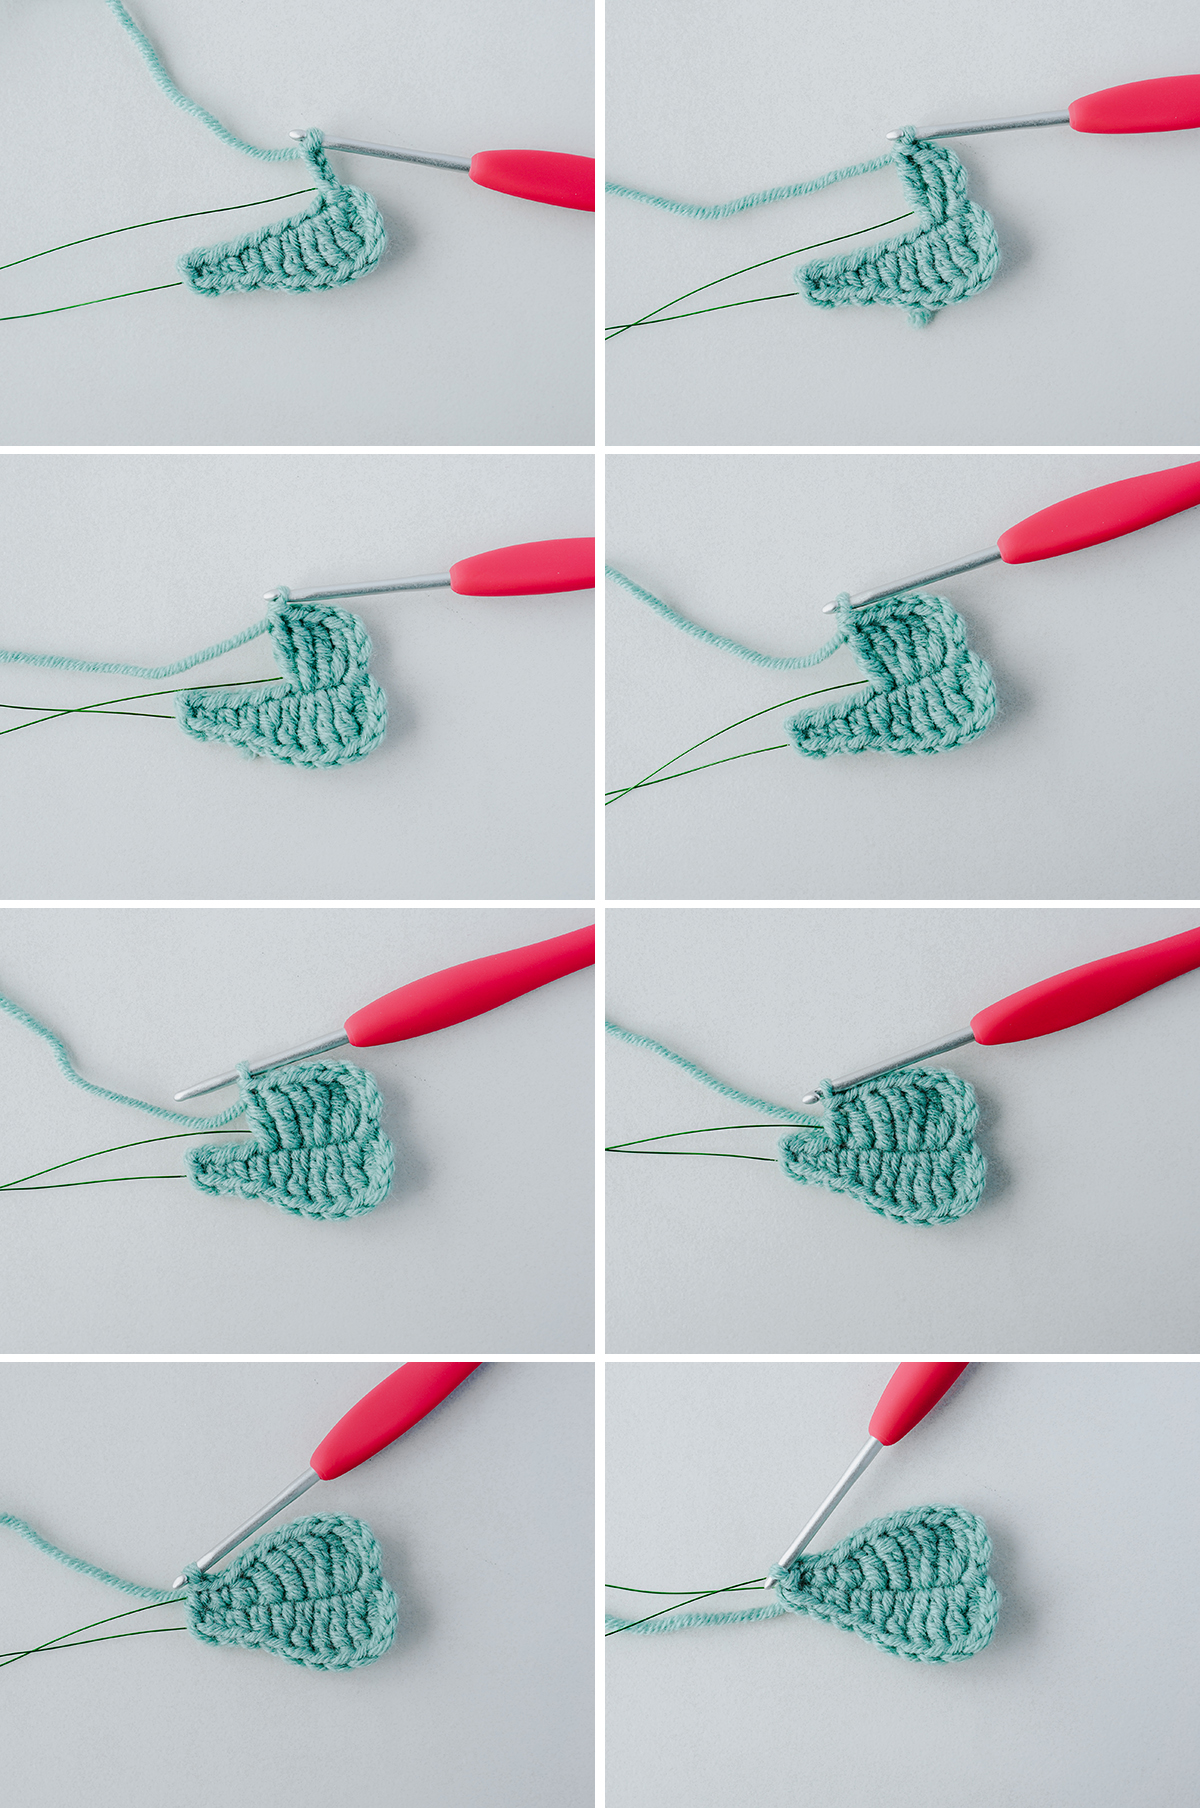
Three leaf clover finished. Now continue to finish another two. Totally need three.

Joining the Clover Leaves
Join the three leaves by wrapping the wires using double-strand yarn (see photos for reference)

16. Eucalyptus Leaf
Crocheting eucalyptus leaves is a wonderful way to incorporate the beauty and symbolism of this beloved plant into your crafting projects. Eucalyptus is well-known for its calming scent, frequently used in aromatherapy to encourage relaxation and alleviate respiratory problems. Traditional medicine uses the leaves to cure various diseases, including coughs, colds, and inflammation.
Beyond its medicinal properties, eucalyptus symbolizes healing, renewal, and protection, making it a popular choice for crafting projects and home decor items. Crocheting eucalyptus leaves is an easy and fun way to incorporate this symbolism into your projects.
You can vary the leaves by using a variety of yarn colors and sizes to suit your preferences, and you get five different crochet designs of the leaf.
Eucalyptus leaves are ideal when creating beautiful wreaths and garlands hung on walls or used as table centerpieces. When added to bouquets, they can provide a unique touch of greenery that adds texture and depth to the arrangement.
Crocheted eucalyptus leaves can add a touch of natural beauty and symbolism to any crafting project or bouquet, whether used alone or in combination with other natural elements.
Abbreviations
- sc – single crochet
- hdc – half double crochet
- ss – slip stitch
- ch – chain
a. Eucalyptus Leaf # 1 (Make 2)
R1: Make a magic ring, ch2, sc2 in the ring, ss pull the yarn and close the loop, leave long tail for sewing
Eucalyptus leaf#1 finished. Now continue to finish another one. Totally need two.
b. Eucalyptus Leaf # 2 (Make 2)
R1: Make a magic ring, ch2, sc6 in the ring, ss pull the yarn and close the loop, ss
R2: ch1, add wire, sc6 in next 6 stitch , ss, Cut and leave long tail
Eucalyptus leaf#2 finished. Now continue to finish another one. Totally need two.

c. Eucalyptus Leaf # 3 (Make 4)
R1: Make a magic ring, ch2, sc7 in the ring, ss pull the yarn and close the loop, ss
R2: ch1, add wire, sc7 in next 7 sts, ss, Cut and leave long tail

Eucalyptus leaf#3 finished. Now continue to finish another three. Totally need four.

d. Eucalyptus Leaf # 4 (Make 2)
R1: Make a magic ring, ch2, sc7 in the ring, ss pull the yarn and close the loop, ss
R2: ch1, add wire, in the next st (sc, hdc), *hdc2 in next st* x 2, in the next st (hdc, dc, hdc), *hdc2 in next st* x 2, in the next st (hdc, sc), ss, Cut and leave a long tail

Eucalyptus leaf#4 finished. Now continue to finish another one. Totally need two.

e. Eucalyptus Leaf # 5 (Make 2)
R1: Make a magic ring, ch2, sc8 in the ring, ss pull the yarn and close the loop, ss
R2: ch1, add wire, in the next st (sc, hdc), *dc3 in same st* x 3, ch2,*dc3 in same st* x 3, in the next st (hdc, sc), ss, Cut and leave a long tail

Eucalyptus leaf#5 finished. Now continue to finish another one. Totally need two.

Joining the Eucalyptus
Using the wire from leaf #1, wrap the leaves around using double-strand yarn, staggering them as you go along (see photo for reference)

Now we are finished.

More Crochet Patterns
If you’ve enjoyed these crochet leaves pattern, you may be interested in other free patterns:
- How to Crochet Glass Rose-Free Pattern
- Easy Crochet Tulip Pattern for Beginner
- Classic Crochet Sunflower for Beginners-Free Pattern
What’s Next?
Pin this post: Save this tutorial to your Pinterest boards so that you can come back to it later.
Leave a comment: We love to hear your feedback. Tell me in the comments below!
Share on Instagram or Facebook or Youtube: When you make this project, share it on social media and tag me @hookok. We love to see what you make!


Wonderful!! So we’ll explained
Amazing patterns
Thank you! Beautiful leaves and very clear tutorial
Thank you!
Love your patterns! For some reason the images of these guides are not showing up anymore 🙁
i encourage you to please look over the instructions before publishing. it is clearly at least mainly written by AI, and many of the steps are incomplete or written incorrectly. for the eucalyptus leaves (the pattern im using), i have had to use separate techniques from what is written on every leaf, even though it is essentially the same thing.
overall the patterns are good, but please put more effort into transcribing them. i should not have to use external resources to complete these projects.
I began to crochet the begonia leaf, not fully understanding about the ‘paid promotion’. Looking to find the full pattern, I can only see a Book of Leaves. Is there an individual pattern for the begonia leaf please?