
As Halloween nears, we’re excited to share a simple and fun project for all crochet enthusiasts. This devilish pumpkin free pattern is perfect for adding a spooky touch to your decorations. Let’s get crafting!

This Crochet Halloween Devil Pumpkin is one of our Halloween collections. We also have other patterns. Check for extra inspiration.
- Crochet Halloween Bat
- Crochet Halloween Pumpkin
- Crochet Halloween Ghosts
- Crochet Halloween Mini Ghost
Color Variations
- Color variations are available to match personal preferences or project requirements. Crochet Devil Pumpkin can be a great Halloween gift idea for friends, kids, and more.
- The exquisite appearance of the crochet Halloween Devil Pumpkin exudes its unique charm. You can experiment with different yarn colors and textures to create multiple variations of this beautiful design.
- In addition, we also provide 86 colors of cotton yarn for you to choose from. What are you waiting for, crocheters? Grab your hooks, select your favorite yarn, and let’s begin this amazing crochet adventure together.

Starter Kits
We have made you beginner-friendly crochet Halloween bouquet kit which included everything needed for homemade Halloween bouquet. The Ghosts are Made of fluorescent yarns, they can glow green light in the dark. And we provide free patterns and video tutorials for you to follow.

Materials for Crochet Halloween Devil Pumpkin
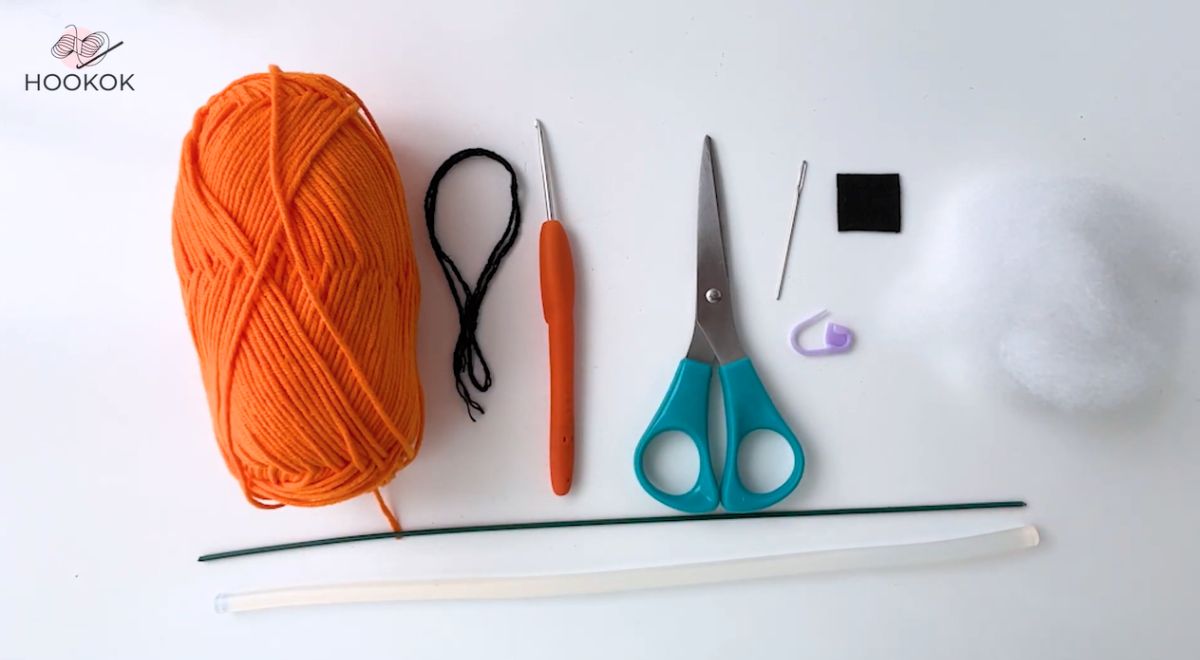
- Yarn – orange yarn, black yarn
- Hook – 2.0 mm
- Scissors
- Stitch marker
- Darning needle
- Non-woven fabric
- Stuffing cotton
- Flower rod
- Hot melt glue
Stitches and Abbreviation
- sc: Single crochet.
- 2 sc in next st: Increase
- Sc2tog: Single Crochet 2 Together
- R1, R2, R3, … R23 – Round 1, Round 2 Round 3 …
Special Stitches
- Single Crochet 2 Together (sc2tog): A decrease stitch used to reduce the number of stitches in a round. It involves working two single crochets together.
Pattern Notes
- Our pattern is written in US crochet terms.
- Follow the pattern carefully to avoid mistakes.
- Take note of the specific stitch counts and techniques.
- Use stitch markers to mark the beginning of each round.
- Additional notes are written in Italics.
Step-by-Step Crochet Halloween Devil Pumpkin Free Pattern
(Note: ss and ch do not count as stitch count)
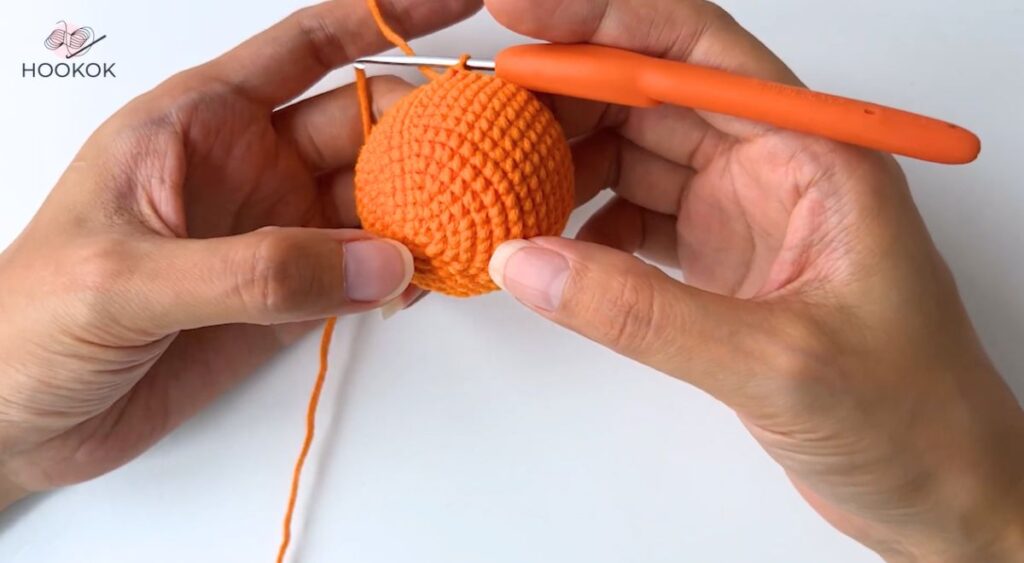
- Start with a magic ring.
- R1: Work 6 sc in the round, 1 ss, 1 ch. [6]
- R2: Make (2 sc in next st) * 6 times, 1 ss, 1 ch. [12]
- R3: Make (1 sc, 2 sc in next st) * 6 times, 1 ss, 1 ch. [18]
- R4: Make (2 sc, 2 sc in next st) *6 times, 1 ss, 1 ch. [24]
- R5: Make (3 sc, 2 sc in next st) *6 times, 1 ss, 1 ch. [30]
- R6: Make (4 sc, 2 sc in next st) *6 times, 1 ss, 1 ch. [36]
- R7: Make (5 sc, 2 sc in next st) *6 times, 1 ss, 1 ch. [42]
- R8-14: Work 42 sc in each round, 1 ss, 1 ch. [42]
- R15: Make (5 sc, sc2tog) *6 times, 1 ss, 1 ch. [36]
- R16: Make (2 sc, sc2tog, 2 sc) *6 times, 1 ss, 1 ch. [30]
- R17: Make (3 sc, sc2tog) *6 times, 1 ss, 1 ch. [24]
- R18: Make Make (1 sc, sc2tog, 1 sc) *6 times. 1 ss, 1 ch. [18]
- R19: Make (1 sc, sc2tog) *6 times. 1 ss, 1 ch. [12]
- R20: Make (sc2tog) *6 times. [6] Cut off and leave long tail. Then weave the end, wrap the tail around the wire.

(See the video for a more detailed Free Pattern of the crocheted Halloween Devil Pumpkin)
How to Assemble Crochet Halloween Devil Pumpkin
- Step 1: Crocheting the Pumpkin: As you crochet the Halloween Devil Pumpkin, pause and insert the flower rod. Also, add fiberfill to give it shape. Continue with your crocheting until the pumpkin is complete.
- Step 2: Finishing Touches: Once done, weave in any loose ends. To add more detail, wrap the flower rod with orange yarn. Secure the yarn’s end using hot melt adhesive to ensure it stays in place.
- Step 3: Creating the Face: Using non-woven fabric, cut out shapes for the eyes and nose of the Devil Pumpkin. Attach them to the pumpkin using hot melt adhesive.

- Step 4: Adding the Mouth: Use black yarn to embroider a mouth onto the pumpkin, giving it its devilish grin.

(See the video for a more detailed Free Pattern of the crocheted Halloween Devil Pumpkin)
Afterthoughts and Wrap Up
In conclusion, our “Crochet Halloween Devil Pumpkin Free Pattern” offers a delightful way to embrace the Halloween spirit. It’s easy, enjoyable, and perfect for those wanting to add a handcrafted touch to their festive decorations. Grab your crochet hooks and give it a go!
If you like our pattern, please give us a 5 star. We love your feedback.

Crochet Halloween Devil Pumpkin – Free Pattern
Equipment
- hook 2.0 mm
- scissors
- stitch marker
- Darning needle
Ingredients
- Yarn orange yarn, black yarn
- Non-woven fabric
- Stuffing cotton
- Flower rod
- Hot melt glue
Instructions
Devil:
- Start with a magic ring.
- R1: Work 6 sc in the round, 1 ss, 1 ch. [6]
- R2: Make (2 sc in next st) * 6 times, 1 ss, 1 ch. [12]
- R3: Make (1 sc, 2 sc in next st) * 6 times, 1 ss, 1 ch. [18]
- R4: Make (2 sc, 2 sc in next st) *6 times, 1 ss, 1 ch. [24]
- R5: Make (3 sc, 2 sc in next st) *6 times, 1 ss, 1 ch. [30]
- R6: Make (4 sc, 2 sc in next st) *6 times, 1 ss, 1 ch. [36]
- R7: Make (5 sc, 2 sc in next st) *6 times, 1 ss, 1 ch. [42]
- R8-14: Work 42 sc in each round, 1 ss, 1 ch. [42]
- R15: Make (5 sc, sc2tog) *6 times, 1 ss, 1 ch. [36]
- R16: Make (2 sc, sc2tog, 2 sc) *6 times, 1 ss, 1 ch. [30]
- R17: Make (3 sc, sc2tog) *6 times, 1 ss, 1 ch. [24]
- R18: Make Make (1 sc, sc2tog, 1 sc) *6 times. 1 ss, 1 ch. [18]
- R19: Make (1 sc, sc2tog) *6 times. 1 ss, 1 ch. [12]
- R20: Make (sc2tog) *6 times. [6] Cut off and leave long tail. Then weave the end, wrap the tail around the wire.
Assemble:
- Step 1: Crocheting the Pumpkin: As you crochet the Halloween Devil Pumpkin, pause and insert the flower rod. Also, add fiberfill to give it shape. Continue with your crocheting until the pumpkin is complete.
- Step 2: Finishing Touches: Once done, weave in any loose ends. To add more detail, wrap the flower rod with orange yarn. Secure the yarn’s end using hot melt adhesive to ensure it stays in place.
- Step 3: Creating the Face: Using non-woven fabric, cut out shapes for the eyes and nose of the Devil Pumpkin. Attach them to the pumpkin using hot melt adhesive.
Video
Notes
- Our pattern is written in US crochet terms.
- Follow the pattern carefully to avoid mistakes.
- Take note of the specific stitch counts and techniques.
- Use stitch markers to mark the beginning of each round.
- Additional notes are written in Italics.
What’s Next?
Pin this post: Save this tutorial to your Pinterest boards so that you can come back to it later.
Leave a comment: We love to hear your feedback. Tell me in the comments below!
Share on Instagram or Facebook or Youtube: When you make this project, share it on social media and tag me @hookokcrochet. We love to see what you make!


