
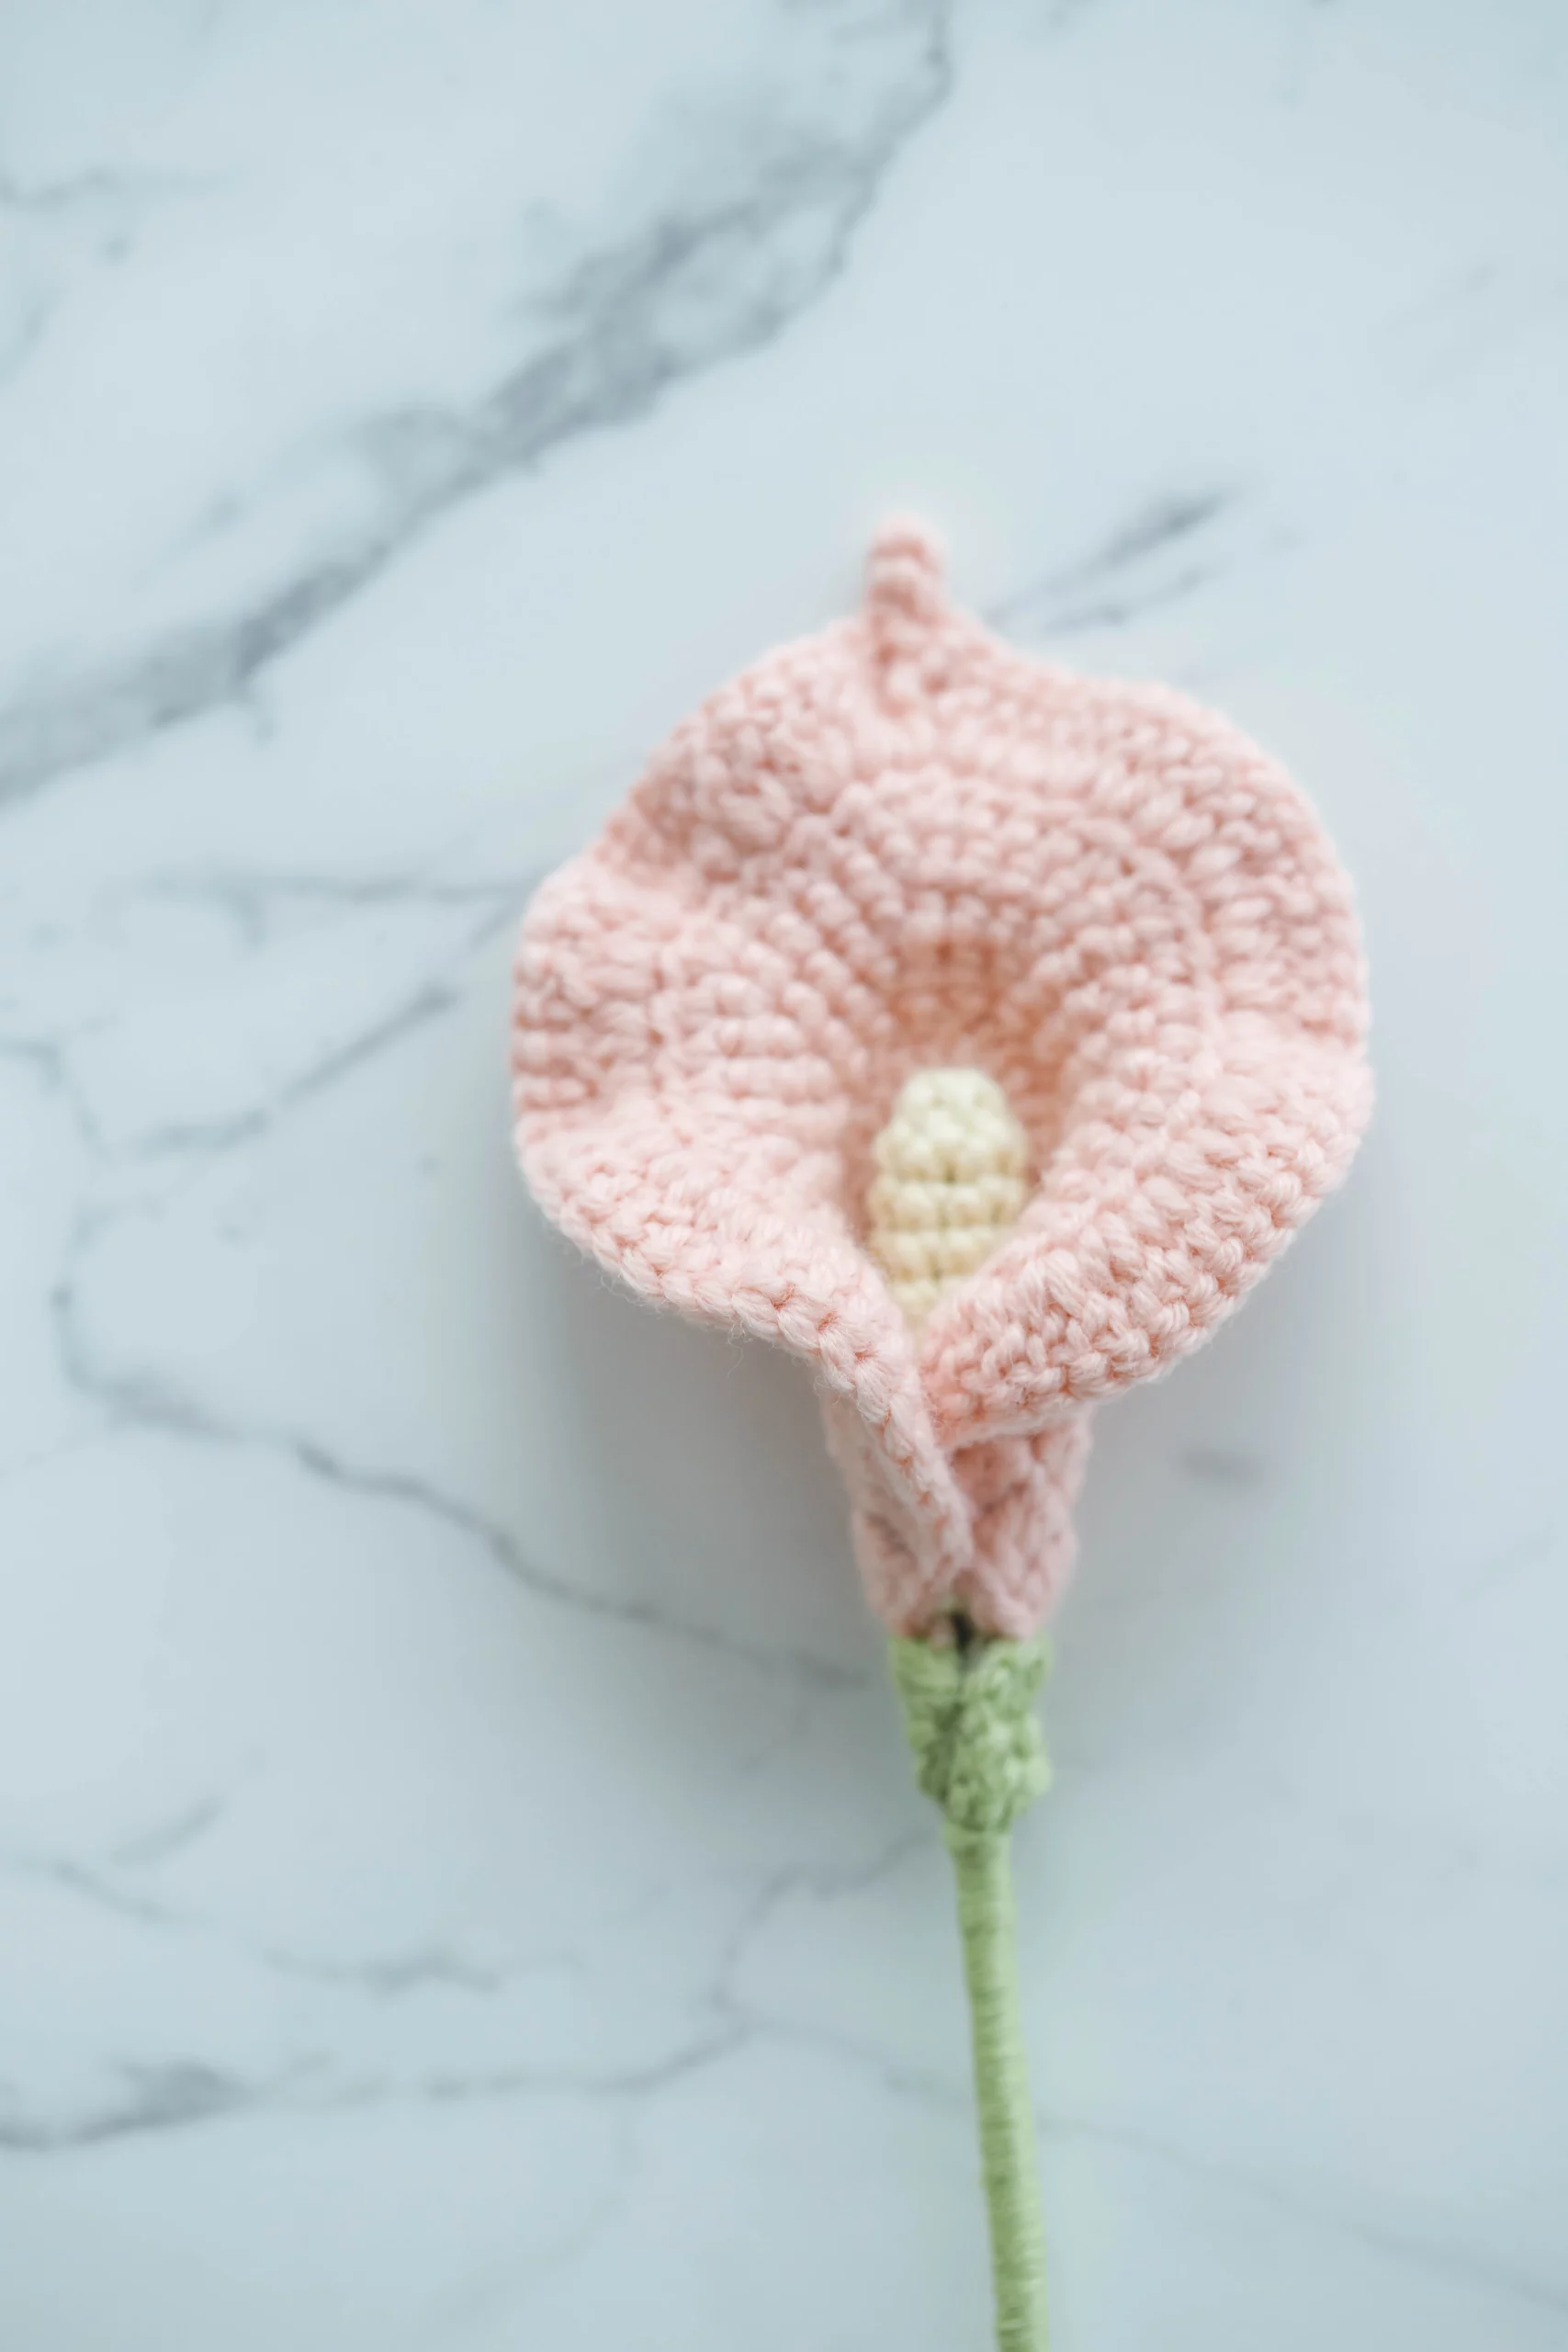
Calla Lily can be a great access flower for any of the flower bouquet. In today’s tutorial, we share a calla lily pattern that is super easy for beginners. The crochet calla lily has a lovely flower stamen and a one time finished flower petal.
This calla lily flower can match well with lots of other crochet flowers. Check the free patterns for more ideas and inspirations.
Video
Note: Video subtitles need to be turned on by yourself in the settings
Materials
- Yarn – yarn of three colors, pink, white and green
- Hook- 2 mm or 2.5 mm
- Flower Rod-16 inches long x 0.08 inches diameter (40cm x 2mm)
- Scissors
- Stitch marker
- Hot melt adhesive
Difficulty
The pattern is very beginner friendly, it only needs you to master 2 basic stitches and you’re good to crochet these elegant lilies.
Stitches
- ch – chain
- st(s) – stitch(es)
- sc – single crochet
- inc – increase (2 stitches in same st)
- hdc – half double crochet
- dc – double crochet
- tr – treble crochet
- ss – slip stitch
- sk – skip
Note
- The pattern is written is US terms.
- We worked in rounds for flower and stamen parts and in rows for sepal.
How to crochet calla Lily Flower
- Start working in magic ring.
- R1: work 10 sc in magic ring. 1 ss in 1st st. [10]
- R2: 3ch, (don’t count as st), (dc inc)*10 times. Ss in 1st dc. [20]
- R3: 1ch, (3 sc, sc inc)*2 times, (sc, sc inc)*2 times, (3 sc, sc inc)*2 times. Ss in 1st sc. [26]
- R4: 1ch, (4 sc, sc inc)*2 times, (2 sc, sc inc)*2 times, (4 sc, sc inc)*2 times. Ss in 1st sc. [32]
- R5: 1ch, 5 sc, 1 sc inc, (2 sc, sc inc)*2 times, (3 sc, sc inc)*2 times, (2 sc, sc inc)*2 times, 5 sc, 1 sc inc. Ss in 1st st. [40]
- R6: 2ch, 6hdc, hdc inc, (3 hdc, hdc inc)*2 times, (4 hdc, hdc inc)*2 times, (3 hdc, hdc inc)*2 times, 7 hdc. Ss in 1st hdc. [47]
- R7: 3ch, 7 dc, (dc inc)*16 times, (in the same stitch: 1 tr, 4 ch, from the 2nd st of the hook make 3 ss, 1 tr), (dc inc)*16 times, 7 dc. 1 ss in 1st dc. [80]
How to crochet calla Lily Sepal
- insert hook into the right 2nd st of the last ss st of flower, (in same stitch, work 2 ch, 2 hdc ), hdc in the ss st, 2 hdc, ch2, turn, sk 1 stitch, 4 hdc, ch1. cut long tail.
Flower stamen
- Let’s start with a magic ring.
- R1-10: 6 sc in each round, 1 ss and 1 ch. cut off and leave a long tail.
How to assemble calla lily with a long stem

- First we need to shape the flower stem. Mark almost 1 inch of the stem and fold it with the help of pliers or hands.
- Cover the double part of the stem with the flower stamen.
- Put this piece in the flower, keep the edge of flower lower than stamen.
- Fold the flower properly around the stamen. Once you’re satisfied with the settings, use hot adhesive to fix all the parts.
- After finishing the flower part, take a long piece of light green yarn. Wrap the complete stem carefully.
Notes: Weave in all ends. And check if any finishing is required.
Make more flowers in different colours to complete your bouquet. Play with different yarns and make your own versions.

Crochet Calla Lily
Equipment
- hook 2 mm or 2.5 mm
- scissors
- stitch marker
Ingredients
- Yarn yarn of three colors, pink, white and green
- Flower rod 16 inches long x 0.08 inches diameter (40cm x 2mm)
- Hot melt adhesive
Instructions
Flower
- Start working in magic ring.R1: work 10 sc in magic ring. ss in 1st st.R2: 3ch, (don’t count as st), (dc inc)*10 times. Ss in 1st dc.R3: 1ch, (3 sc, sc inc)*2 times, (sc, sc inc)*2 times, (3 sc, sc inc)*2 times. Ss in 1st sc.R4: 1ch, (4 sc, sc inc)*2 times, (2 sc, sc inc)*2 times, (4 sc, sc inc)*2 times. Ss in 1st sc.R5: 1ch, 5 sc, 1 sc inc, (2 sc, sc inc)*2 times, (3 sc, sc inc)*2 times, (2 sc, sc inc)*2 times, 5 sc, 1 sc inc. Ss in 1st st.R6: 2ch, 6hdc, hdc inc, (3 hdc, hdc inc)*2 times, (4 hdc, hdc inc)*2 times, (3 hdc, hdc inc)*2 times, 7 hdc. Ss in 1st hdc.R7: 3ch, 7 dc, (dc inc)*16 times, ( in the same stitch, 1 tr, 4 ch, make 3 ss into the 2nd st from the hook, 1 tr), (dc inc)*16 times, 7 dc. Ss in 1st dc.
Flower Sepal
- Insert hook into the right 2nd st of the last ss st of flower, (in same stitch, work 2 ch, 2 hdc ), hdc in the ss st, 2 hdc, ch2, turn, sk 1 stitch, 4 hdc, ch1. cut long tail.
Flower stamen
- Let’s start with a magic ring.R1-10: 6 sc in each round, 1 ss and 1 ch. cut off and leave a long tail.
Assemble
- 1st we need to shape the flower stem. Mark almost 1 inch of the stem and fold it with the help of pliers or hands. Cover the double part of the stem with the flower stamen. Put this piece in the flower, keep the edge of flower lower than stamen. Fold the flower properly around the stamen. Once you’re satisfied with the settings, use hot adhesive to fix all the parts. After finishing the flower part, take a long piece of light green yarn. Wrap the complete stem carefully.
Notes
- The pattern is written is US terms.
- Weave in all ends. And check if any finishing is required.
What’s Next?
Pin this post: Save this tutorial to your Pinterest boards so that you can come back to it later.
Leave a comment: We love to hear your feedback. Tell me in the comments below!
Share on Instagram or Facebook or Youtube: When you make this project, share it on social media and tag me @hookokcrochet. We love to see what you make!


Me gustaría saber cuanstos puntos quedan en cada vuelta, pues sino se hace complicado tejer
We have improve the pattern and add the total stitch number in the end of each row.
That was so amazing! Thank you for sharing your talent and gift for crocheting.
Love it and easy to follow the instruction. As beginner,its easy to follow especially with pictures of the product. Will crochet more petals . Finished one petal.
I made a lot of flowers from yours other patterns and I must say, that it was VERY frustrating. It’s nice to see a pattern that makes use of actual abbreviations (such as Inc) and written correct in general. Love your patterns, the flowers are looking really good, but when you write for example two SC in EACH stich, it doesn’t make any sense. It should be two SC in THE SAME stich at last, or better yet, Inc.
Still, thanks for your work and sharing these amazing patterns 😀
I noticed that the written pattern doesn’t mention that the “foundation stitches” for the flower stamen is meant to be a MAGIC RING, and not just six chains! I only figured this out by watching the video, and this inconsistency and some of the wording choices made this pattern a bit frustrating to follow.
It’s otherwise quite well written though! Thank you for making so many patterns available to us!
Amazing patterns
Hej
Hvorfor står der ikke noget om db stangmasker i opskrift som det fremgår af video ?
Vh Kirsten
In the flower part, row five, it says: 1sc inc. do i just single crochet or increase? Or both?
Because i increased, and i got 42 instead of 40