
This crochet rose is a 3D rose pattern. It is assembled with rose petals, leaves and a long stem. With the stem, you can use this crochet rose for a lovely rose bouquet.
Any popular color can be used to make this crochet rose. Our favorite is red, white, pink and yellow. So grab your hook and start crocheting today.
This crochet 3D rose is one of our rose collections. We also have other patterns, not only other styles of roses, but also tulips, gerberas, daisies, and so on. Check patterns list for extra inspiration.

Rose Meaning
- The crochet rose is a symbolic representation of beauty, love, and rarity. It is often associated with something delicate, precious, and unique. As a gift, a glass rose is a thoughtful and meaningful gesture conveying admiration, affection, and appreciation.
- In some cultures, the crochet rose is also a sign of hope and strength because it represents the ability to stay strong and get through hard times. The fragile nature of the glass rose is a lesson that even the smallest and most fragile things can be strong and resilient when they have to be.

Rose Gifting Idea
- The glass rose is a beautiful and meaningful gift conveying various emotions and sentiments. It is a timeless sign of love, beauty, and hope that anyone who gets it will surely treasure. This pattern will let you make a lovely rose flower, perfect as a home accent or a meaningful present for a friend or loved one.
- Crochet glass roses are perfect for various occasions, such as weddings, birthdays, or Valentine’s Day. They make a great gift for someone special, a loved one, or even as a unique way to show appreciation to a colleague or friend.
- You can customize them to match any color scheme or personal taste, making them a truly personal and thoughtful gift.


Starter Kits
We have made you a beautiful crochet rose starter kit which included everything needed for homemade rose. We mix a purple and light purple so you can make the rose bouquet more real. With this package, you can make a rose bouquet contains 3 roses.

Yarns for crochet beginners:
We provide 86 colors of cotton yarn for you to choose from. With this yarn, you can make anything such as crochet flowers, blankets, scarves, amigurumi, and so on. What are you waiting for, crocheters? Grab your hooks, select your favorite yarn, and let’s begin this amazing crochet adventure together.

Materials for crochet rose
- Yarn- yarn of two colors, light purple and green
- Hook – 2/2.5 mm
- Flower Rod – 40cm long x 2mm diameter (16 x .87 inches)
- Iron wire – 15 cm long x 0.4mm diameter ( 6 x 0.02 inches)
- Hot melt adhesive
- Double-sided tape
- Stitch markers
- Scissors
Notes
To add the wire, insert your hook under the wire and crochet over it.
Abbreviations
- sc – single crochet
- hdc – half double crochet
- dc – double crochet
- tr – treble stitch
- ss – slip stitch
- ch – chain
- st – stitch
3D Rose Pattern
Big Rose Petals*3:
- Make a magic ring
- R1: 6sc into the magic ring, 1 ss, 1 ch.[6]
- R2: (2sc in next st)*6 times, 1 ss, 1 ch.[12]
- R3: (1 sc, 2sc in the next st)*6 times, 1 ss, 1 ch.[18]
- R4: (1 sc, 2sc in the next st, 1 sc)*6 times, 1 ss, 1 ch.[24]
- R5: (3 sc, 2sc in next st)*6 times .1 ss, 1 ch.[30]
- R6: (2 sc, 2sc in next st, 2 sc)*6 times.1 ss, 1 ch.[36]


- R7: sc10, 2sc in next st; (4 sc, 2sc in next st)*3 times; 10 sc. 1 ss, 1 ch.[40]
- R8: sc10, 2sc in next st; (sc5, 2sc in next st)*3 times;11 sc. 1 ss, 1 ch.[44]
- R9: sc11, 2 sc in next st, (sc6, 2sc in next st)*3 times, 11sc, 1 ss, 1 ch. [48]
- R10: sc11, 2 sc in next st, (3sc, sc2 in next st)*6 times, 12 sc,1 ss, 1 ch.[55]
- R11: sc12, 2sc in next st, sc4; (in the same st: 1 sc, 1 ch, 1 sc); sc4, 2sc in next st, sc4, (in the same st 1sc,2ch, 1sc); sc4, 2sc in next st,sc4; (in the same st 1sc, 1ch, 1sc); sc4, 2sc in next st, sc12. 1ss.
Finished big petal, we are going to make another two petals. Totally need three.

Medium Rose Petals*3:
- Make a magic ring
- R1: 6sc into the magic ring, 1 ss, 1 ch.[6]
- R2: (2sc in next st)*6 times, 1 ss, 1 ch.[12]
- R3: (1 sc, 2sc in the next st)*6 times, 1 ss, 1 ch.[18]
- R4: (1 sc, 2sc in the next st, 1 sc)*6 times, 1 ss, 1 ch.[24]
- R5: (3 sc, 2sc in next st)*6 times .1 ss, 1 ch.[30]
- R6: (2 sc, 2sc in next st, 2 sc)*6 times.1 ss, 1 ch.[36]
- R7: sc10, 2sc in next st; (4 sc, 2sc in next st)*3 times; 10 sc. 1 ss, 1 ch.[40]
- R8: sc10, 2sc in next st; (sc5, 2sc in next st)*3 times;11 sc. 1 ss, 1 ch.[44]
- R9: sc11, 2 sc in next st, (sc6, 2sc in next st)*3 times, 11sc, 1 ss, 1 ch. [48]
- R10: sc11, 2 sc in next st,3 sc; (in the same st: 1sc, 1ch, 1sc); sc3, 2sc in next st, sc3; (in the same st: 1sc,2ch, 1sc); sc3, 2sc in next st, sc3; (in the same st 1sc, 1ch, 1sc); sc3, 2sc in next st, sc12 . 1ss, cut and leave a tail.
Finished medium petal, we are going to make another two petals. Totally need three.
Small Rose Petals*3:
- Make a magic ring
- R1: 6sc into the magic ring, 1 ss, 1 ch.[6]
- R2: (2sc in next st)*6 times, 1 ss, 1 ch.[12]
- R3: (1 sc, 2sc in the next st)*6 times, 1 ss, 1 ch.[18]
- R4: (1 sc, 2sc in the next st, 1 sc)*6 times, 1 ss, 1 ch.[24]
- R5: (3 sc, 2sc in next st)*6 times .1 ss, 1 ch.[30]
- R6: (2 sc, 2sc in next st, 2 sc)*6 times.1 ss, 1 ch.[36]
- R7: sc10, 2sc in next st; (4 sc, 2sc in next st)*3 times; 10 sc. 1 ss, 1 ch.[40]
- R8: sc10, 2sc in next st; (sc5, 2sc in next st)*3 times;11 sc. 1 ss, 1 ch.[44]
- R9: sc11, 2 sc in next st, (sc6, 2sc in next st)*3 times, 11sc, 1 ss, 1 ch. [48]
Small petal finished. Now we continue to finish another two petals. Totally need three.
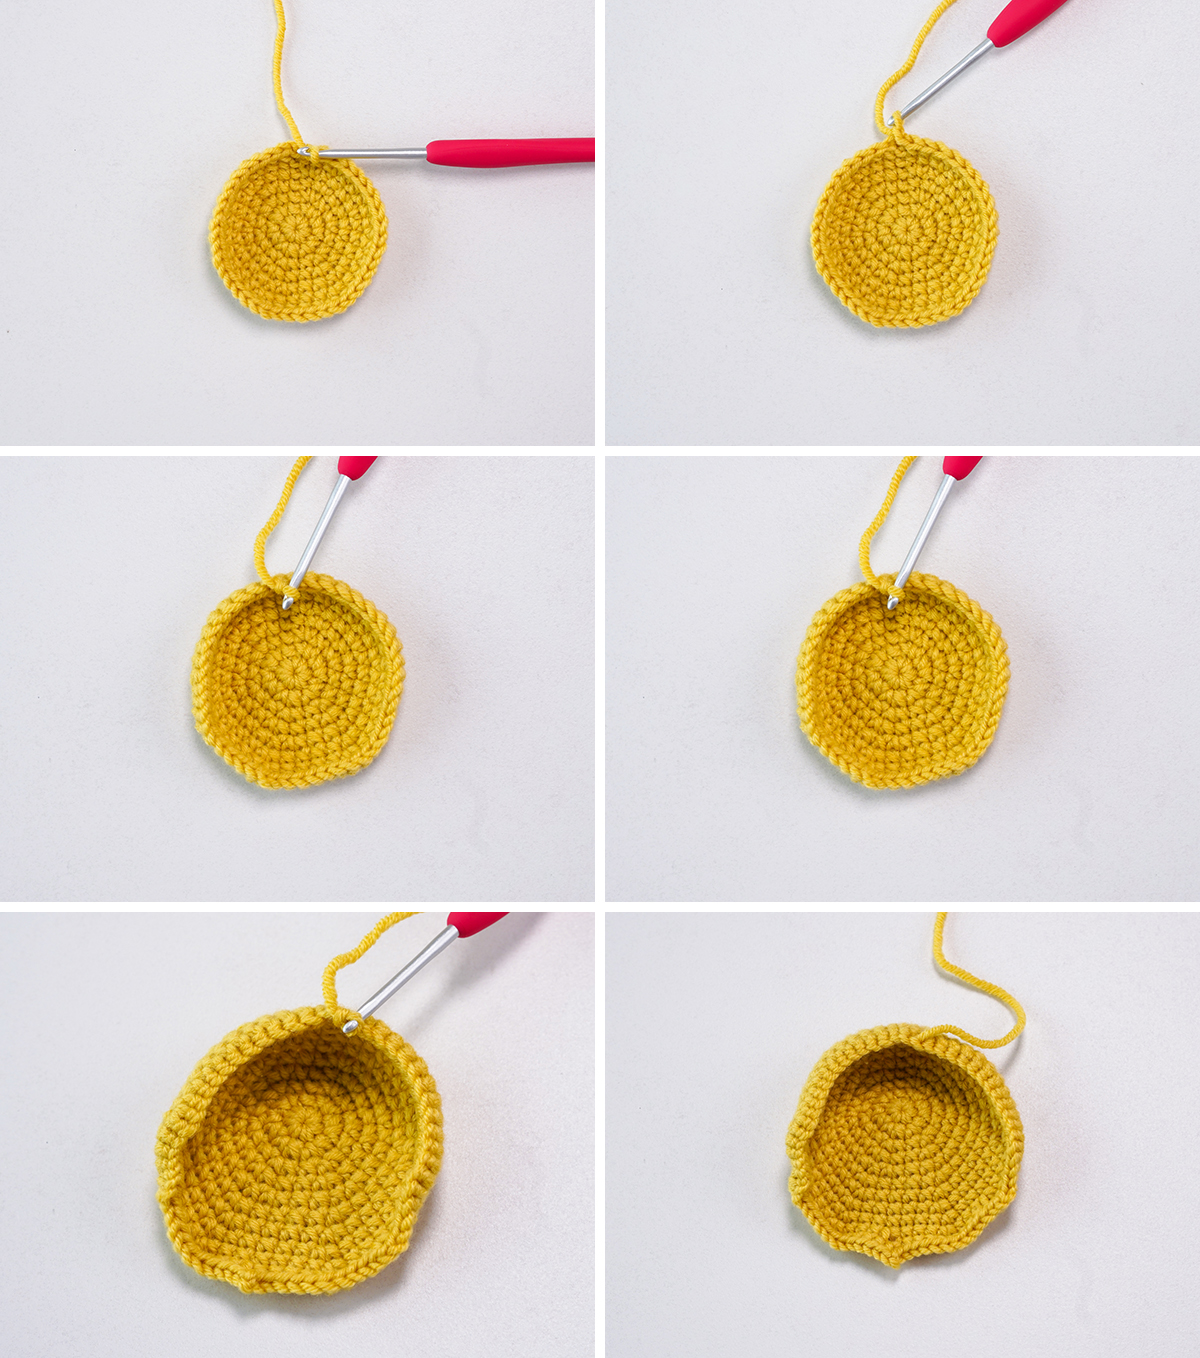
Rose Sepal:
- Start with a magic ring.
- R1: sc6 in magic ring.1 ss,1ch.[6]
- R2: (2sc in next st)*6 times, 1 ss,1ch.[12]
- R3: (1sc, 2sc in next st)*6 times, 1 ss,1ch.[18]
- R4: work sc18 in the round, 1 ss.[18]

- R5: (ch13, start the 2nd st from hook: 1ss, sc2, hdc2, dc3, tr4, sk 2 sts, 1 ss in the 4th sts)*6 times
Sepal finished.

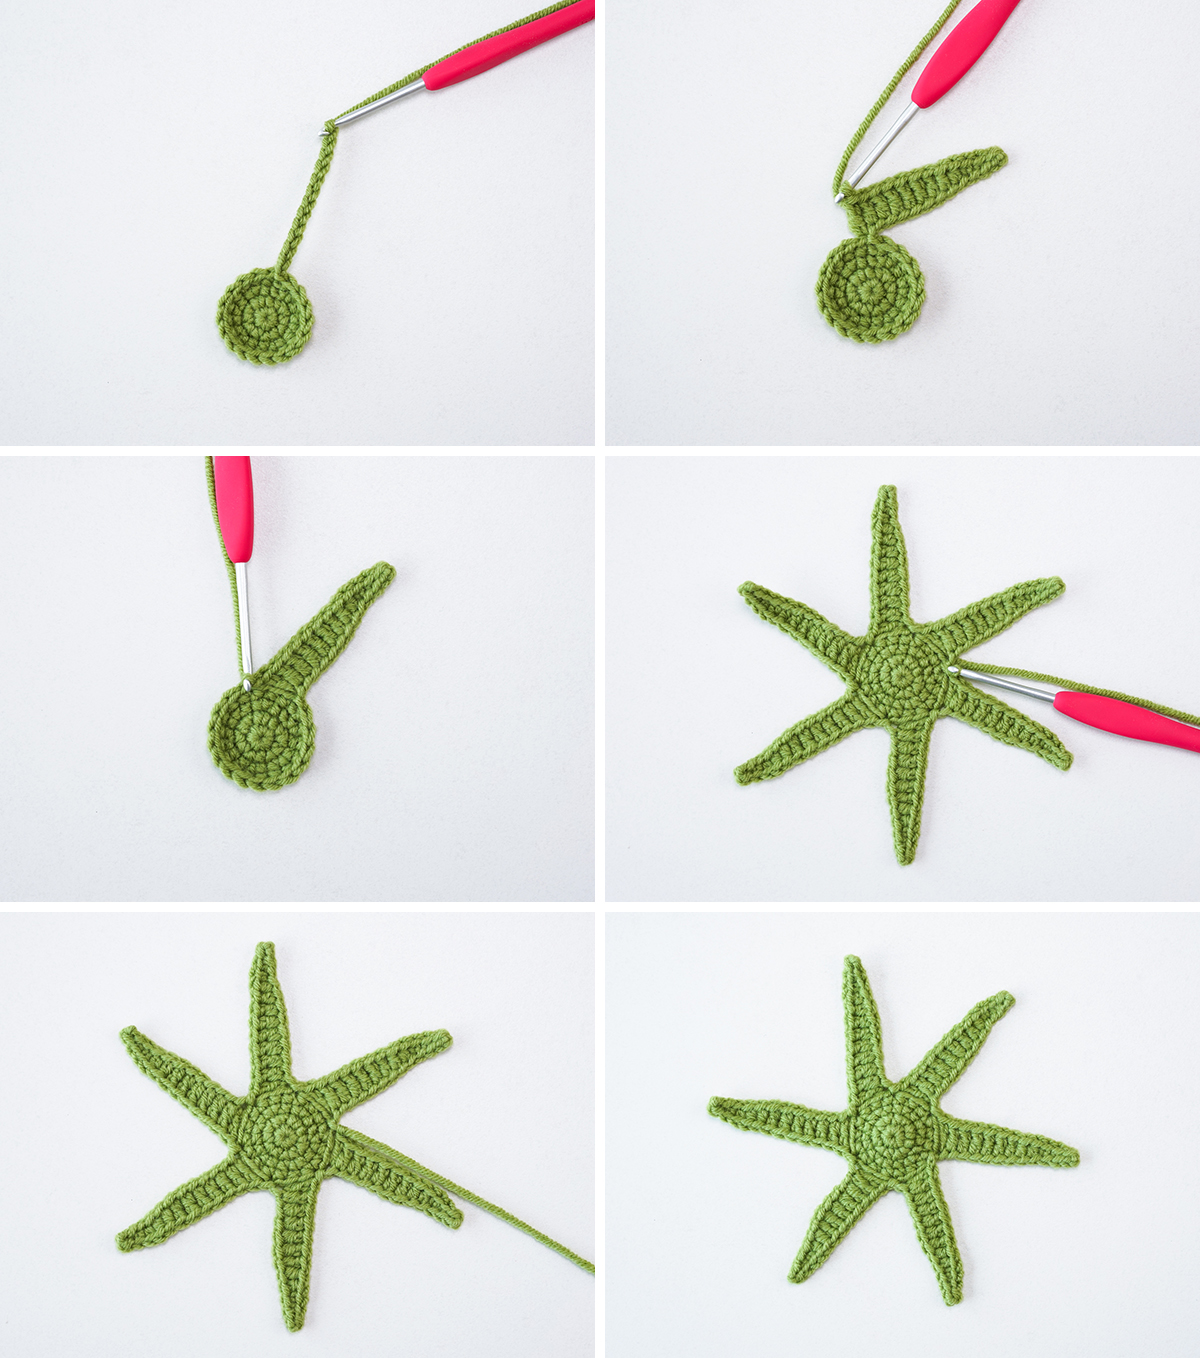
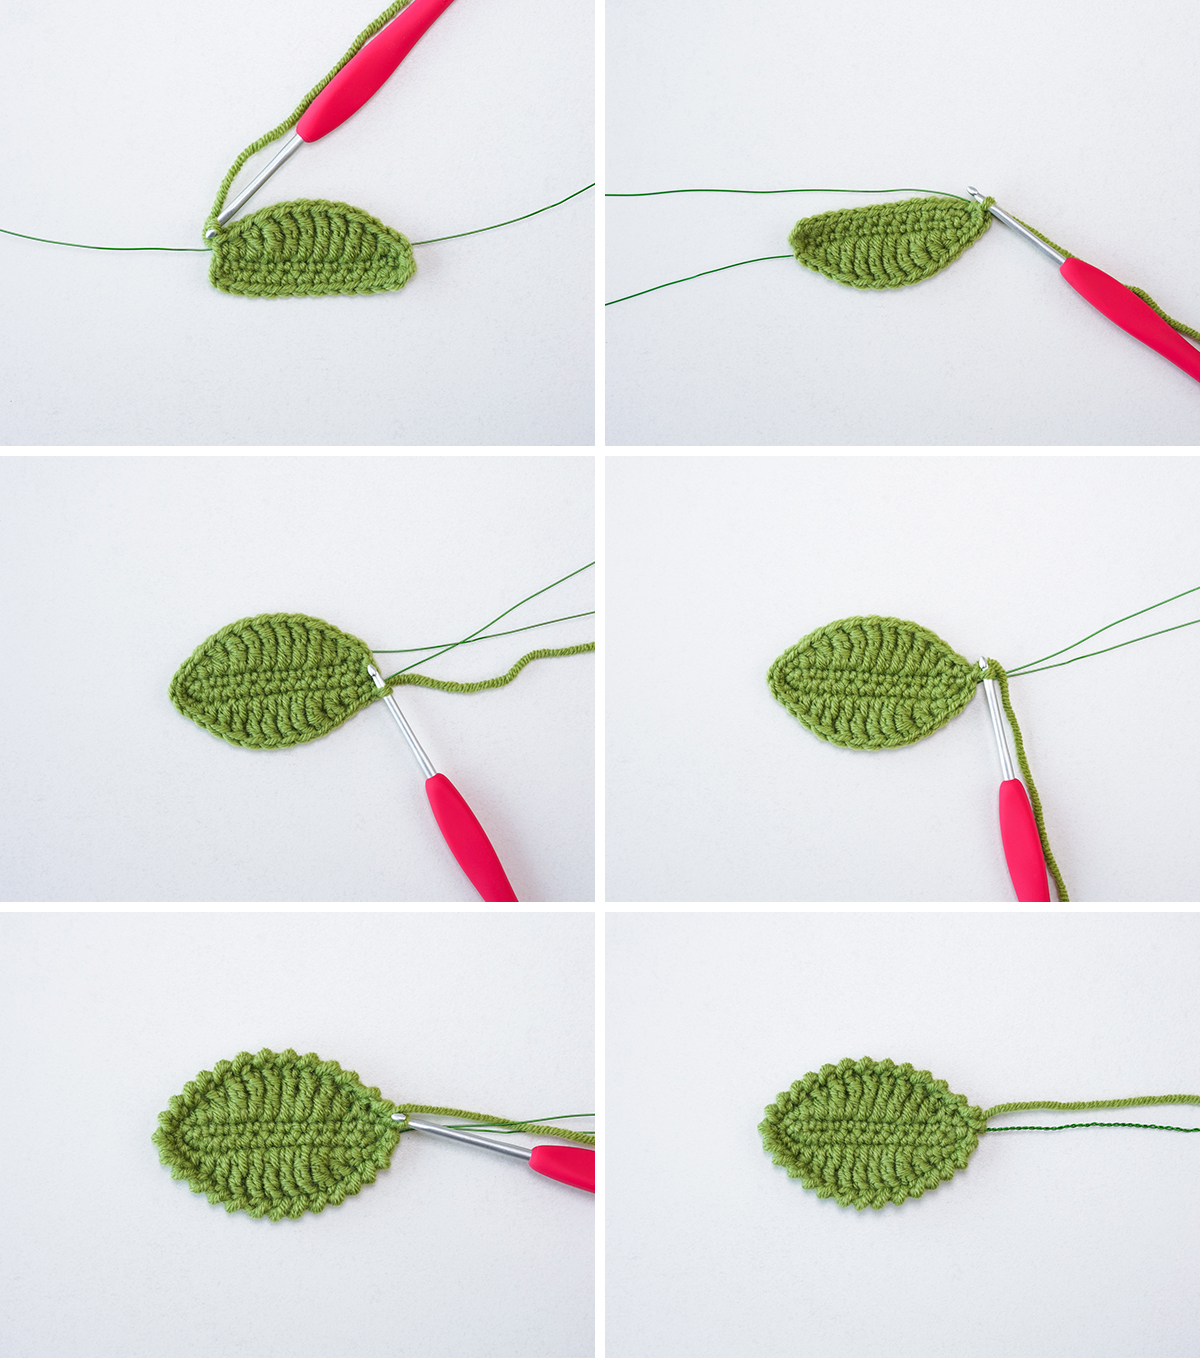
Rose Leaves*3:
- Let’s start with foundation chain: Ch13
- R1: sc in 2nd st from hook, sc10, 3 sc in last chain,(working on the other side of ch) sc10, sc2 in next st ,ss, ch1

- R2: add wire, sc,hdc, dc, tr6, dc,hdc, sc, 3sc in last ch (working on the other side of ch) sc,hdc, dc, tr6, dc,hdc, sc2, ss,1ch.
- R3: from the last st of hook, sc in all the sts, 1 ss, cut and leave tail for wrap
How to assemble the crochet rose

Now let’s assemble all the part for our crochet 3D rose together. We will assemble the rose leaf before joining it with the rose flower.
Assembling rose leaves
- wrap the tail around the iron wire and tie.
- continue to finish another two. Totally need three.
- wrap 3 leaves together around iron wire with yarn.
Assembling the rose flower and leaf
- Insert the stem into the middle of the small petals, bend the end of the stem.
- Apply hot melt adhesive to the petals, wrap the petals around the stem.
- Then add small petals, medium petals, and large petals in turn, and cut off the excess yarn tails.
- Insert the stem into the middle of the flower sepals, and apply hot melt adhesive to the sepals and secure to the flower.
- Take a green yarn to wrap the flower stem.
- Then add the leaf wrap, continue wrapping to the end, cut the long tail and secure it with hot melt adhesive.
Here we are, finished a lovely 3D crochet rose. You can try to twist it with different colors, even black ones.

Crochet Rose Pattern
Equipment
- hook 2/2.5 mm
- scissors
- stitch marker
Ingredients
- Yarn yarn of two colors, light purple and green
- Flower Rod 40cm long x 2mm diameter (16 x .87 inches)
- Iron wire 15 cm long x 0.4mm diameter ( 6 x 0.02 inches)
- Hot melt adhesive
- Double-sided tape
Instructions
Big Flower Petals (Make 3)
- Make a magic ring
- R1: 6sc into the magic ring, 1 ss, 1 ch.[6]
- R2: (2sc in next st)*6 times, 1 ss, 1 ch.[12]
- R3: (1 sc, 2sc in the next st)*6 times, 1 ss, 1 ch.[18]
- R4: (1 sc, 2sc in the next st, 1 sc)*6 times, 1 ss, 1 ch.[24]
- R5: (3 sc, 2sc in next st)*6 times .1 ss, 1 ch.[30]
- R6: (2 sc, 2sc in next st, 2 sc)*6 times.1 ss, 1 ch.[36]
- R7: sc10, 2sc in next st; (4 sc, 2sc in next st)*3 times; 10 sc. 1 ss, 1 ch.[40]
- R8: sc10, 2sc in next st; (sc5, 2sc in next st)*3 times;11 sc. 1 ss, 1 ch.[44]
- R9: sc11, 2 sc in next st, (sc6, 2sc in next st)*3 times, 11sc, 1 ss, 1 ch. [48]
- R10: sc11, 2 sc in next st, (3sc, sc2 in next st)*6 times, 12 sc,1 ss, 1 ch.[55]
- R11: sc12, 2sc in next st, sc4; (in the same st: 1 sc, 1 ch, 1 sc); sc4, 2sc in next st, sc4, (in the same st 1sc,2ch, 1sc); sc4, 2sc in next st,sc4; (in the same st 1sc, 1ch, 1sc); sc4, 2sc in next st, sc12. 1ss.
- Finished big petal, we are going to make another two petals. Totally need three.
Medium Flower Petals (Make 3)
- Make a magic ring
- R1: 6sc into the magic ring, 1 ss, 1 ch.[6]
- R2: (2sc in next st)*6 times, 1 ss, 1 ch.[12]
- R3: (1 sc, 2sc in the next st)*6 times, 1 ss, 1 ch.[18]
- R4: (1 sc, 2sc in the next st, 1 sc)*6 times, 1 ss, 1 ch.[24]
- R5: (3 sc, 2sc in next st)*6 times .1 ss, 1 ch.[30]
- R6: (2 sc, 2sc in next st, 2 sc)*6 times.1 ss, 1 ch.[36]
- R7: sc10, 2sc in next st; (4 sc, 2sc in next st)*3 times; 10 sc. 1 ss, 1 ch.[40]
- R8: sc10, 2sc in next st; (sc5, 2sc in next st)*3 times;11 sc. 1 ss, 1 ch.[44]
- R9: sc11, 2 sc in next st, (sc6, 2sc in next st)*3 times, 11sc, 1 ss, 1 ch. [48]
- R10: sc11, 2 sc in next st,3 sc; (in the same st: 1sc, 1ch, 1sc); sc3, 2sc in next st, sc3; (in the same st: 1sc,2ch, 1sc); sc3, 2sc in next st, sc3; (in the same st 1sc, 1ch, 1sc); sc3, 2sc in next st, sc12 . 1ss, cut and leave a tail.
- Finished medium petal, we are going to make another two petals. Totally need three.
Small Flower Petals (Make 3)
- Make a magic ring
- R1: 6sc into the magic ring, 1 ss, 1 ch.[6]
- R2: (2sc in next st)*6 times, 1 ss, 1 ch.[12]
- R3: (1 sc, 2sc in the next st)*6 times, 1 ss, 1 ch.[18]
- R4: (1 sc, 2sc in the next st, 1 sc)*6 times, 1 ss, 1 ch.[24]
- R5: (3 sc, 2sc in next st)*6 times .1 ss, 1 ch.[30]
- R6: (2 sc, 2sc in next st, 2 sc)*6 times.1 ss, 1 ch.[36]
- R7: sc10, 2sc in next st; (4 sc, 2sc in next st)*3 times; 10 sc. 1 ss, 1 ch.[40]
- R8: sc10, 2sc in next st; (sc5, 2sc in next st)*3 times;11 sc. 1 ss, 1 ch.[44]
- R9: sc11, 2 sc in next st, (sc6, 2sc in next st)*3 times, 11sc, 1 ss, 1 ch. [48]
- Small petal finished. Now continue to finish another two. Totally need three.
Flower Sepal
- Start with a magic ring.
- R1: sc6 in magic ring.1 ss,1ch.[6]
- R2: (2sc in next st)*6 times, 1 ss,1ch.[12]
- R3: (1sc, 2sc in next st)*6 times, 1 ss,1ch.[18]
- R4: work sc18 in the round, 1 ss.[18]
- R5: (ch13, start the 2nd st from hook: 1ss, sc2, hdc2, dc3, tr4, sk 2 sts, 1 ss in the 4th sts)*6 times
Leaves (Make 3)
- Let’s start with foundation chain: Ch13
- R1: sc in 2nd st from hook, sc10, 3 sc in last chain,(working on the other side of ch) sc10, sc2 in next st ,ss, ch1
- R2: add wire, sc,hdc, dc, tr6, dc,hdc, sc, 3sc in last ch (working on the other side of ch) sc,hdc, dc, tr6, dc,hdc, sc2, ss,1ch.
- R3: from the last st of hook, sc in all the sts, 1 ss, cut and leave tail for wrap
- Flower leaf finished. Now continue to finish another two. Totally need three.
Assemble
- Assembling the leaves: wrap the tail around the iron wire and tie. Then wrap 3 leaves together around the iron wire with yarn.
- Assembling the flower and leaf: Insert the stem into the middle of the small petals, and bend the end of the stem. Apply hot melt adhesive to the petals, and wrap the petals around the stem. Then add small, medium, and large petals in turn, and cut off the excess yarn tails.
- Insert the stem into the middle of the flower sepals, apply hot melt adhesive to the sepals, and secure to the flower.
- Take a green yarn to wrap the flower stem.
- Then add the leaf wrap, continue wrapping to the end, cut the long tail, and secure it with hot melt adhesive.
Video
Notes
- The petals are worked in a round
- Do not ch1 at the beginning of the round
- Always palace a stitch marker on the first st of the round so you dont lose count.
More Crochet Patterns
If you’ve enjoyed this crochet rose pattern, you may be interested in these other free patterns:
- Classic Crochet Sunflower for Beginners-Free Pattern
- Easy Crochet Tulip Pattern for Beginner
- 17 Crochet Leaf Patterns – Beautiful Crochet Leaves
What’s Next?
Pin this post: Save this tutorial to your Pinterest boards so that you can come back to it later.
Leave a comment: We love to hear your feedback. Tell me in the comments below!
Share on Instagram or Facebook or Youtube : When you make this project, share it on social media and tag me @hookokcrochet. We love to see what you make!


I like how detailed this is, but just want to know if there is any size recommendations for the yarn? I see the pattern uses a 2/2.5mm hook, but wasn’t sure about the yarn. In the video it almost looks like a worsted weight yarn? Is that correct?
We also used our yarn products to do it,you can get it in our web,https://hookok.com//product/yarn-hookok/.
Very beautiful project, but pattern would be much easier to follow if the number of stitches in each round was mentioned.
Thanks for your suggestion. We will try to improve the pattern.
Follow-up question. Since the updates to the pattern, I notice that the medium size petal no longer has the stitches (SC, CH, SC) that make little peaks in the final round. Is this how the medium size petal is intended? Peaks on Large only – Small and medium with no peaks?
I love the detailing. It was easy to follow. Just one question, I used 2.5 mm hook and still got big petals, any suggestions how to update pattern instructions to attain smaller rose?
We also use 2.0 0r 1.8mm hook
Overall I have enjoyed this pattern.
I don’t understand the terminology for the last round of the leaf. In the video it looks as though the SC are done going backwards (but not turning). Is this right?
Also, some of the numbers aren’t the same in the print version compared to the web page. Several of the rounds are 1 repetition short.
Yes, don’t turn, make a round of Reverse Single Crochet (right-handed version). Thanks for your feedback, we have unified the writing method
Oooohhh. That’s a new stitch for me to learn 🙂
Excellent
Thank you for sharing your patterns. I enjoy making lovely flowers, it’s a great help. Hope you continue to inspire us.
Hi what is the size of the finished rose flower only? I just want to make sure I’m using the right yarn type. Thank you!
It is remarkable, this rather valuable message
Hey, would you allow artists to sell roses from this pattern independently? With you credited for the pattern, of course.
It says “The petals are worked in a round.
Do not ch1 at the beginning of the round”
But then the pattern tells you to slip stitch and chain 1 each round????
Seems like a lovely pattern.
Muy lindo
This is so easy to follow! This is the second wine glass rose pattern I found online and the first I was actually able to comprehend.
Beautiful
I’m very new to crochet and I’m struggling with the big petals, it’s says 6 times in each row but that doesn’t seem right?I watched the video and she doesn’t seem to be doing it just 6x either? I couldn’t see exactly where she was placing stitches but I assume that the stitches repeat like in row 5 where it’s 3 sc and then 2sc, you would just repeat those. Any insight would be very helpful! I am using the 4ply cotton yarn from your store.
Thank youuu