
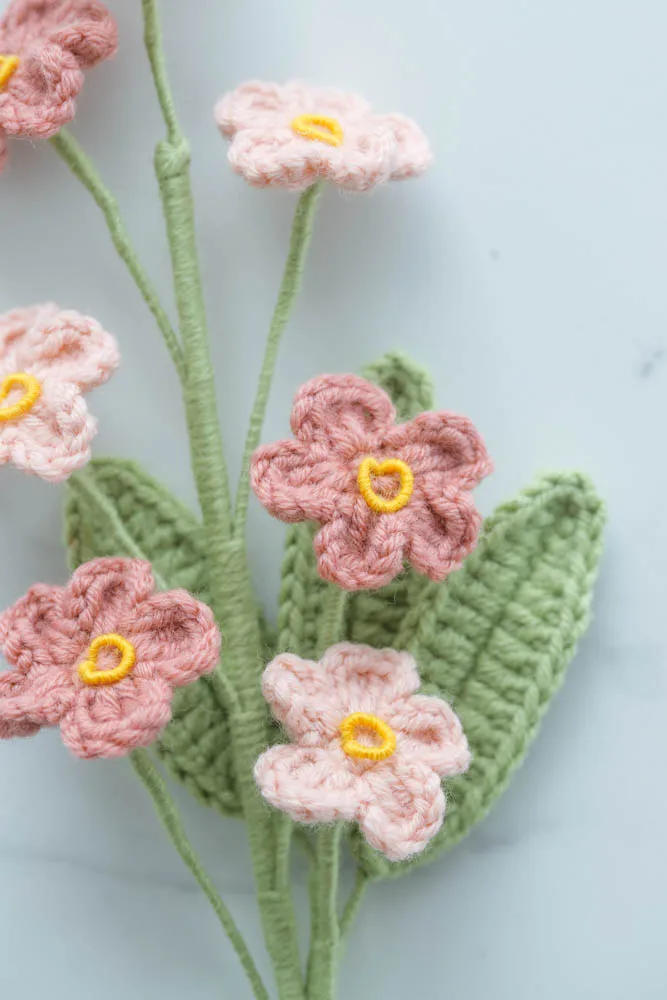
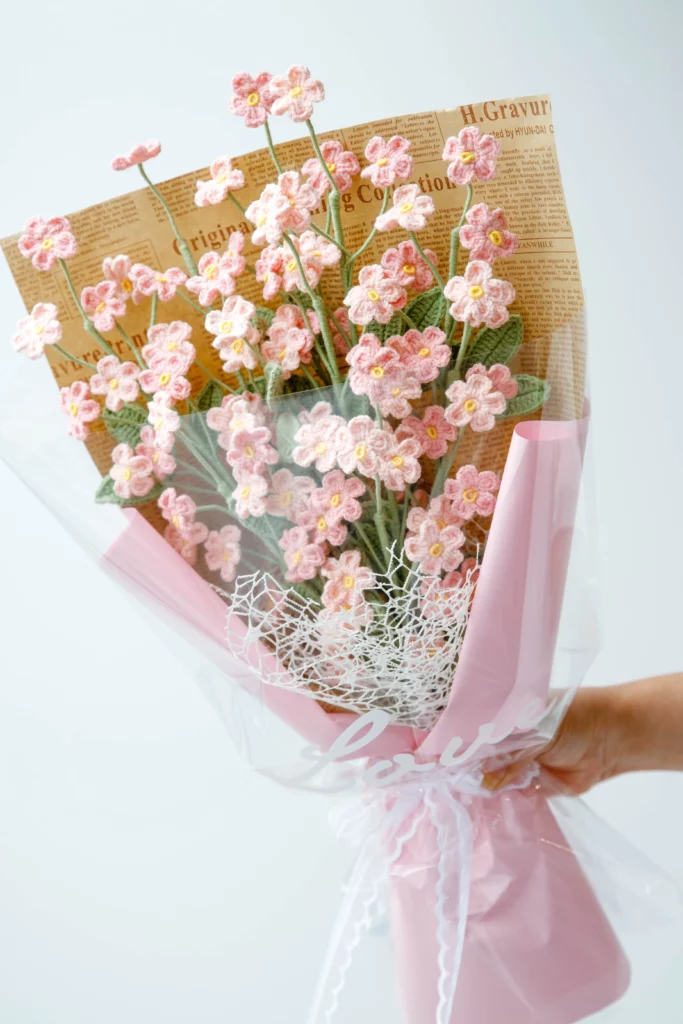
This pattern is a great project for crocheters who enjoy making pretty flowers or want to try them for the first time. This crochet pattern looks like the well-known Forget-Me-Not flower, with detailed petals and a cute center. You can use the patterns and apply them as appliqués, decorations, or as part of a bouquet.
Forget-me-not are the most common filler flowers in crochet flower bouquets, and can also be used in handfuls as decoration. Check patterns list of all our crochet flowers.

Usage
- Original Uses: Forget-me-nots are thoughtful gifts or used as pretty decorations to add a touch of beauty to any area.
- Functional Usage: The crochet flowers and leaves will add a floral twist to other crochet items such as blankets, scarves, and hats.
- Ideas for Flower Bouquets: You can use forget-me-nots as the main flower in a bouquet using different colors for each branch. They are also great as accent flowers or plants with other crochet flowers like roses, daisies, or baby’s breath.
Video
Note: Video subtitles need to be turned on by yourself in the settings
Materials
- Yarn – yarn of four colors, light and dark pink, green, and yellow.
- Hook – 2.5 mm
- Flower Rod – 16 inches long x 0.08 inches diameter (40cm x 2mm)
- Iron wire – 0.4mm or 0.5mm diameter
- Stitch marker
- Darning needle
- Pair of scissors
- Hot melt adhesive
Difficulty
Advanced intermediate. (However, even as a beginner looking for a challenge, you can try this pattern using as it provides the step-by-step tutorial).
Gauge
Not applicable. Changing the hook size and yarn will change the size of the projects.
Stitches
- Double crochet – dc
- Half double crochet – hdc
- Single crochet – sc
- Slip stitch – ss
Special Stitches
None
Pattern Notes
- The pattern is in US terminology.
- The rows are worked in a round.
- Additional notes are indicated in italics.
Forgot me not Patterns
How to make the forgot me not flower (Make 7)
If you don’t need to assemble it as bouquet or flower with stem. You can attach this single forgot me not flower in other crochet projects like hats, bags, pillow covers and even blankets.

- Start with a magic ring ch1
- R1: 5 sc in the magic ring, ss and close the opening
- R2: [in the same st (ch3, 2dc, 3ch ), 1 ss ]* 5 times, ch1
- Cut the tail and weave in ends.
How to make forgot me not stamen: (Make 7)

- Take 6 inches (15cm) of iron wire, starting at 2in (5cm), and wrap the yellow yarn for 1in (2.5cm).
- Then fold the wire in half, making sure the ends of the yellow are aligned.
- Using the green yarn, wrap the two wires together for 1 in (2.5cm), and cut and tie a knot.
How to make Leaf for forgot me not flower: (Make 3)

- Using green work a foundation chain: ch 16
- R1: Add iron wire, sc into the 2nd sts from hook, hdc, dc9, hdc2, sc, 3 sc in last stitch (working on the other side of ch), sc, hdc2, dc9, hdc, sc, ss, cut and wrap yarn around the wire until completely cover, tie a knot
Assemble forgot me flower with leaf and a long stem

Note: watch the video tutorial for further details.
Assembling Flowers and Stamen
- Step 1: Insert the wire end of the stamen through the center of the flower until it is aligned.
- Step 2: Using the green yarn, wrap the yarn under the base of the flower until the whole wire is completely covered, and tie a knot at the end.
- Repeat steps 1 and two for the remaining 6 flowers and stamens.
Leaf Assembly
- Align the three leaves together and wrap green yarn around the wire until the end in a way that you can spread them as if they are budding.
Assembling Flowers and Leaves
- Step 1: Take the rod and wrap the first flower at the tip, making sure the wire is completely joined to the rod.
- Step 2: Continue joining the other flowers one by one, half an inch apart, ensuring they are staggering against the rod.
- Step 3: When you have added all the flowers, add the leaves and then continue wrapping until the end of the rod. Finish by gluing the yarn at the tip of the rod with hot melt adhesive.

Afterthoughts
Crochet Forget Me Not flower is a fun project to make beautiful, nostalgic flowers. You can customize these lovely blossoms in blue, purple, pink, white, or any color you choose. Either make a lovely forgot me not flower bouquet or simply attach it to other crochet items. It will be a lovely crochet flower idea. Happy crocheting!

Crochet Forget Me Not Flower
Equipment
- hook 2.5 mm
- stitch marker
- scissors
- Darning needle
Ingredients
- Yarn yarn of four colors, light and dark pink, green, and yellow
- Flower Rod 16 inches long x 0.08 inches diameter (40cm x 2mm)
- Iron wire 0.4mm or 0.5mm diameter
- Hot melt adhesive
Instructions
Flower (Make 7)
- Start with a magic ring ch1R1: 5 sc in the magic ring, ss and close the openingR2: [in the same st (ch3, 2dc, 3ch ), 1 ss ]* 5 times, ch1Cut the tail and weave in ends
Stamen: (Make 7)
- Take 6 inches (15cm) of iron wire, starting at 2in (5cm), and wrap the yellow yarn for 1in (2.5cm)
- Then fold the wire in half, making sure the ends of the yellow are aligned
- Using the green yarn, wrap the two wires together for 1 in (2.5cm), and cut and tie a knot
Leaf : (Make 3)
- Using green work a foundation chain: ch 16
- R1: Add iron wire, sc into the 2nd sts from hook, hdc, dc9, hdc2, sc, 3 sc in last stitch (working on the other side of ch), sc, hdc2, dc9, hdc, sc, ss, cut and wrap yarn around the wire until completely cover, tie a knot
Assembling Flowers and Stamen
- Step 1: Insert the wire end of the stamen through the center of the flower until it is aligned.
- Step 2: Using the green yarn, wrap the yarn under the base of the flower until the whole wire is completely covered, and tie a knot at the end.
- Repeat steps 1 and two for the remaining 6 flowers and stamens.
Leaf Assembly
- Align the three leaves together and wrap green yarn around the wire until the end in a way that you can spread them as if they are budding.
Assembling Flowers and Leaves
- Step 1: Take the rod and wrap the first flower at the tip, making sure the wire is completely joined to the rod.
- Step 2: Continue joining the other flowers one by one, half an inch apart, ensuring they are staggering against the rod.
- Step 3: When you have added all the flowers, add the leaves and then continue wrapping until the end of the rod. Finish by gluing the yarn at the tip of the rod with hot melt adhesive.
Video
Notes
- The pattern is in US terminology.
- The rows are worked in a round.
- Additional notes are indicated in italics.
- Video subtitles need to be turned on by yourself in the settings
More Crochet Patterns
Check out our following flower patterns too.
Crochet Tulip- Stuffed Tulip
Crochet Lily
What’s Next?
Pin this post: Save this tutorial to your Pinterest boards so that you can come back to it later.
Share on Instagram or Facebook or Youtube: When you make this project, share it on social media and tag me @hookokcrochet. We love to see what you make!


 HOOKOK Hug Bucket – Pink Lily and Gesang Flower Hug Bucket (34 pieces)
  PDF Pattern-Wineglass Rose
  Handmade Crochet Flower Garden Shadow Box with Amigurumi Bunny Girl Floral Frame Art
I just wish i’d found out about your art sooner! They are so beautiful. I’m having a blast trying all this patterns. Love them all!
Thank you Minten.
What type of yarn did u use?:) (What brand)
we used our products ,it is a special cotton yarn ,you can get it on the web ,https://hookok.com/product/yarn-hookok/
Wah, ini luar biasa! Seperti angin sepoi-sepoi membersihkan tanah kebijaksanaan. 💨🧠 #IndosneioAnginKebijaksanaan
I love all your beautiful flowers, I have made them in fine cotton and they look so realistic. Thank you for the free patterns. They are written so clearly.
Thank you for this great pattern! Your video tutorials are very well produced, understandable and very easy to follow. Thank you so much!
wow, amazing
love this pattern
If I didn’t understand something the video really helped
Thank you for this amazing pattern
Sanne
Super easy to follow, and even though it’s titled as a filler, it’s so beautiful that it could be all by itself and still steal the show.
This is an amazing pattern, but some parts are a little confusing.
If you have any questions, please feel free to contact us and send us an email message